By: Team W14-3 Since: Jan 2019 Licence: MIT
- 1. Setup
- 2. Design
- 3. Implementation
- 3.1. Map feature
- 3.2. Ship Management feature
- 3.3. Battle feature
- 3.4. Enemy AI feature
- 3.5. Statistics feature
- 3.6. Logs
- 3.7. Configuration
- 4. Documentation
- 5. Tests
- 6. Dev Ops
- Appendix A: Product Scope
- Appendix B: User Stories
- Appendix C: Use Cases
- Appendix D: Non Functional Requirements
- Appendix E: Glossary
- Appendix F: Instructions for Manual Testing
1. Setup
To set up the project, the following must be installed on your machine:
-
JDK
9or laterJDK 10on Windows will fail to run tests in headless mode due to a JavaFX bug. Windows developers are highly recommended to use JDK9. -
IntelliJ IDE
IntelliJ by default has Gradle and JavaFx plugins installed.
Do not disable them. If you have disabled them, go toFile>Settings>Pluginsto re-enable them.
1.1. Setting up the project in your computer
-
Fork this repo, and clone the fork to your computer
-
Open IntelliJ (if you are not in the welcome screen, click
File>Close Projectto close the existing project dialog first) -
Set up the correct JDK version for Gradle
-
Click
Configure>Project Defaults>Project Structure -
Click
New…and find the directory of the JDK
-
-
Click
Import Project -
Locate the
build.gradlefile and select it. ClickOK -
Click
Open as Project -
Click
OKto accept the default settings -
Open a console and run the command
gradlew processResources(Mac/Linux:./gradlew processResources). It should finish with theBUILD SUCCESSFULmessage.
This will generate all resources required by the application and tests. -
Open
MainWindow.javaand check for any code errors-
Due to an ongoing issue with some of the newer versions of IntelliJ, code errors may be detected even if the project can be built and run successfully
-
To resolve this, place your cursor over any of the code section highlighted in red. Press ALT+ENTER, and select
Add '--add-modules=…' to module compiler optionsfor each error
-
-
Repeat this for the test folder as well (e.g. check
HelpWindowTest.javafor code errors, and if so, resolve it the same way)
1.2. Verifying the setup
-
Run the
seedu.address.MainAppand try a few commands -
Run the tests to ensure they all pass.
1.3. Configuring the project writing code
1.3.1. Configuring the coding style
This project follows oss-generic coding standards. IntelliJ’s default style is mostly compliant with ours but it uses a different import order from ours. To rectify,
-
Go to
File>Settings…(Windows/Linux), orIntelliJ IDEA>Preferences…(macOS) -
Select
Editor>Code Style>Java -
Click on the
Importstab to set the order-
For
Class count to use import with '*'andNames count to use static import with '*': Set to999to prevent IntelliJ from contracting the import statements -
For
Import Layout: The order isimport static all other imports,import java.*,import javax.*,import org.*,import com.*,import all other imports. Add a<blank line>between eachimport
-
Optionally, you can follow the UsingCheckstyle.adoc document to configure Intellij to check style-compliance as you write code.
1.3.2. Updating documentation to match your fork
After forking the repo, the documentation will still have the Battleships branding and refer to the CS2103-AY1819S2-W14-3/main repo.
If you plan to develop this fork as a separate product (i.e. instead of contributing to CS2103-AY1819S2-W14-3/main), you should do the following:
-
Configure the site-wide documentation settings in
build.gradle, such as thesite-name, to suit your own project. -
Replace the URL in the attribute
repoURLinDeveloperGuide.adocandUserGuide.adocwith the URL of your fork.
1.3.3. Setting up CI
Set up Travis to perform Continuous Integration (CI) for your fork. See UsingTravis.adoc to learn how to set it up.
After setting up Travis, you can optionally set up coverage reporting for your team fork (see UsingCoveralls.adoc).
| Coverage reporting could be useful for a team repository that hosts the final version but it is not that useful for your personal fork. |
Optionally, you can set up AppVeyor as a second CI (see UsingAppVeyor.adoc).
| Having both Travis and AppVeyor ensures your App works on both Unix-based platforms and Windows-based platforms (Travis is Unix-based and AppVeyor is Windows-based) |
1.3.4. Getting started with coding
When you are ready to start coding,
-
Get some sense of the overall design by reading Section 2.1, “Architecture”.
-
Take a look at [GetStartedProgramming].
2. Design
2.1. Architecture

The Architecture Diagram given above explains the high-level design of the App. Given below is a quick overview of each component.
The .pptx files used to create diagrams in this document can be found in the diagrams folder. To update a diagram, modify the diagram in the pptx file, select the objects of the diagram, and choose Save as picture.
|
Main has only one class called MainApp. It is responsible for,
-
At app launch: Initializes the components in the correct sequence, and connects them up with each other.
-
At shut down: Shuts down the components and invokes cleanup method where necessary.
Commons represents a collection of classes used by multiple other components.
The following class plays an important role at the architecture level:
-
LogsCenter: Used by many classes to write log messages to the App’s log file.
The rest of the App consists of four components.
Each of the four components
-
Defines its API in an
interfacewith the same name as the Component. -
Exposes its functionality using a
{Component Name}Managerclass.
For example, the Logic component (see the class diagram given below) defines it’s API in the Logic.java interface and exposes its functionality using the LogicManager.java class.

How the architecture components interact with each other
The Sequence Diagram below shows how the components interact with each other for the scenario where the user issues the command attack a1.

attack a1 commandThe sections below give more details of each component.
2.2. UI component

API : Ui.java
The UI consists of a MainWindow that is made up of parts e.g.CommandBox, ResultDisplay, Map, StatusBarFooter, BrowserPanel etc. All these, including the MainWindow, inherit from the abstract UiPart class.
The UI component uses JavaFx UI framework. The layout of these UI parts are defined in matching .fxml files that are in the src/main/resources/view folder. For example, the layout of the MainWindow is specified in MainWindow.fxml
The UI component,
-
Executes user commands using the
Logiccomponent. -
Listens for changes to
Modeldata so that the UI can be updated with the modified data.
2.3. Logic component

API :
Logic.java
-
Logicuses theBattleshipParserclass to parse the user command. -
This results in a
Commandobject which is executed by theLogicManager. -
The command execution can affect the
Model(e.g. putting a ship). -
The result of the command execution is encapsulated as a
CommandResultobject which is passed back to theUi. -
In addition, the
CommandResultobject can also instruct theUito perform certain actions, such as displaying help to the user.
2.4. Model component

API : Model.java
The Model component,
-
stores a
UserPrefobject that represents the user’s preferences. -
stores a
PlayerStatisticsobject that represents the user’s statistics. -
manages the players, maps and ships in the game
-
does not depend on any of the other three components.
2.5. Storage component

API : Storage.java
The Storage component,
-
can save
PlayerStatisticsobjects in json format and read it back.
2.6. Battle component
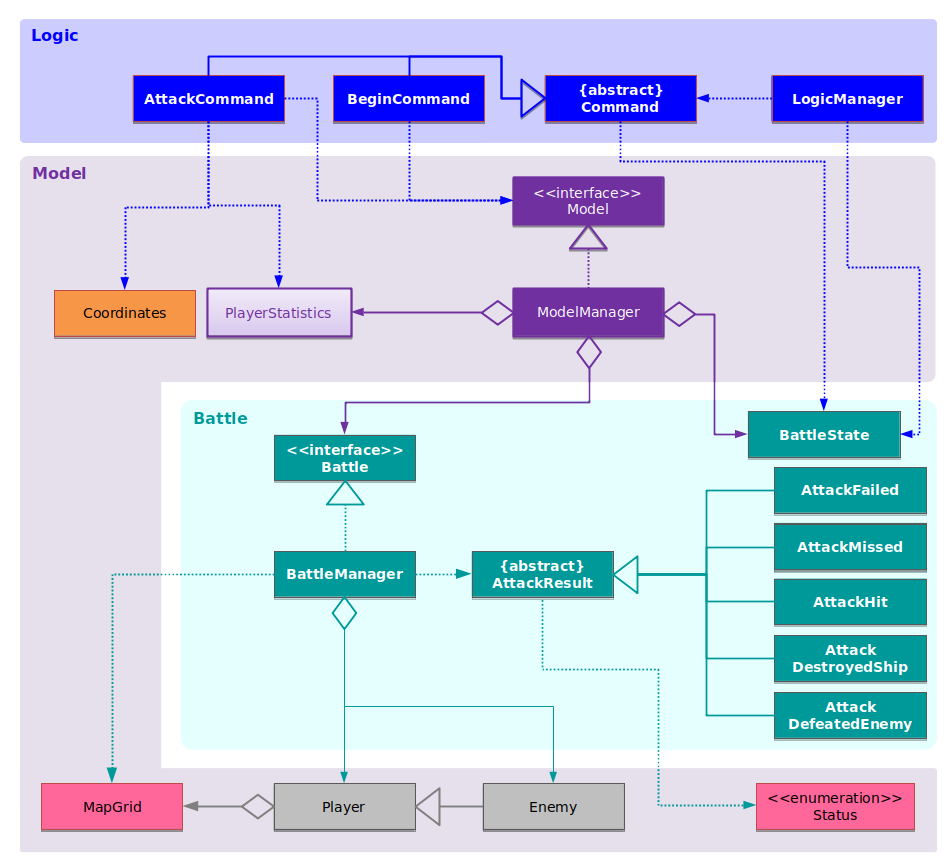
Battle Component and interactions with Model and LogicAPI : Battle.java
The Battle component:
-
keeps track of the progress of the battle,
-
restricts the computer to place its ships at the correct time,
-
allows the user and the computer enemy to attack each other and maintain proper turn-taking while doing so.
As the battle involves many different components (map, player, etc.),
this component cannot be reduced to just one interface class of Battle.
2.7. Common classes
Classes used by multiple components are in the seedu.address.commons package.
3. Implementation
This section describes some noteworthy details on how certain features are implemented.
3.1. Map feature
The map feature handles the interactions of the game in the map level. The map feature does the following:
-
Initialise both players' maps.
-
Allow placing of ships in the cells.
-
Allow attacking of cells.
3.1.1. Implementation of map initialisation
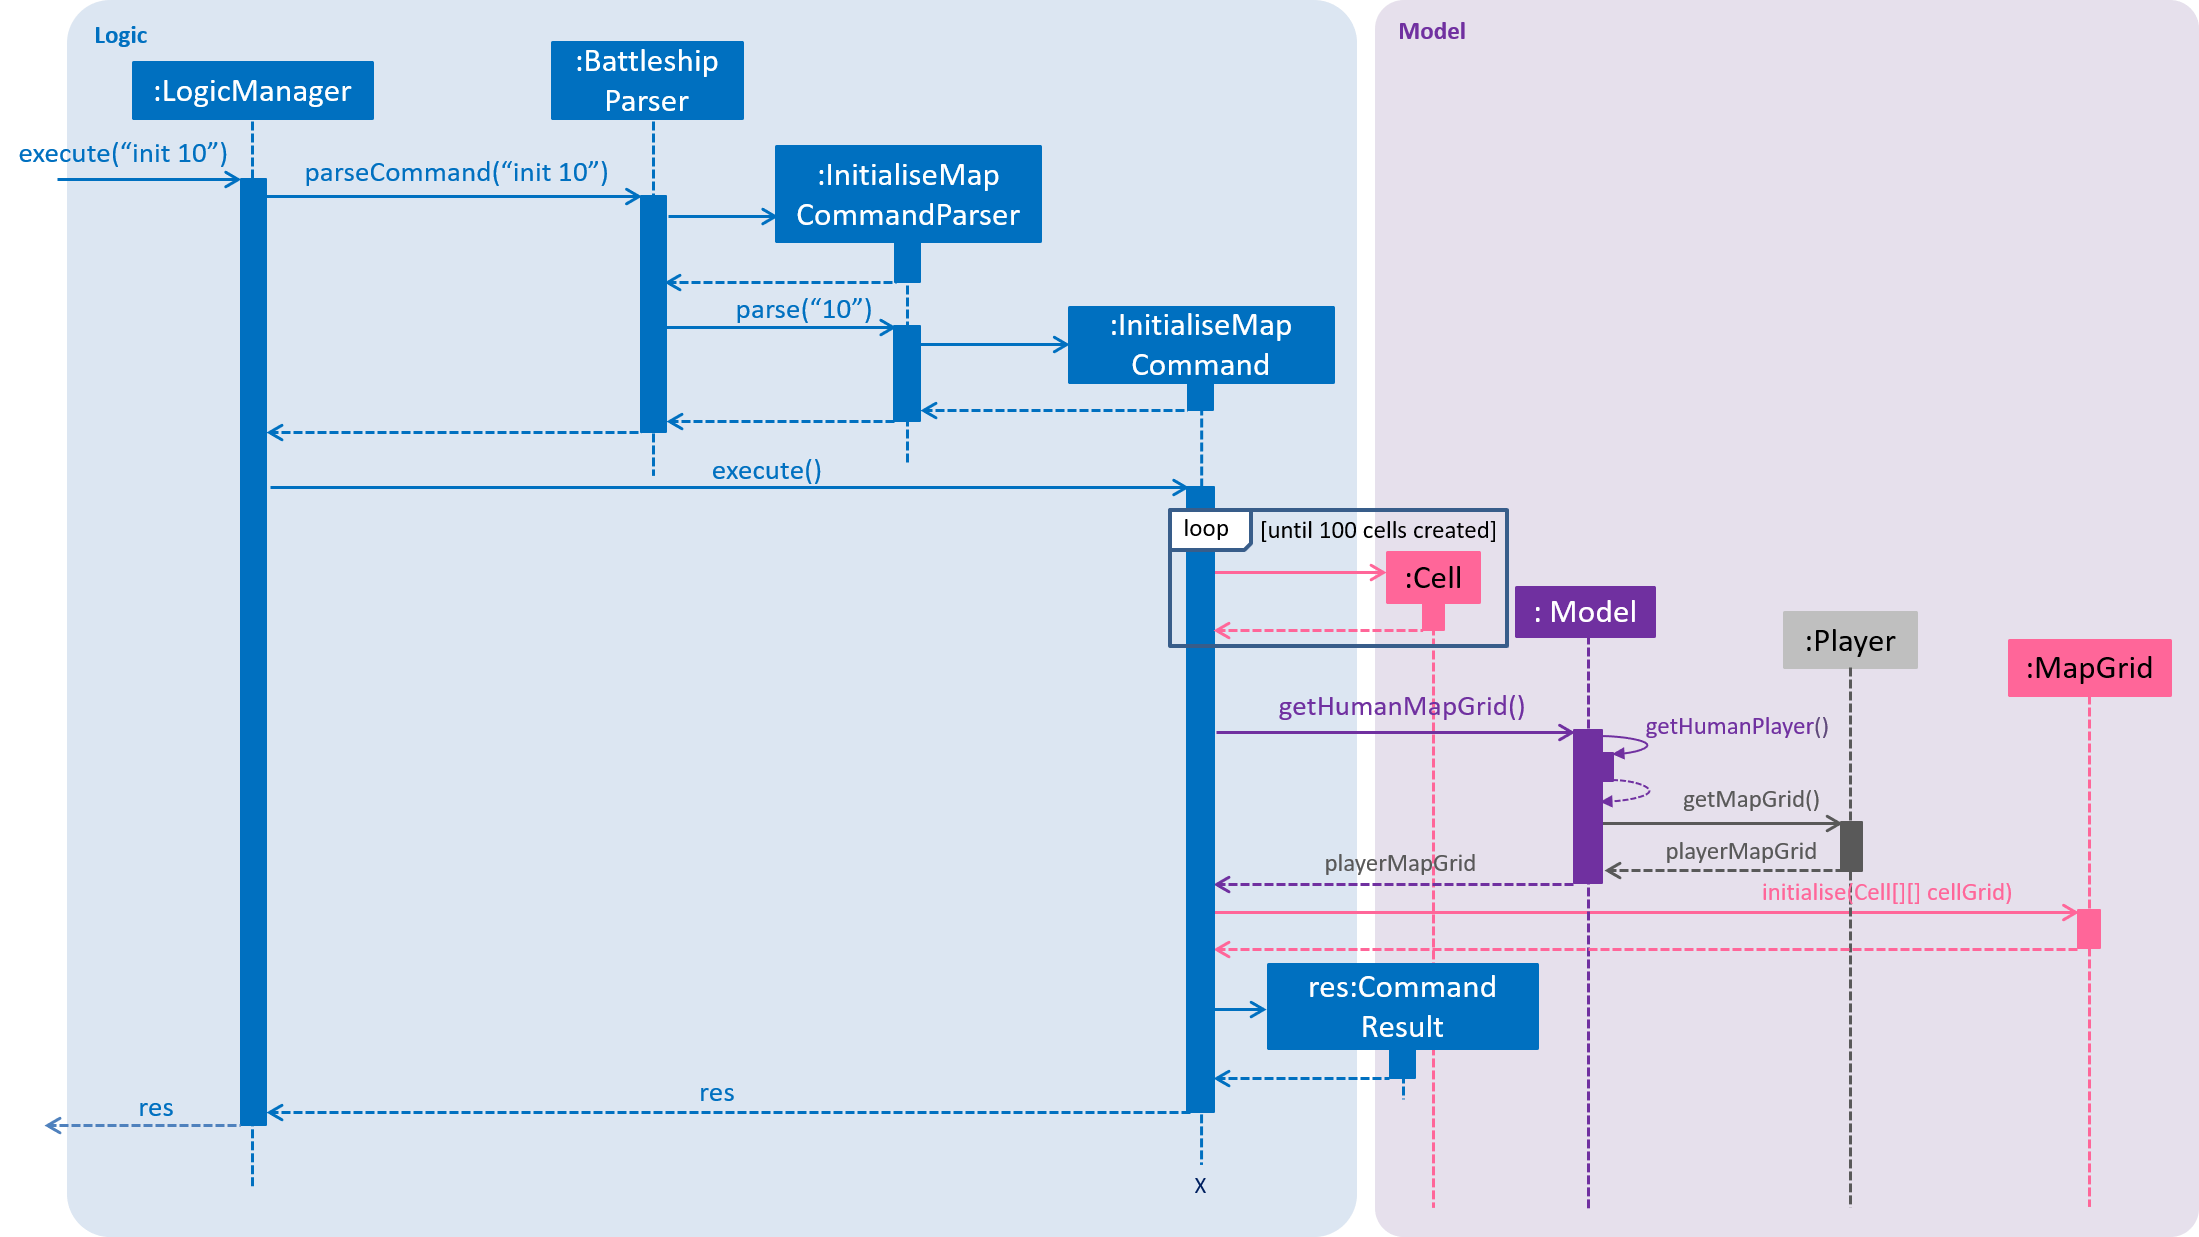
The map feature is facilitated by MapGrid and Cell.
The map grid is stored internally in MapGrid as a 2D array of Cell objects.
MapGrid implements the following method to initialise the map:
-
MapGrid#initialise(Cell[][] map)— initialises the map using the givenCell2D array.
Below is the code snippet for the initialise method. cellGrid is the internal 2D array comprising of Cell objects.
The method copy2dArray copies the map parameter passed in to the internal cellGrid
    public void initialise(Cell[][] map) {
        this.size = map.length;

        cellGrid = new Cell[size][size];

        copy2dArray(cellGrid, map);
        updateUi();
    }
Below is the code snippet for the copy2dArray method. The copy2dArray method creates a new Cell object for each of the input Cell objects.
The copying is done using a constructor in Cell that takes in a parameter Cell.
This constructor copies the private attributes of the given Cell parameter.
    private void copy2dArray(Cell[][] output, Cell[][] toBeCopied) {
        for (int i = 0; i < size; i++) {
            for (int j = 0; j < size; j++) {
                output[i][j] = new Cell(toBeCopied[i][j]);
            }
        }
    }
The following sequence diagram shows what happens when the "initialise map" command is used.:
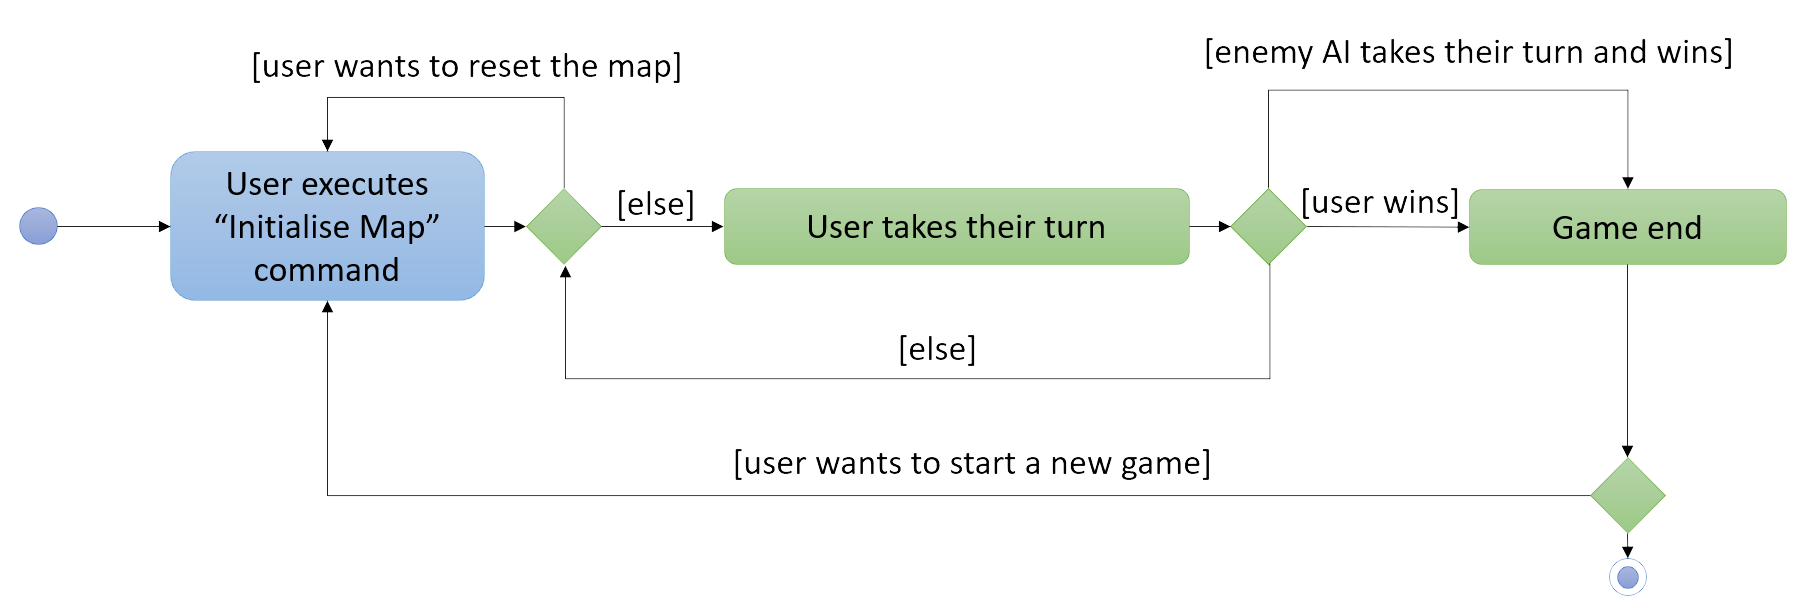
The following activity diagram shows when the "initialise map" command can be used by the user:
3.1.2. Implementation of the Cell class
The cells are the lowest-level feature of the game and is represented by the Cell class. Each Cell allows one ship to be placed on it but the same ship can be referenced from multiple Cell objects. Cell also allows receiving of an attack and will propagate the attack call to the Battleship in it. To support the above, the following methods are available:
-
void putShip(Battleship ship)- places a ship in theCell. -
boolean receiveAttack()- receives an attack and returns true if it’s a hit, false otherwise.
Also, each Cell has a Status attribute which is an enum of the following:
| Status | Description |
|---|---|
HIDDEN |
This cell has not been hit. |
EMPTY |
This cell is empty and has not been hit. |
EMPTYHIT |
This cell has been hit before, and is empty. |
SHIP |
This cell has a ship in it. |
SHIPHIT |
This cell has been hit before, and there is a damaged ship here. |
DESTROYED |
This cell has been hit before, and the ship here has been destroyed. |
The Status of a Cell can be checked through the following method:
-
Status getStatus()- returns theStatusof theCell.
The Status is used by several higher level functionality such as:
-
the UI to know what colour should a
Cellbe displayed as. -
placing ships to check whether a ship has already been placed.
3.1.3. Design considerations
3.1.3.1. Aspect: How the maps are initialised
-
Alternative 1 (current choice):
MapGridwill have an initialise method that takes in a 2D array ofCellobjects. The initialise method inMapGridwill then do a deep copy of the passed in 2D array to initialise the internal 2D array ofCell.-
Pros: The underlying 2D array in
MapGridis better protected from modification as it can only be modified through the initialise method. -
Cons: Might have more overhead due to deep copying.
-
-
Alternative 2:
MapGridwill have a getter method that returns the 2D array ofCell.InitialiseMapCommandwill then use this method to get the internal 2D array and populate it from outside of theMapGridclass.-
Pros: Easy to implement.
-
Cons: The 2D array within
MapGridis unprotected and open for modification.
-
Alternative 1 was chosen as the overhead is negligible and a defensive approach to the design is preferable.
3.1.3.2. Aspect: Data structure to support the map
-
Alternative 1 (current choice): 2D array of
Cellobjects.-
Pros: Resulting code is simple and readable.
-
Cons: More changes to be done from the original AB4 codebase.
-
-
Alternative 2: List of lists of
Cellobjects.-
Pros: Easier to implement from the original AB4 codebase.
-
Cons: Worse readability and more complicated compared to using a 2D array.
-
Alternative 1 was chosen because of good code readability and it being the simpler implementation. Good code readability is important for new developers taking on the project. Simpler implementation means the likelihood of bugs being introduced is less when changes are made.
3.2. Ship Management feature
|
The Ship Management feature is named as such to avoid confusion with the main title of the game, Battleship. In this section, the words "battleship" and "ship" are used interchangeably. The capitalised word |
3.2.1. Current Implementation
The ship management feature handles the following:
-
Putting ships on the map grid and ensuring that ships are placed in valid areas on the map grid.
-
Keeping track of the status of ships in the player.
We can see the use case scenarios in the diagram below.
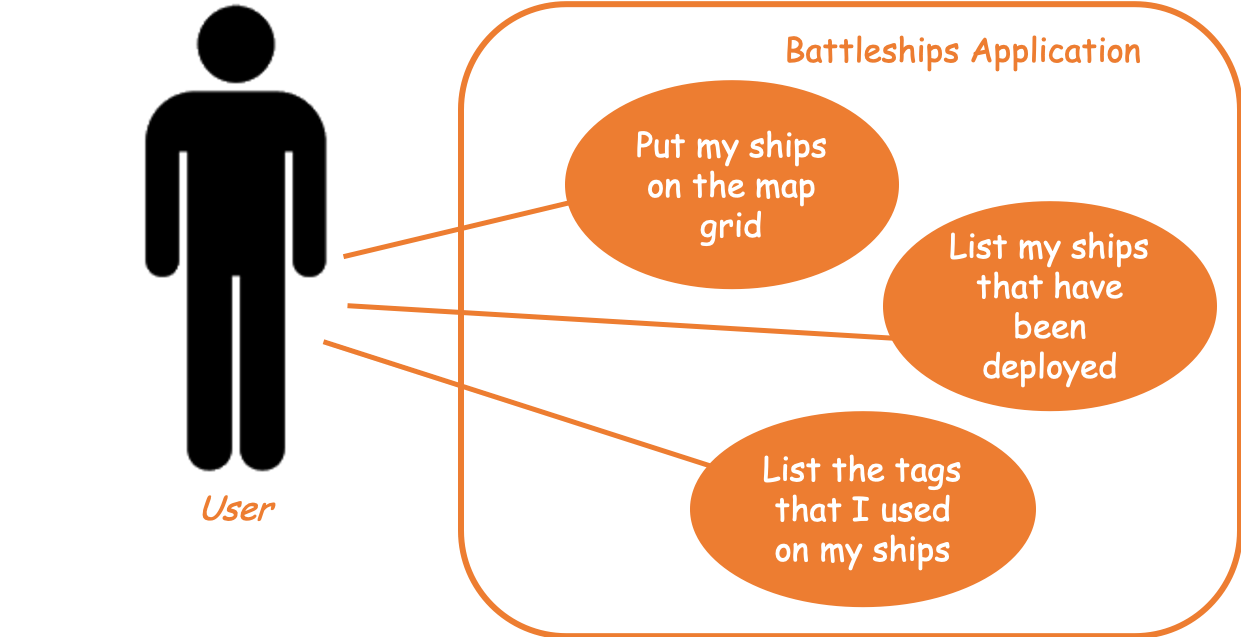
Battleship is a class representing a ship that can be placed on the map grid. A FleetEntry class is internally used to store the Battleship in a player’s Fleet. FleetEntry is a nested class within Fleet that contains a Battleship, its head Coordinates and its Orientation on the map grid.
The length of the ship varies depending on the type of ship. The user can tag a ship using a t/[TAG] parameter in the put command. Tagging a ship is optional.
There are three types of ships and the number of each ship depends on the size of the map. The relationship between map size and the number of each ship is illustrated in the table below.
| Type of Ship | Length | Number |
|---|---|---|
Cruiser |
2 |
|
Destroyer |
3 |
|
Aircraft carrier |
5 |
|
The management of ships can be carried out with three commands, namely put, listTags and list.
3.2.1.1. Putting ships
The put command puts a ship on the map grid, specified by the head coordinates.
What are the head coordinates?
The head coordinates are the coordinates of the top-most and left-most cell of a ship. When coordinates are specified in the put command, they refer to the head coordinates of the ship.
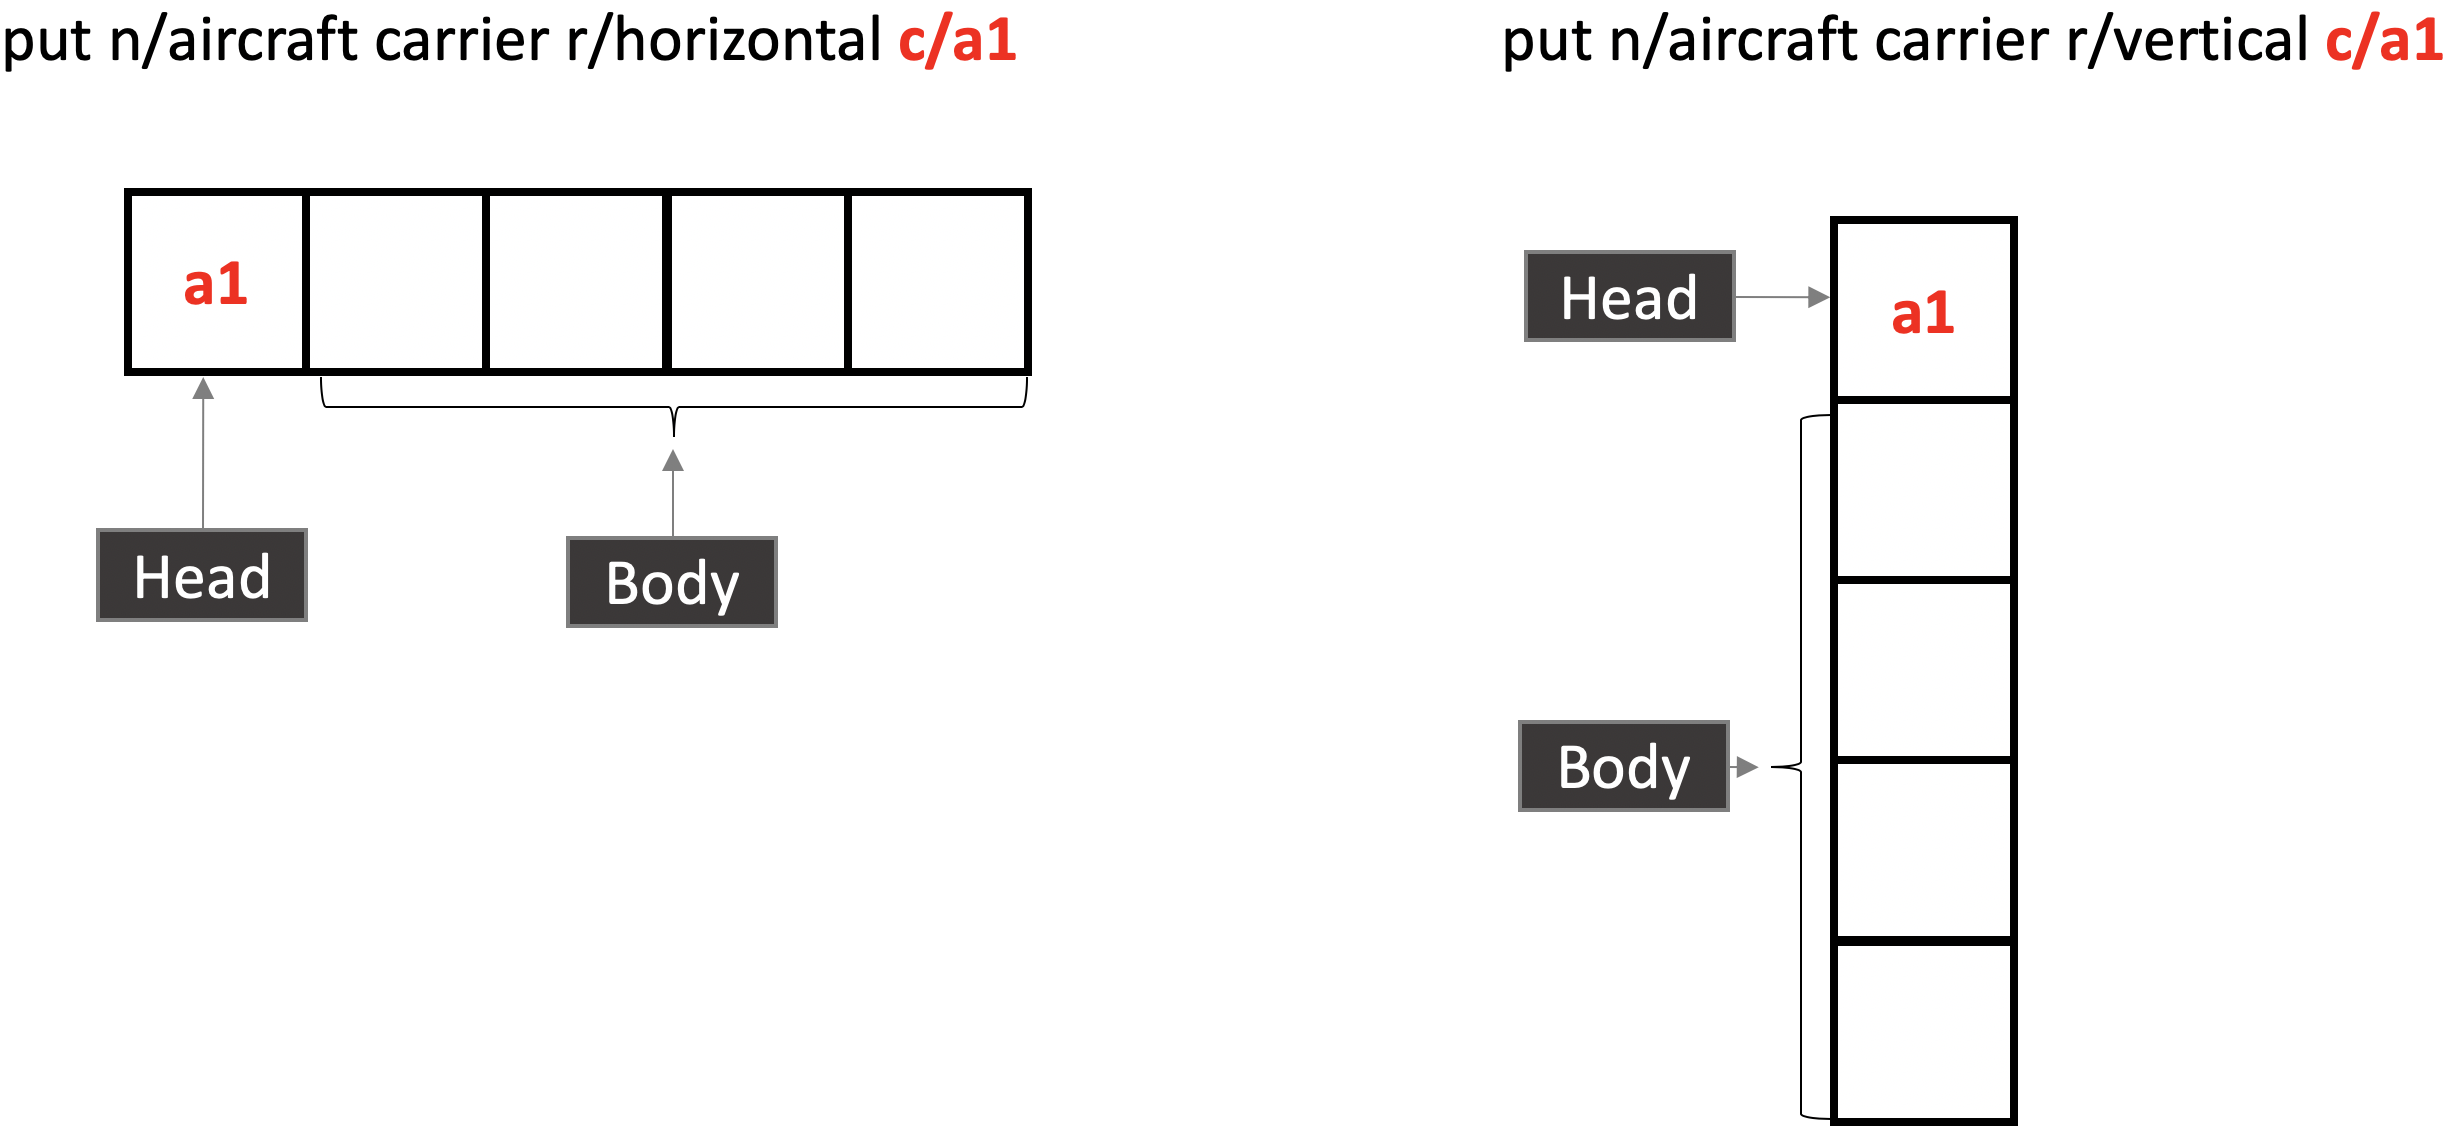
The following operations are called when the put command is called.
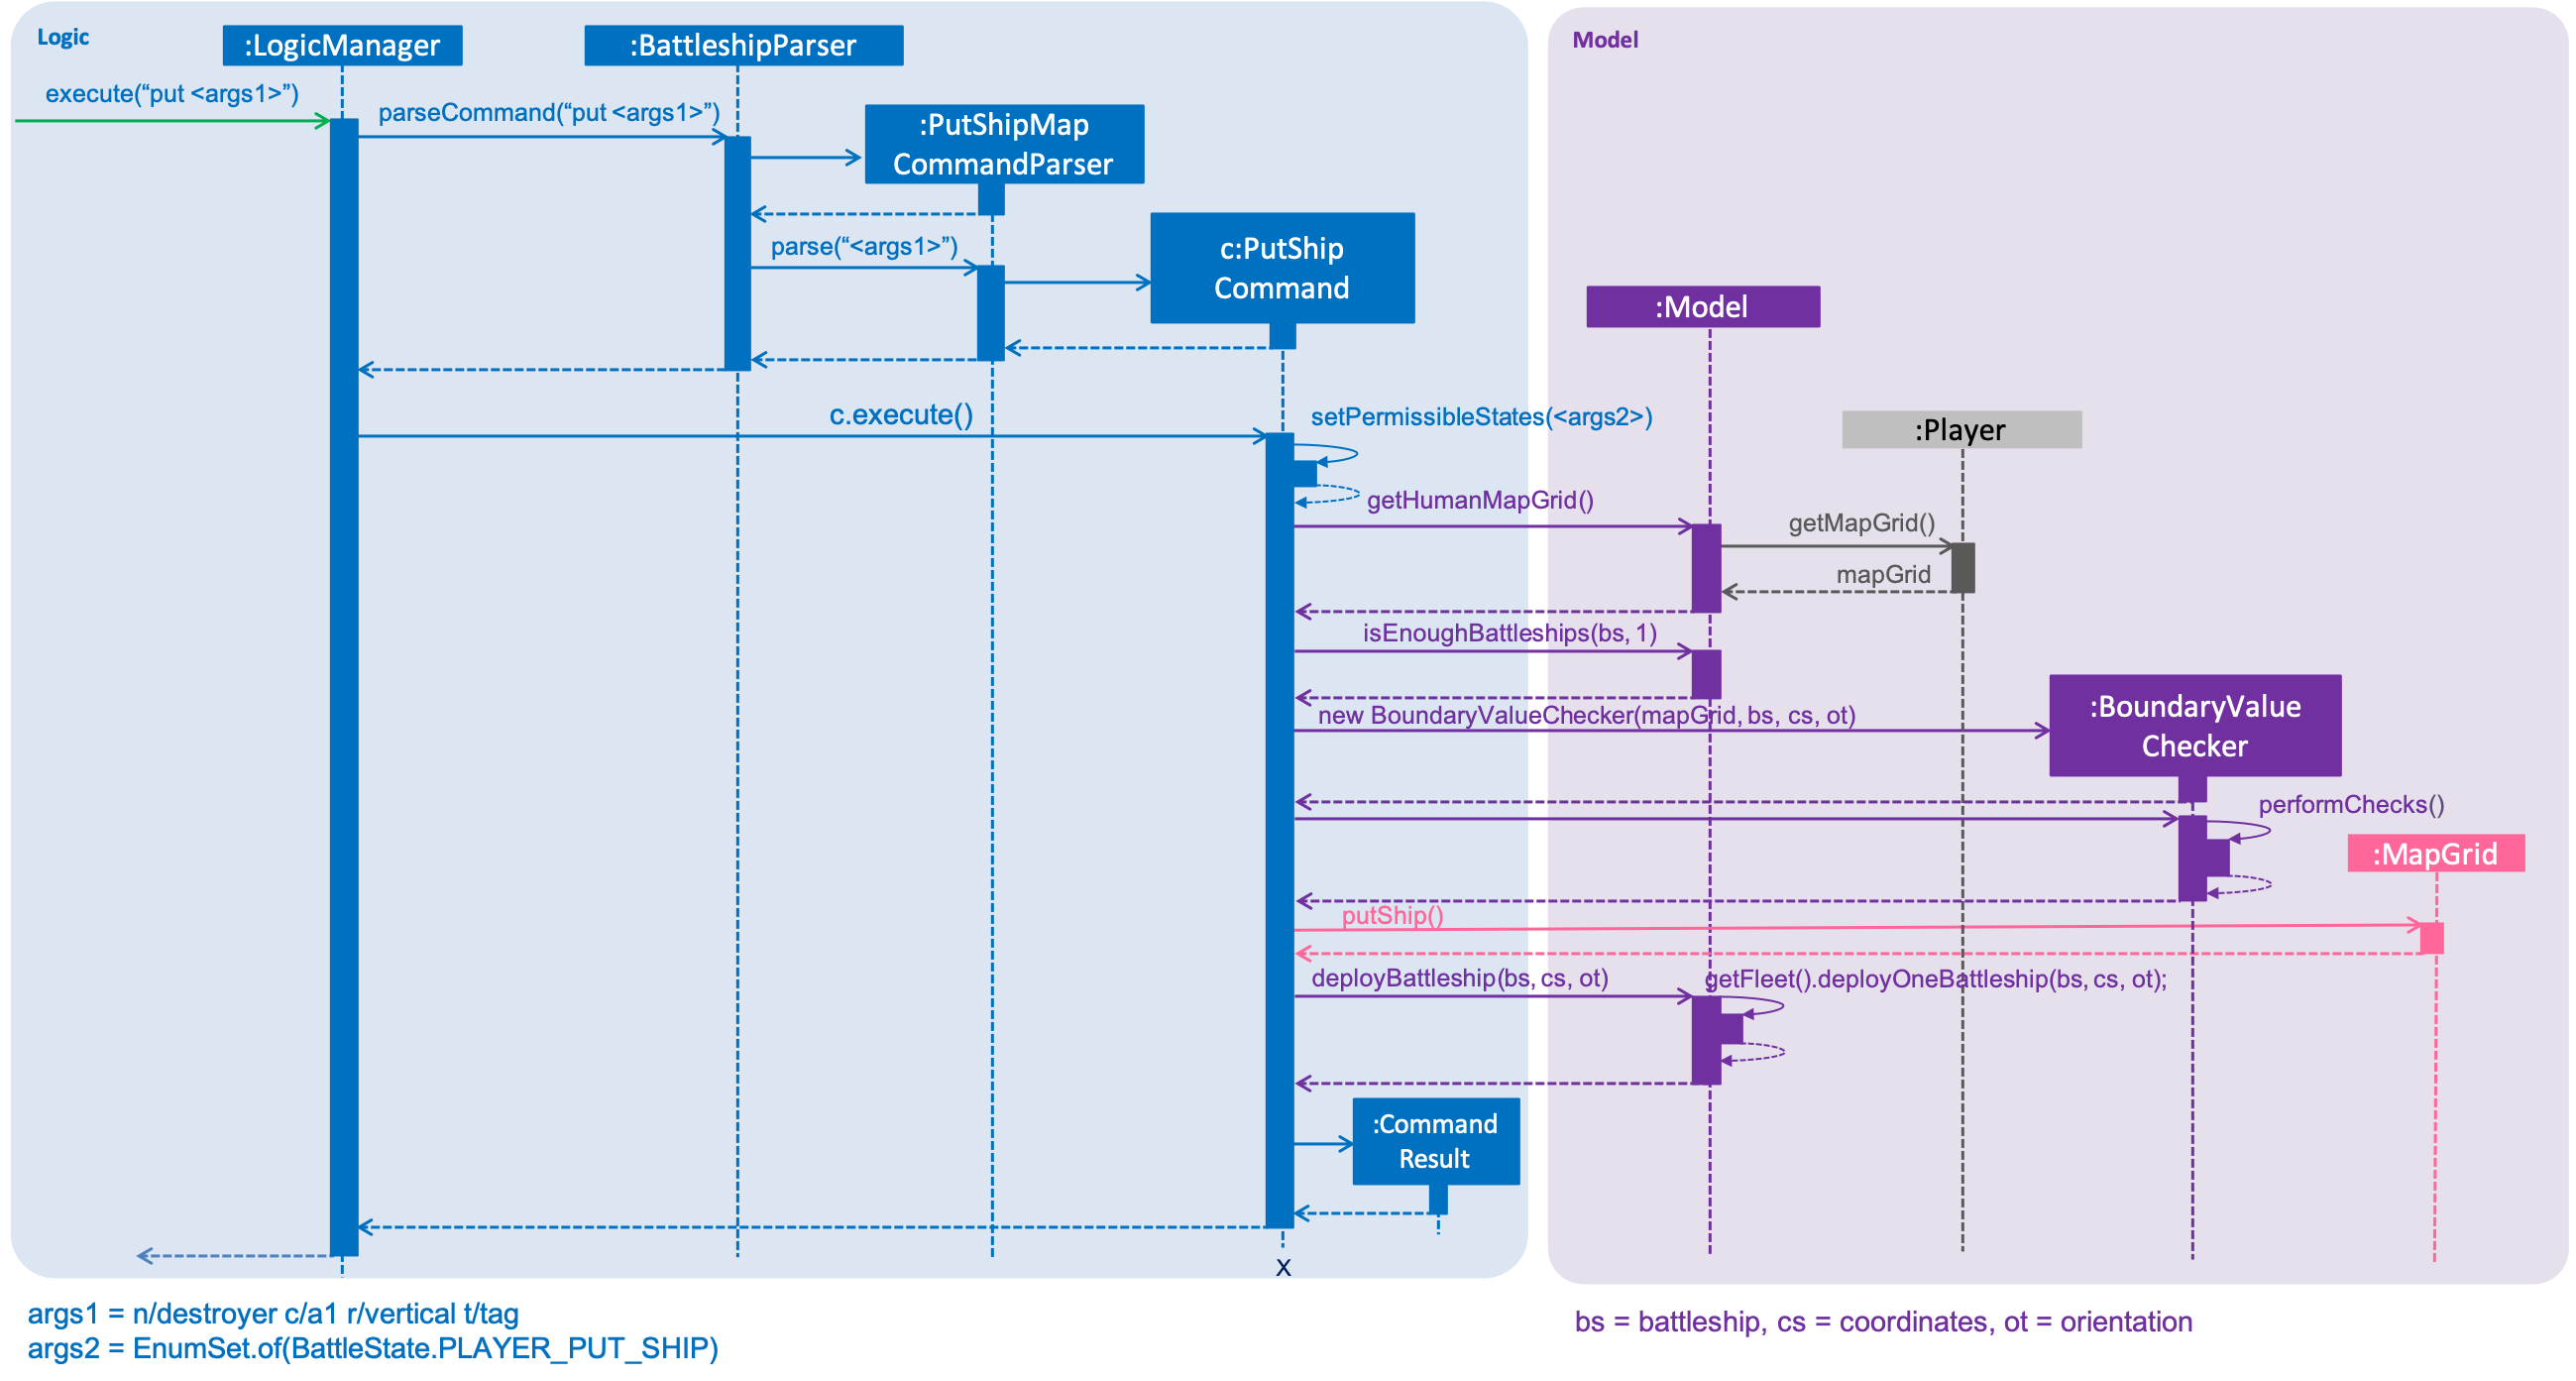
-
performChecks()- Performs checks to ensure that the ship can be put on the map. -
putShip()- Puts the ship into the cell.
The boundary checks are essential to the functionality of both the human and computer player. This is because BoundaryValueChecker is used by the human player in the put command and when the computer player deploying its own ships after the human player’s turn has ended. BoundaryValueChecker relies on four separate methods to perform its checks. They are:
-
isHeadWithinBounds()- Checks if the head coordinates falls within the map grid. -
isBodyWithinBounds()- Checks if the body of the ship falls within the map grid. -
isBattleshipAbsent()- Checks if there are no other ships that are situated on the head coordinates. -
isClear()- Checks if there are no other ships that situated along the body of the ship.
These methods check the horizontal and vertical boundaries when a ship is being deployed. They distinguish between the head and body of a ship in order to provide more specific feedback for the user. For the methods isBattleshipAbsent() and isClear(), BoundaryValueChecker calls the getCellStatus() method of the mapGrid object to obtain the status of Cell for checks.
Once BoundaryValueChecker has finished its checks and there are no exceptions thrown, the put command proceeds to call the putShip() method of the mapGrid object to put the ship on the map grid. It then updates the Fleet in the human player. The following sequence diagram shows what happens when the put command is called.
3.2.1.2. Listing tags
Ships can be tagged. You can list all the tags used by ships that have been deployed on the map grid with the listTags command. The command uses the getAllTags() method of the Fleet class. The code snippet below shows the operation of the getAllTags() method. The method returns a list of all the unique tags present in the player’s fleet of deployed ships.
    public List<FleetEntry> getByTags(Set<Tag> tagSet) {
        return this.getDeployedFleet().stream()
                .filter(fleetEntry -> fleetEntry.getBattleship()
                        .getTags()
                        .containsAll(tagSet))
                .collect(Collectors.toList());
3.2.1.3. Listing ships
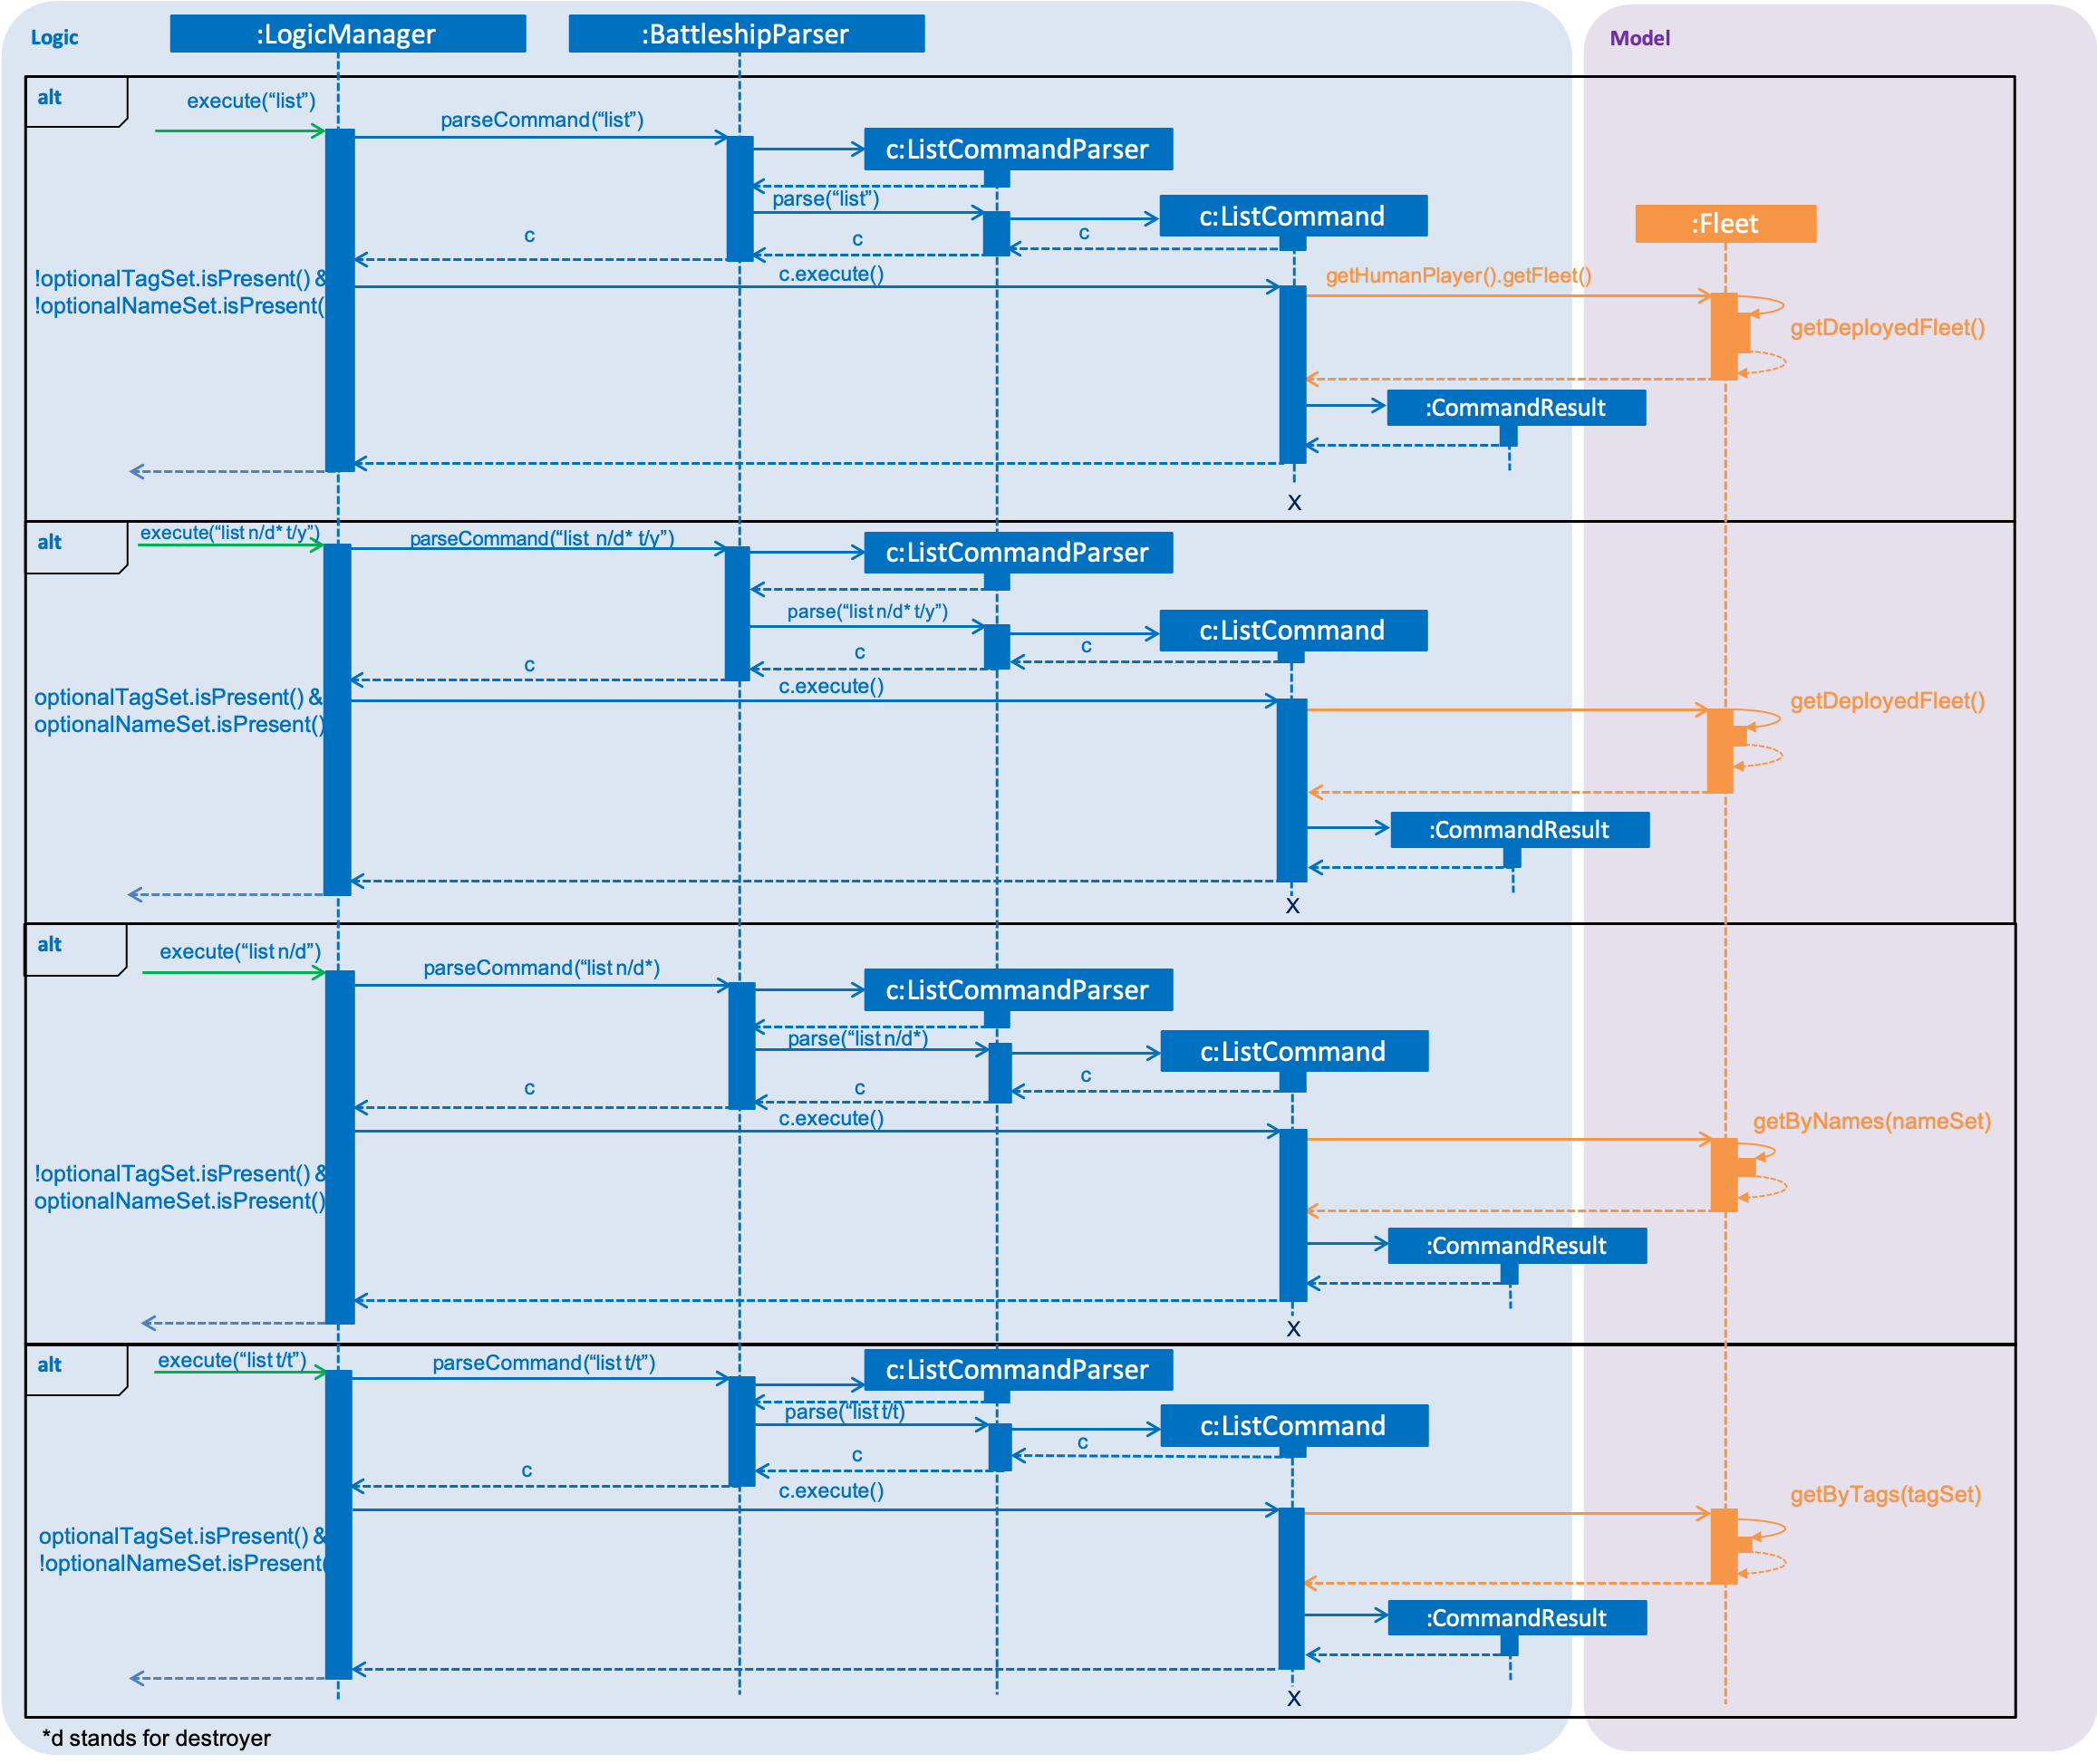
Ships that have been deployed can also be listed in four different ways:
-
List all ships:
list -
List ships with certain tags:
list t/t1 t/t2 -
List certain ships:
list n/destroyer n/cruiser -
List certain ships with certain tags:
list n/destroyer n/cruiser t/t1 t/t2
The set of unique tags and the set of unique names are presented to the ListCommand as an Optional class. This is because both sets may be empty. In such cases, instead of redudantly checking whether each fleetEntry contains the ship and an empty set, ListCommand simply returns the entire fleet.
The list command can list certain ships with certain tags by filtering the list of deployed ships. The following sequence diagram shows how deployed ships are listed when the list command is entered into the command line.
3.2.2. Activity Diagram
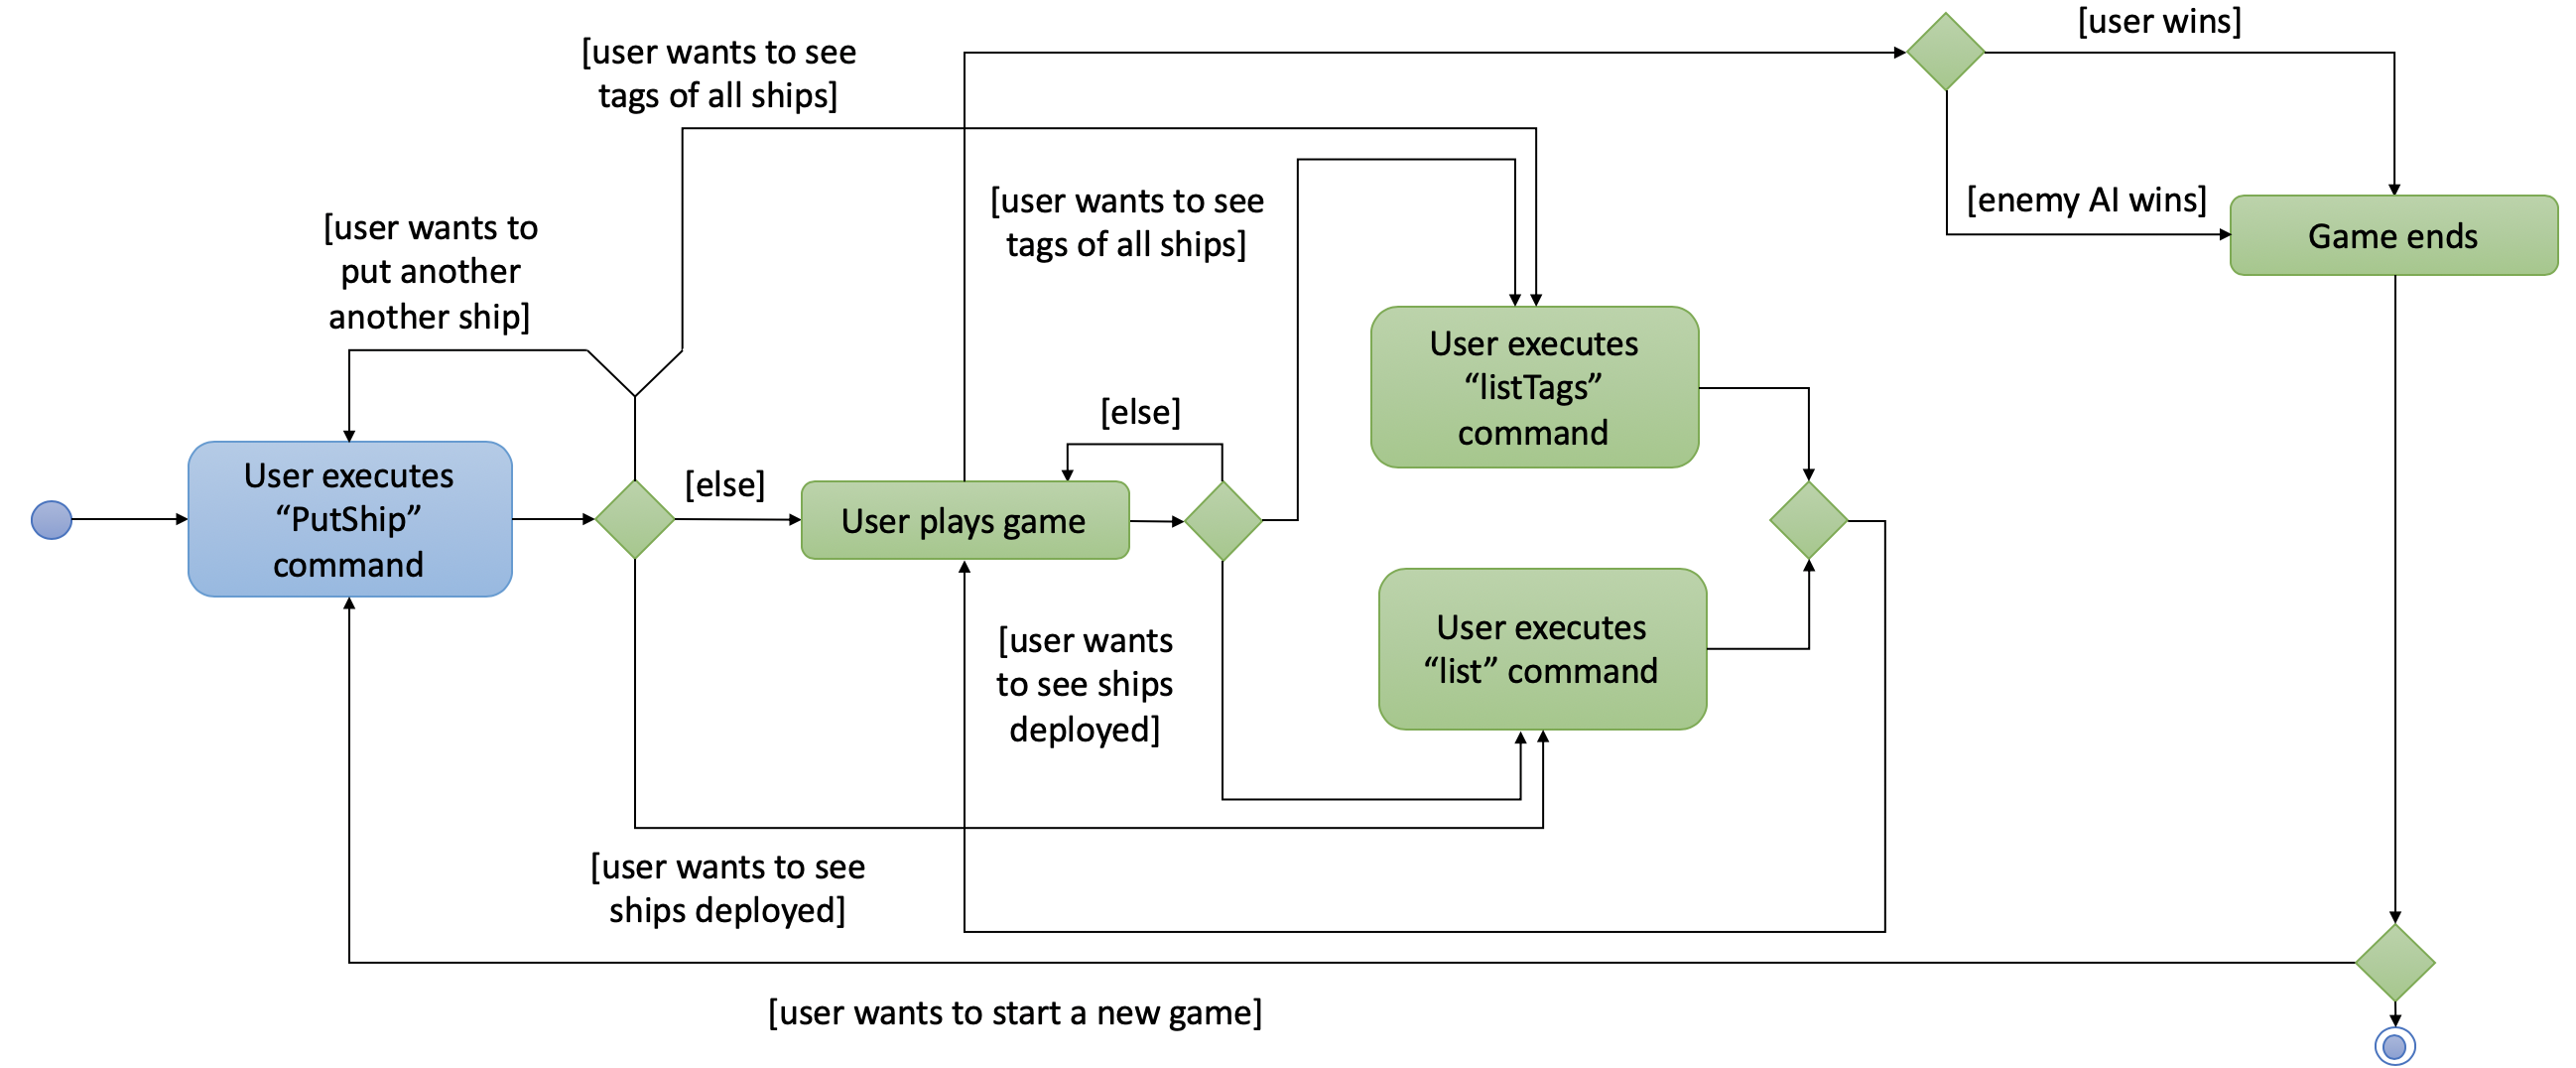
Ship management functions throughout the entirety of the game. As there are multiple states during the game, it is beneficial to visualise the operations of the put, listTags and list commands with respect to the different game states. The activity diagram below illustrates these operations.
3.2.3. Design Considerations
3.2.3.1. Aspect: How a ship is placed on the map
-
Current choice:
The sameBattleshipobject is put in multiple cells. Each cell contains a reference to the sameBattleshipobject. When a ship on theCellneeds to be modified, theBattleshipattribute in theCellis accessed.-
Pros: This allows any cell that is hit to access the same
Battleshipobject without having to separately find theBattleshipobject. -
Cons: Difficult to keep track of each
Battleshipposition.
-
-
Alternative:
Two separateBattleshipandBattleshipPartobjects are used. TheBattleshipPartobject represents the body of theBattleshipand contains an attribute that points to theBattleship. When a battleship on theCellneeds to be modified, theBattleshipPartis accessed, which then accesses the mainBattleshipobject.-
Pros: Clearer separation between the body of the ship and the ship itself.
-
Cons: Difficult to handle hits on the cell.
-
3.2.3.2. Aspect: How a ship is stored in each player’s fleet
-
Current choice:
AnArrayListofFleetEntryobjects is used for storage, whereFleetEntrycontains a reference to theBattleship, itsOrientationandCoordinatesof the head coordinates. TheFleetEntryclass is a nested class inFleet. Whenever aFleetmethod is called, it accesses theArrayListofFleetEntryto obtain information about theBattleshipand its position on theMapGrid.-
Pros: Can identify
Battleshipby position. -
Cons: Harder to implement, as a nested class has to be implemented from scratch, compared to using an
ArrayList.
-
-
Alternative:
ArrayListofBattleship.-
Pros: Easier to implement and provides a cleaner design.
-
Cons: Harder check position of
Battleshipon the map grid. In order to do so, a separate data structure must be created to store the coordinates and orientation of the ship. This data structure then has to be aligned with the originalArrayListthat stores the ships.
-
3.3. Battle feature
The Battle feature handles the following:
-
keeping track of the stage of the battle, and ensuring that the player does not enter a command in the wrong stage of the game,
-
allowing the computer to place its ships at the correct time,
-
allowing the user and the computer enemy to attack each other and maintain proper turn-taking while doing so.
The Battle feature is split between several packages:
-
seedu.address.battle: the mainBattleclass is implemented here. -
seedu.address.battle.state: theBattleStateclass is implemented here, and can be stored and retrieved viaModel. -
seedu.address.battle.result: the attack result classes are implemented here. These classes are returned byBattle#humanPerformAttack(Coordinates)andBattle#takeComputerTurn(). -
BeginCommandandAttackCommandhandle the player’s interaction with this component.
In the following sections, we will explain the workings of each of these different packages.
3.3.1. Implementation of battle state

In this program, there are certain commands that may only be executed at
specific phases of the game (e.g. attack must only be used when battling,
not while placing ships). To implement this, the battle state must be tracked.
The battle state is implemented as a BattleState enumeration, and stored
within the Model. When LogicManager executes a Command object, it checks
whether that command is allowed to be executed in the current state using
Command#canExecuteIn(BattleState). Only if the command is allowed to execute
does LogicManager then call Command#execute - if it is not, then execution
is prevented and the user is notified.
In addition, certain commands may change the battle state - for example, start
changes the battle state from PLAYER_PUT_SHIP to ENEMY_PUT_SHIP then finally
to PLAYER_ATTACK.
3.3.2. Implementation of the BattleManager class
The BattleManager class contains four important methods, detailed as follows.
3.3.2.1. void startGame()
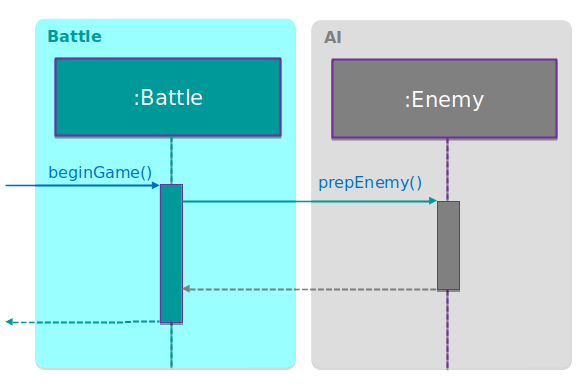
startGame methodstartGame is called when the player begins the battle (via BeginCommand,
see next section for more details).
startGame prepares the Enemy for battle by calling Enemy#prepEnemy,
which causes the enemy to place its ships and set up other data structures.
For more information, please see the "Enemy AI Feature" section below.
3.3.2.2. AttackResult performAttack(Player, Player, Coordinates)
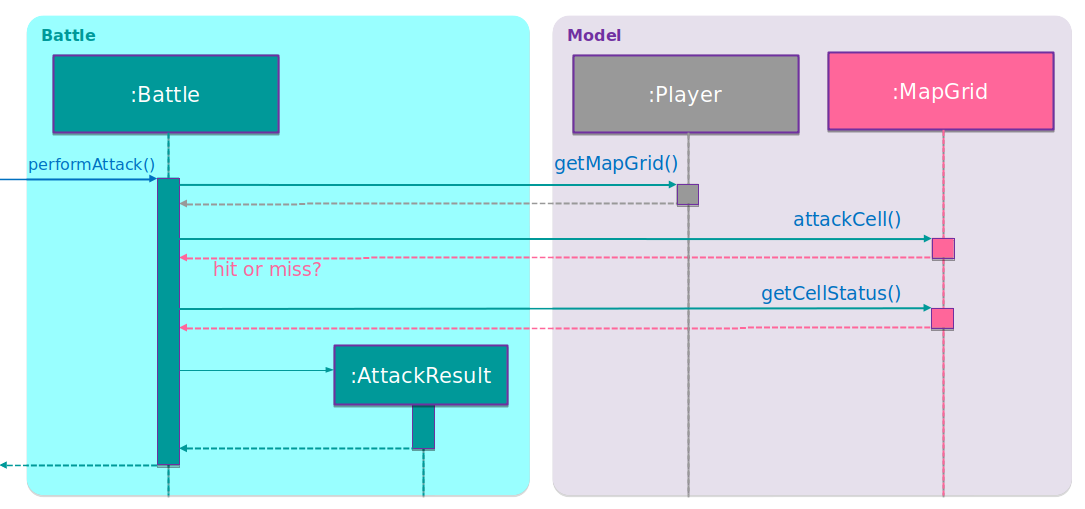
performAttack methodperformAttack is the method that actually performs the attack from one
player to another. It takes in an attacker Player, a target Player and
the attacked Coordinates, and returns an AttackResult. (See section
3.3.3 for the description of what AttackResult is returned in what scenario.)
This method is an internal method, used by both humanPerformAttack and
takeComputerTurn.
3.3.2.3. AttackResult humanPerformAttack(Coordinates)
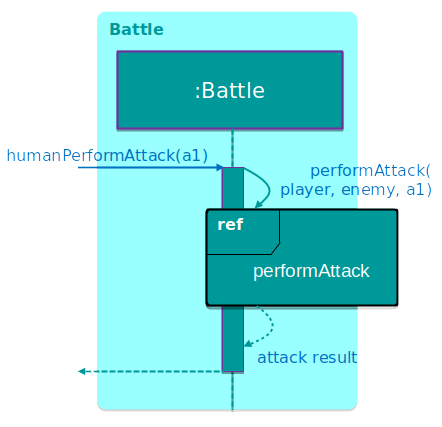
humanPerformAttack methodhumanPerformAttack is called when the player makes an attack (via
AttackCommand, see below.)
This method simply calls performAttack with the human player as the
attacker, the computer player as the target and the argument coordinate
as the attacked coordinate.
3.3.2.4. List<AttackResult> takeComputerTurn()
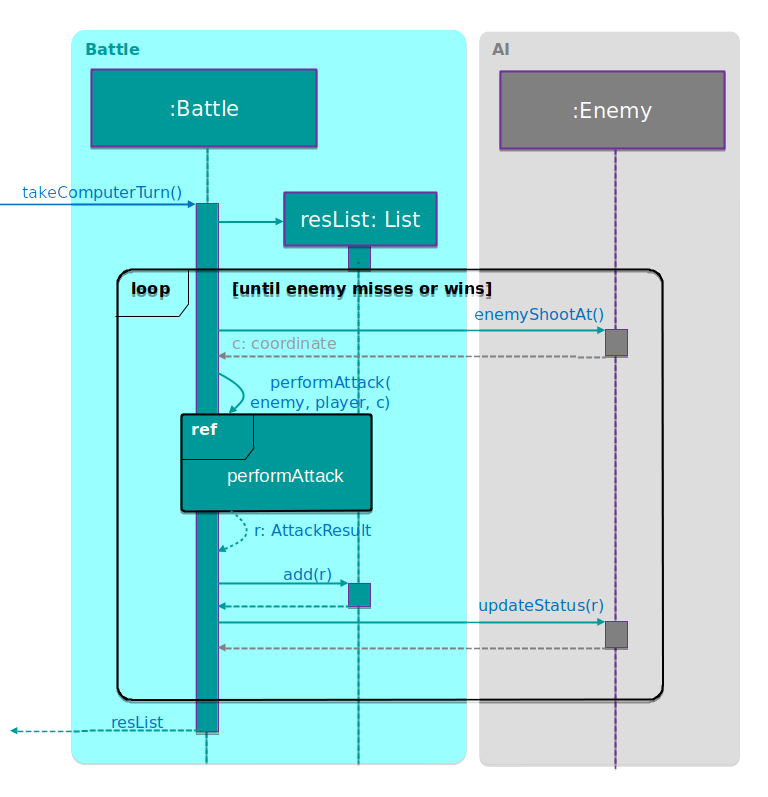
takeComputerTurn methodtakeComputerTurn is called after the player makes an attack but misses
(via AttackCommand, see below). As mentioned in the game rules, after
the player misses the computer may begin to attack until it misses, and
this method implements that functionality.
3.3.3. Implementation of attack result
The representation of the result of an attack is the class AttackResult and
its subclasses. To help the receiver in deciphering the attack result without
needing to resort to instanceof, methods are provided to test for attributes
such as whether the attack is a hit.
The methods are:
-
isSuccessful: tests whether the attack actually completed -
isHit: tests whether the attack damaged a ship -
isDestroy: tests whether the attack destroyed the ship -
isWin: tests whether the attack caused the attacker to win
A summary of each type of AttackResult can be seen from the following table:
| Result type | Scenario |
|---|---|
|
The |
|
The attack did not hit an enemy ship. |
|
The attack hit an enemy ship but did not sink it. |
|
The attack hit an enemy ship and sank it, but the enemy still has ships remaining. |
|
The attack hit the last of the enemy’s ships and sank it, resulting in a victory for the attacker. |
3.3.4. Implementation of player interaction via commands
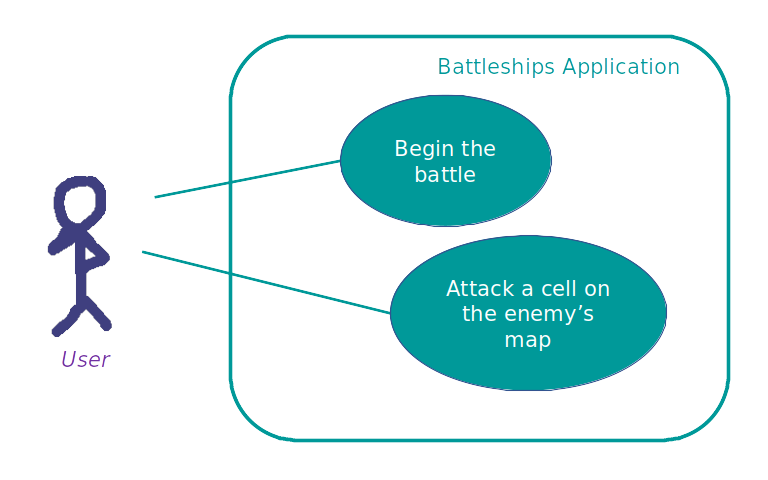
Battle Component.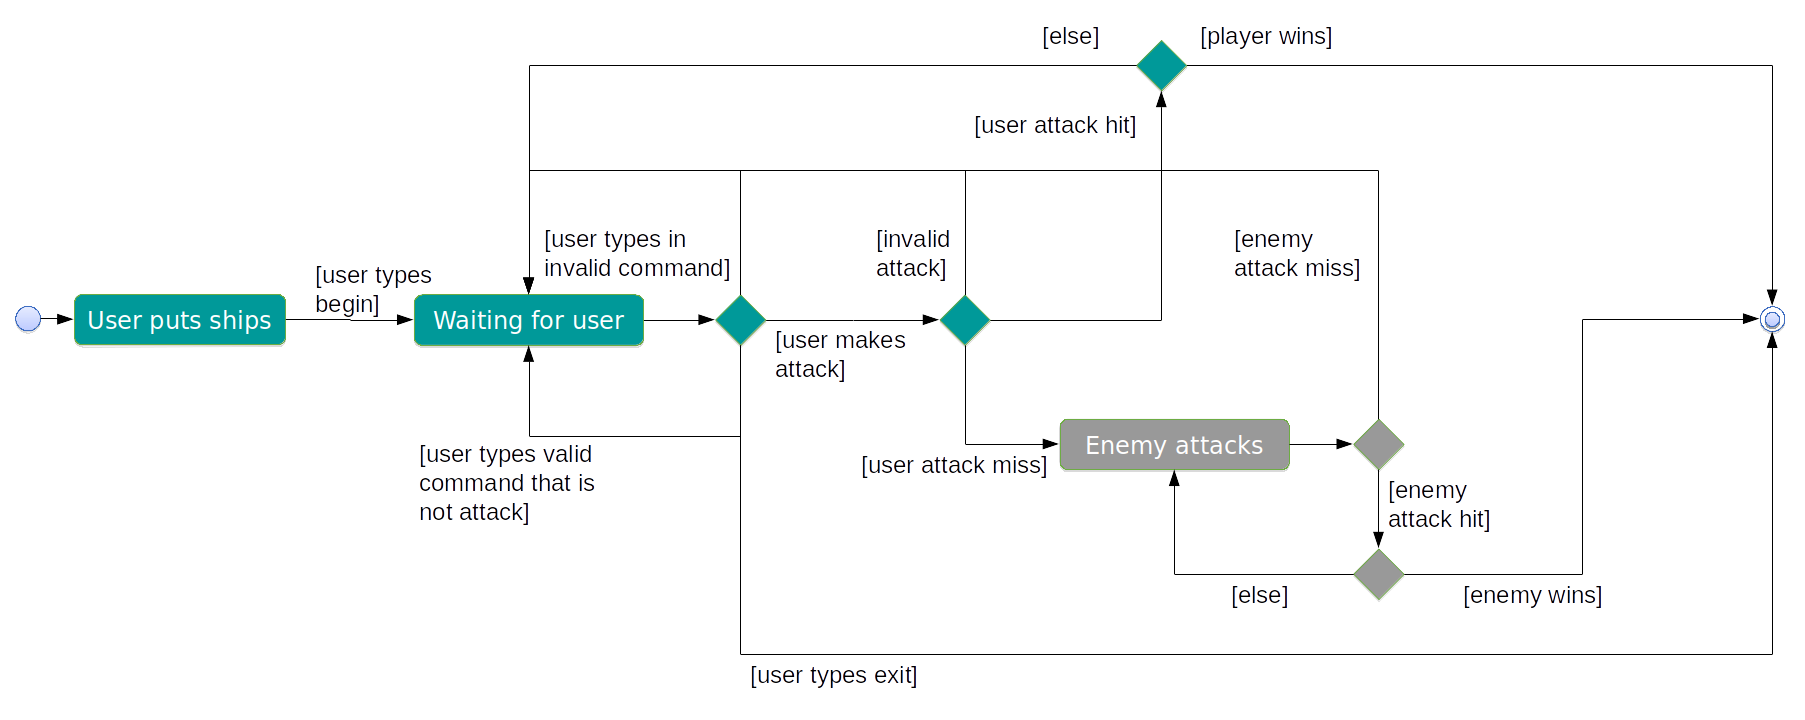
The upper diagram is a use case diagram which shows briefly the possible
interactions between the user and the application during the battling phase.
Below is a more detailed activity diagram of what happens when the
user does battle against the computer enemy. As shown, the player
does battle by using the begin command to initiate the battle,
then the attack command to attack the enemy.
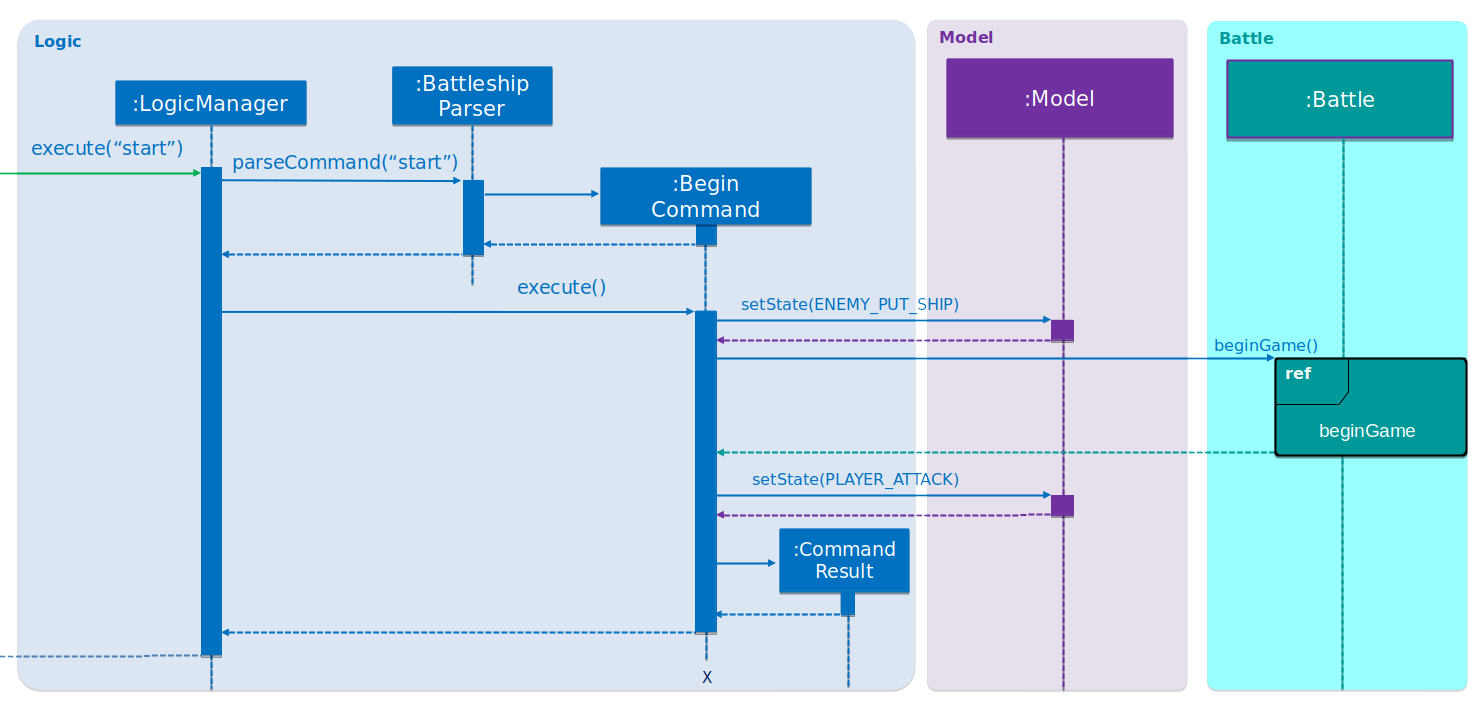
The following sequence diagrams show what happens when the user enters
the begin command, then the attack a1 command.
begin.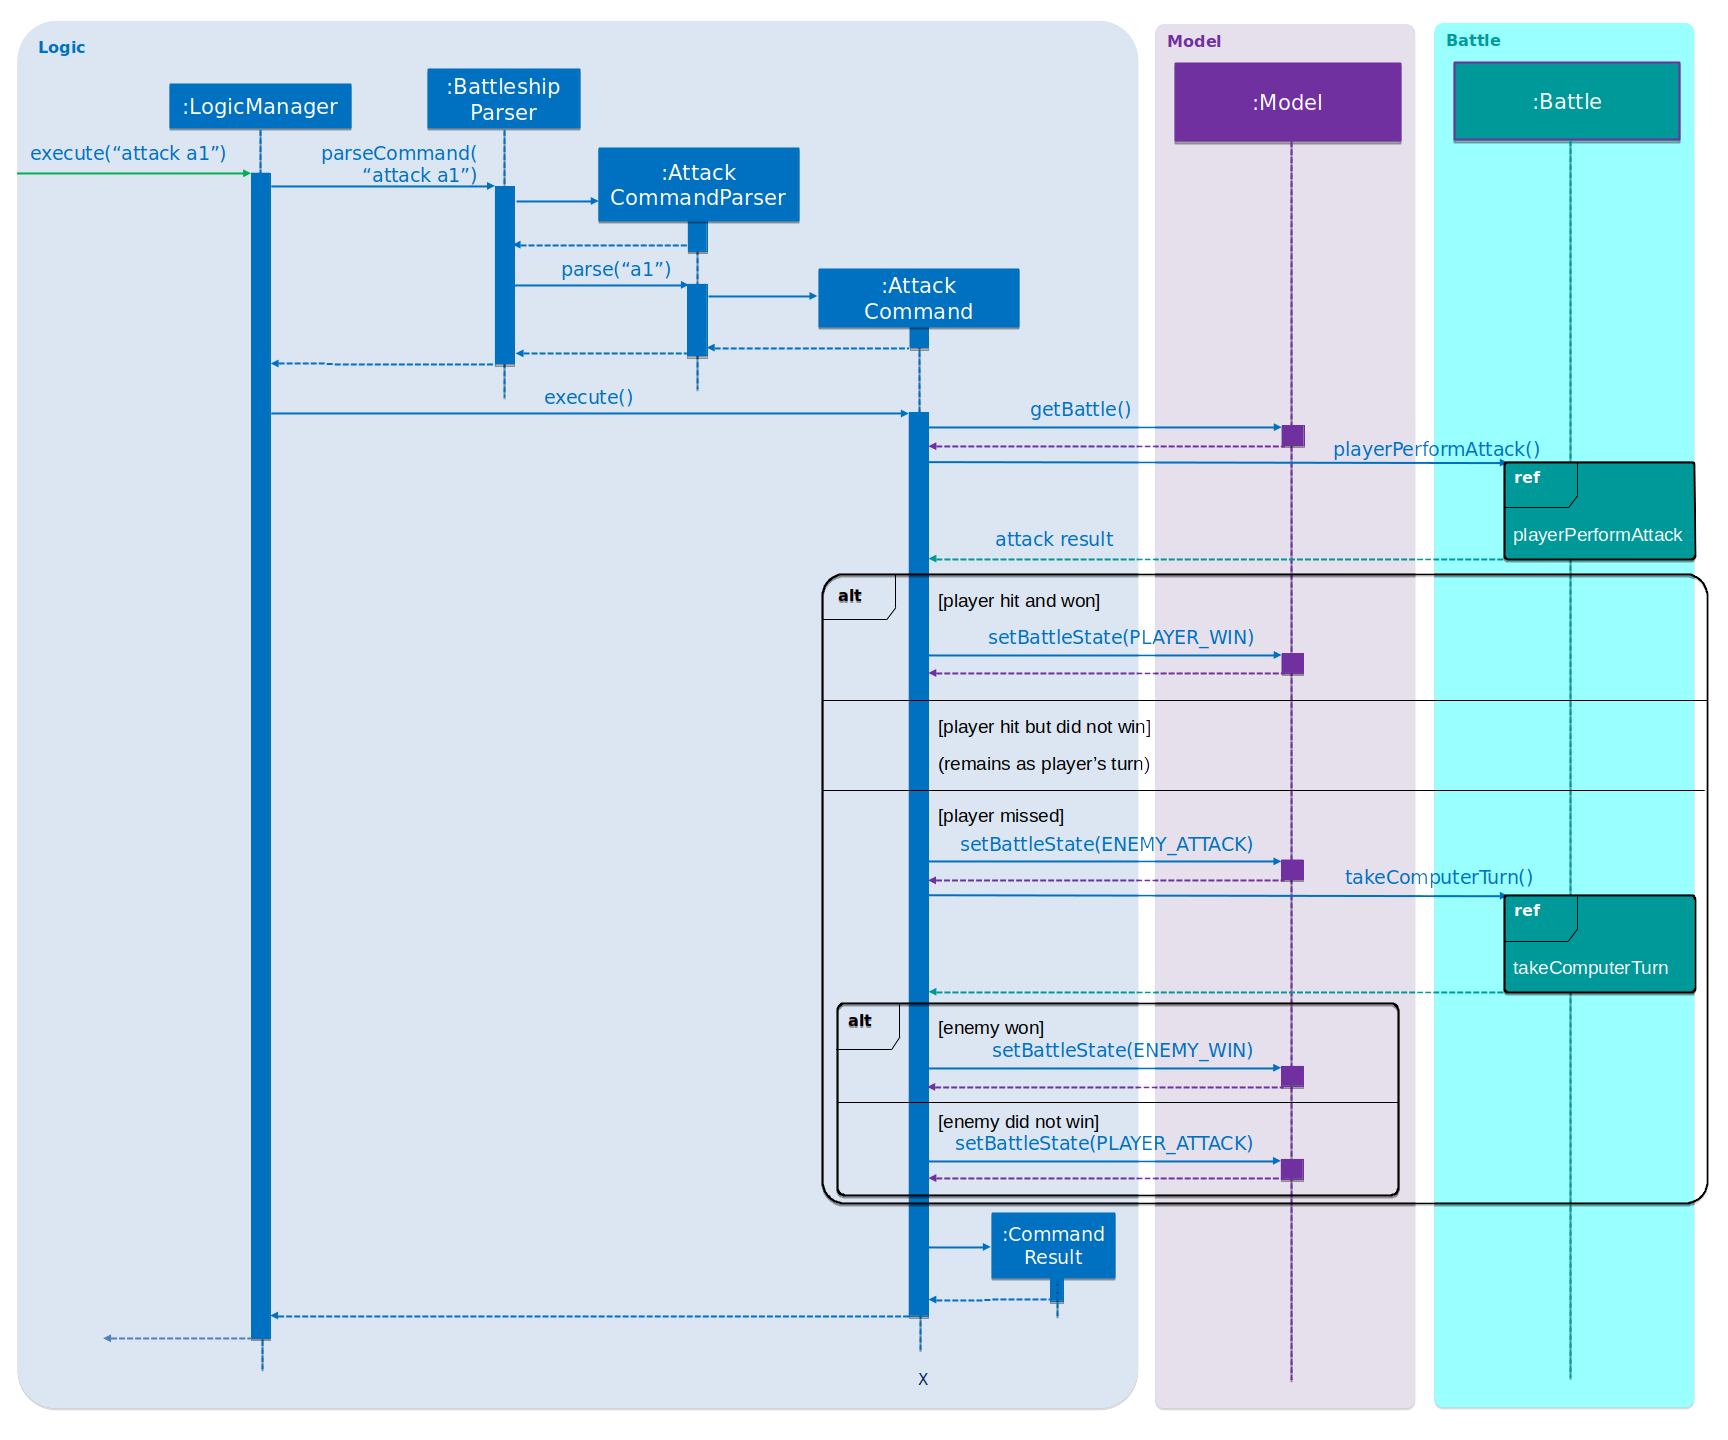
attack a1.3.3.5. Design considerations
-
Current choice:
BattleManageris stored underModel. Every timeAttackorBegincommands are executed, they will use thisBattleManagerto actually perform the actions, with the logic in theCommand-s mostly being error handling.
When AI performs attacks, theBattleManagerwill call the AI to compute its attack and return it, then call an internal method to actually perform the attack.-
Pros:
-
Command logic is abstracted into places where it can be reused by the AI.
-
Flow of program is clear - it always is a higher level component calling a lower-level component.
(e.g. when the player types in an Attack command, user interacts withUI, which callsLogic, which callsModelandBattleManager, which call the lowest level classesMapandPlayer)
-
-
Cons:
-
The
Modelcomponent now contains game logic (BattleManager) within it.
-
-
-
Alternative
BattleManageris stored underLogic. Every timeAttackorBegincommands are executed, they will perform the action using the logic coded within themselves, not interfacing withBattleManager.
When AI performs attacks, theBattleManagerwill create these commands and execute them. In theModel, the current attacking player is kept track of, allowing the commands to be used for both a human and AI player.-
Pros:
-
The game’s model and logic are kept separate from each other.
-
-
Cons:
-
AttackCommandis now state-dependent (the state being the current attacking player) which can more easily lead to bugs and race conditions.
-
In the end, we decided to implement Option 1. Even though some team members preferred either option, we decided that
LogicandModelnot being kept separate was a worthy tradeoff for the advantages of Option 1. -
3.4. Enemy AI feature
The enemy player serves as a computerised opponent for this single-player game.
3.4.1. Current implementation
The Enemy AI feature is currently implemented as an extension of the Player class,
and serves as the opponent player since Battleship is a single-player game.
The Enemy AI can automatically perform initialising actions similar to the human player.
Mainly, the Enemy AI can randomly initialise its own mapGrid with randomly generated ships,
which is invoked by the command start game.
We can see these scenarios here:
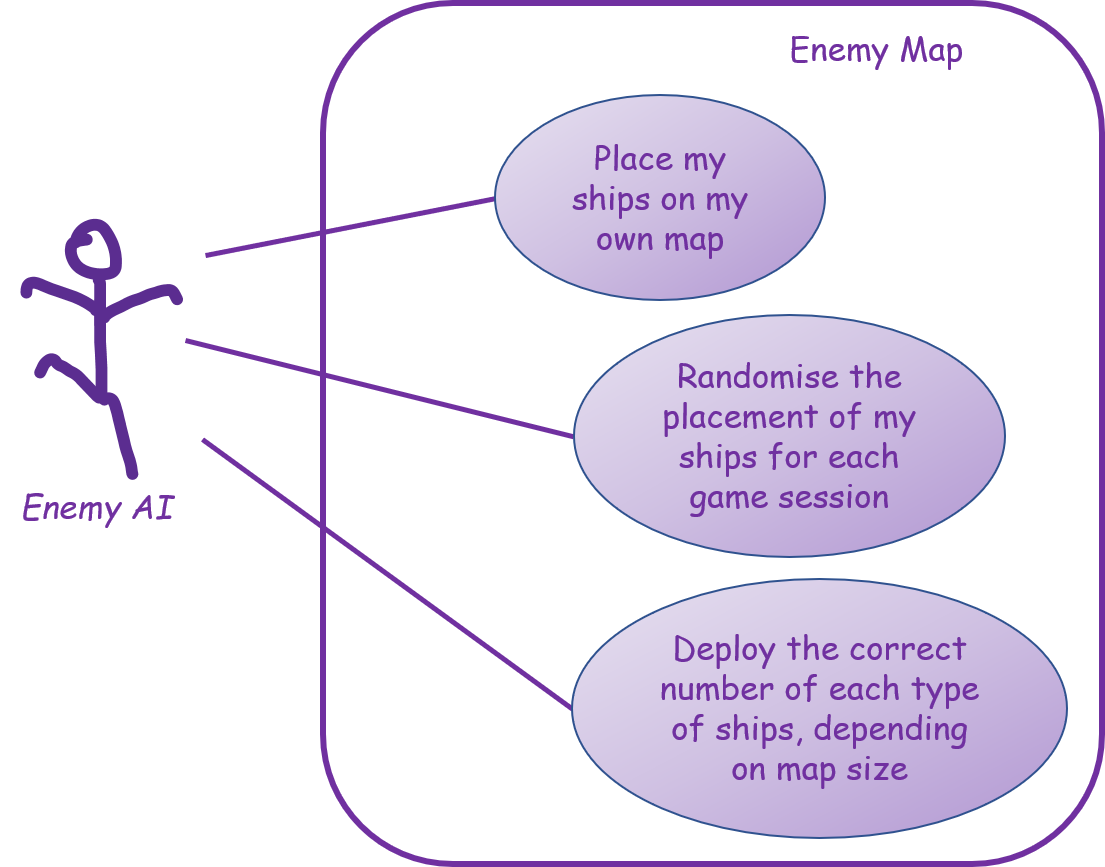
The Enemy AI also supports the ability for the enemy to automatically and intelligently shoot the player’s map when the player ends their turn, encapsulated by these scenarios:
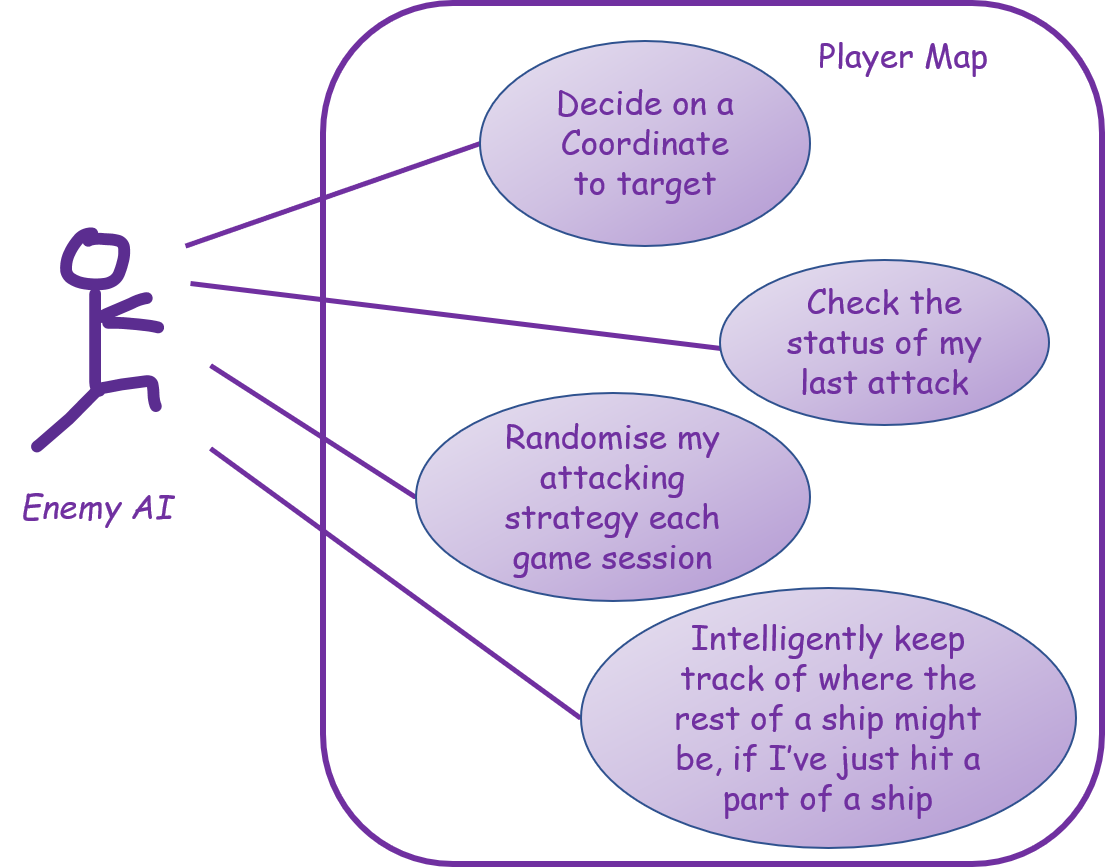
Note that the Enemy AI feature does not contain any explicit commands to be entered by the Player. Its methods are called by other features instead, and does its magic in the background.
3.4.2. Initialisation of Enemy MapGrid
The Enemy AI has the method populateMapGrid() which is called by the method prepEnemy(),
which is in turn called by the Battle Manager when the Player enters the command start game.
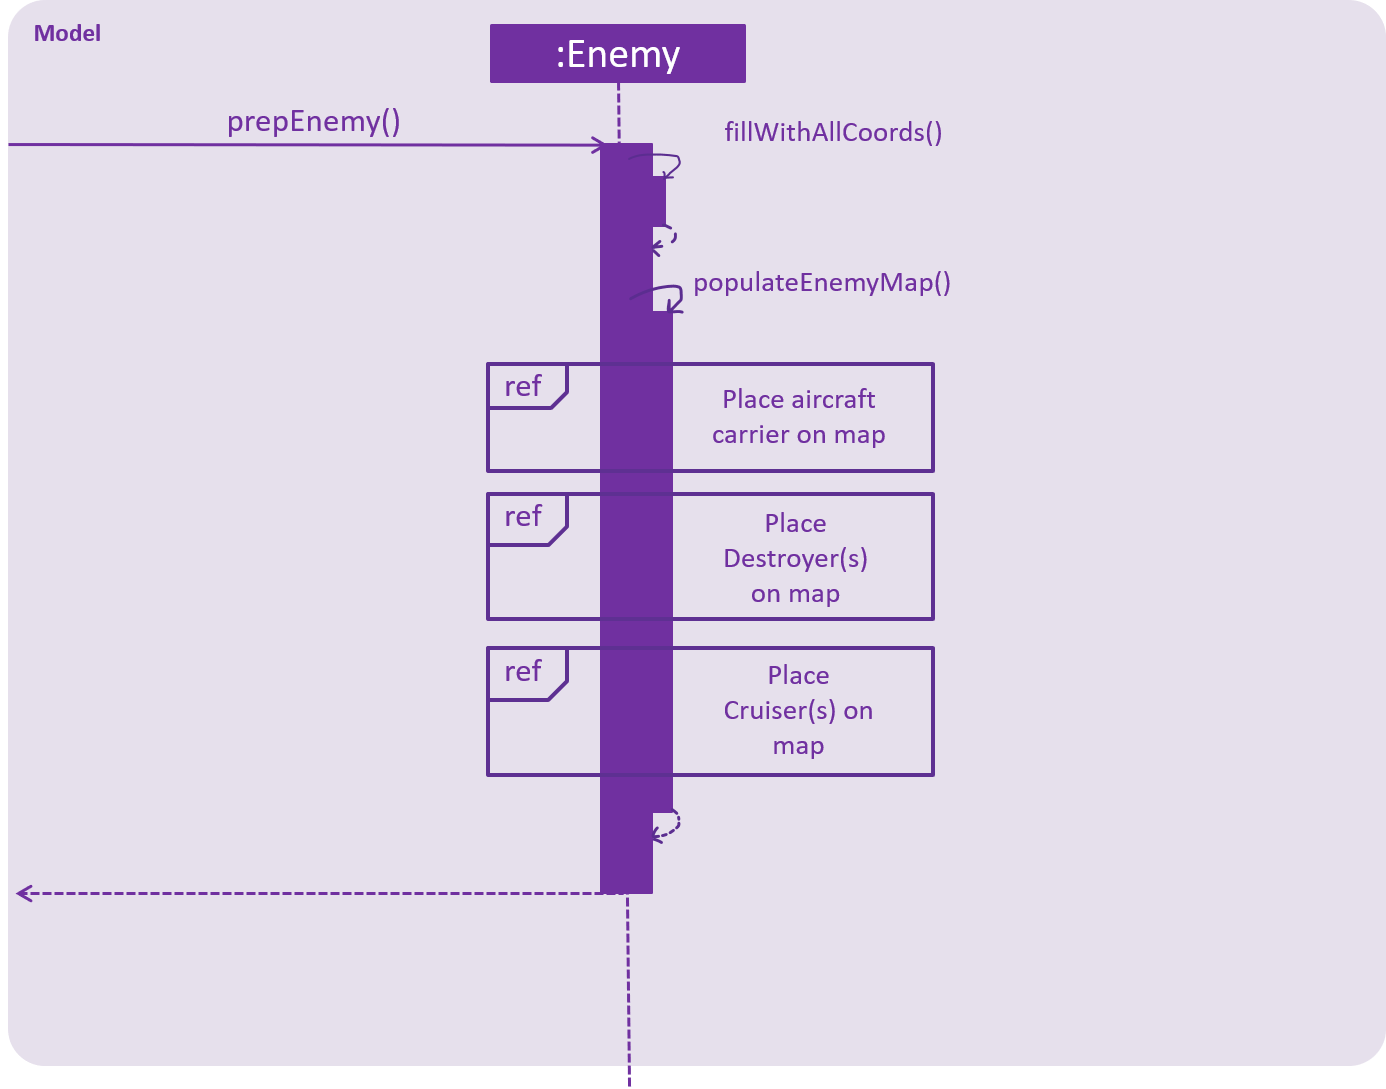
It can be seen from the above sequence diagram that populateMapGrid() goes on to call the methods
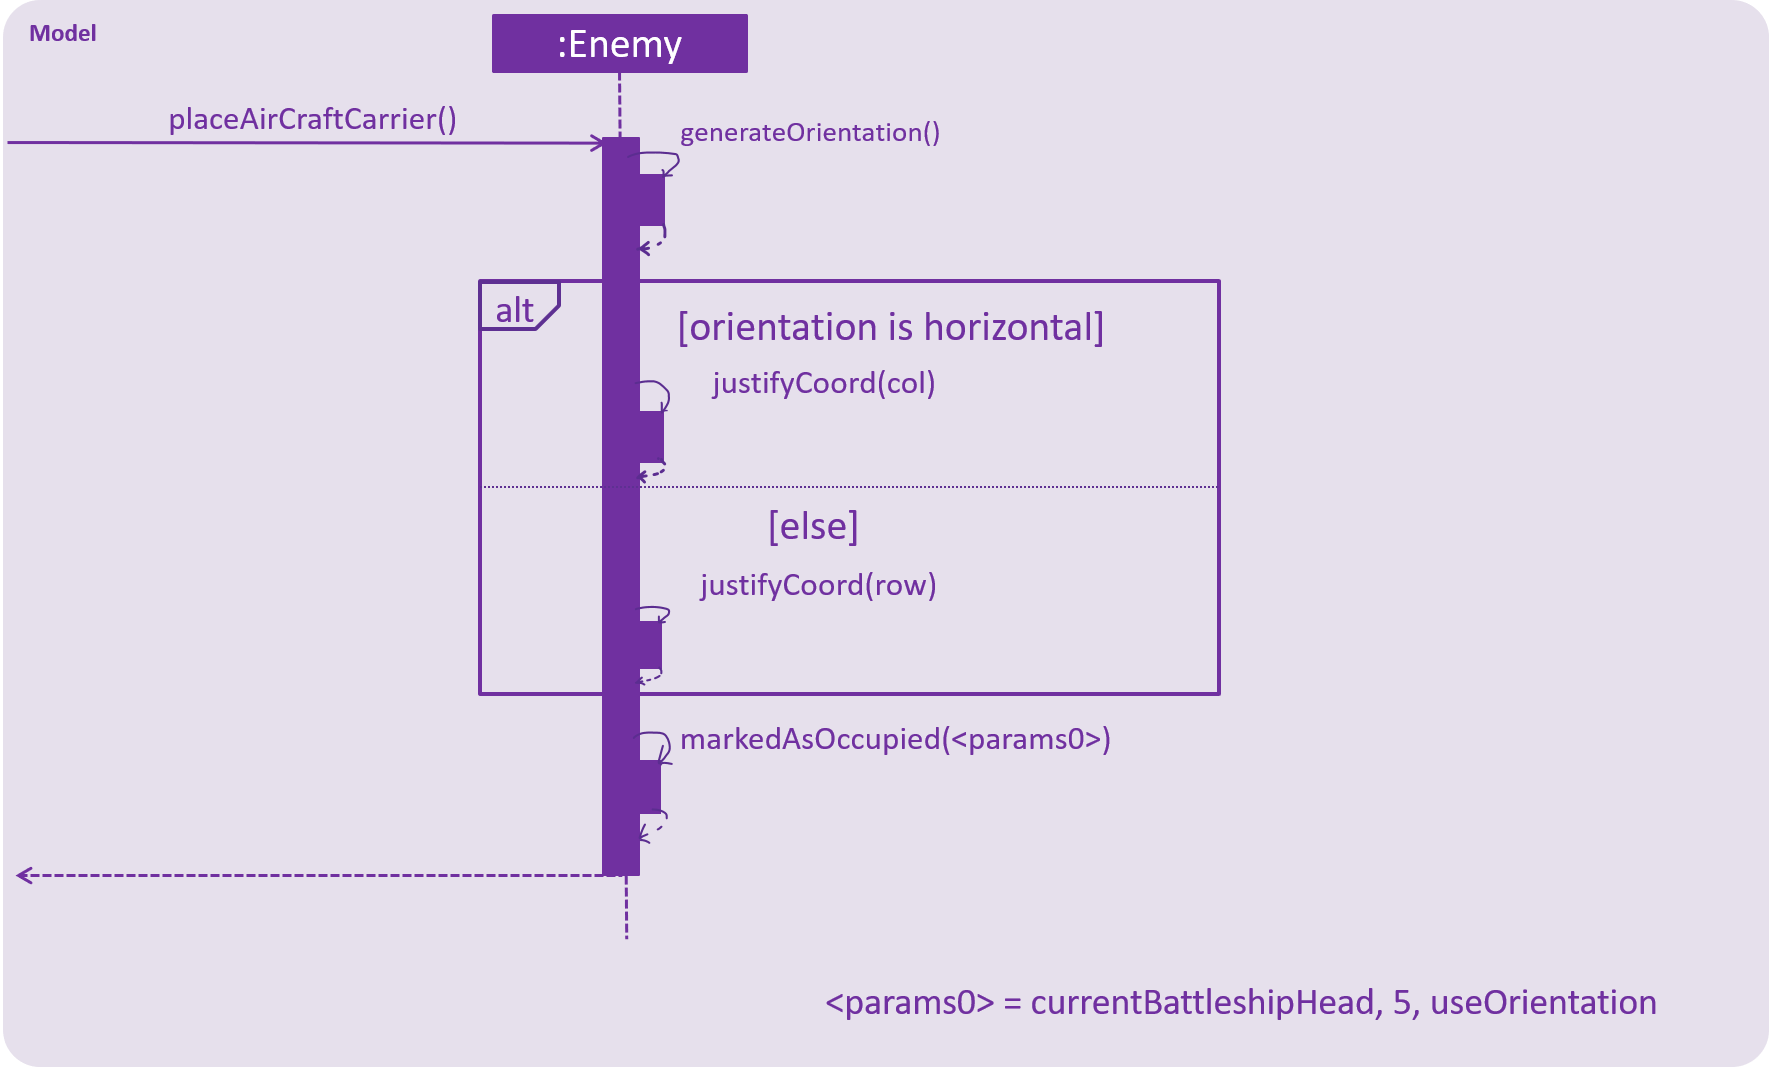
placeAirCraftCarrier() and placeMultipleDestroyerAndCruiser().
placeAirCraftCarrier() is called once, and places only one Aircraft Carrier onto the map, since the game rules state that
no matter the map size, every game will only feature a single Aircraft Carrier.
On the other hand, placeMultipleDestroyerAndCruiser() is called twice consecutively. The first call takes in the parameters required
to put as many Destroyers as available onto the enemy map, while the second call will do so for Cruisers.
The reason why placeMultipleDestroyerAndCruiser() is called twice is because the implementation to place Destroyers and Cruisers
are identical, but we still want to keep their placement separate for better abstraction and easier testing.
The following two sequence diagrams illustrate how placeAirCraftCarrier() and placeMultipleDestroyerAndCruiser() prepare the
enemy ships and put them on the enemy map grid.
Sequence Diagram for placeAirCraftCarrier()
Sequence Diagram for placeMultipleDestroyerAndCruiser()
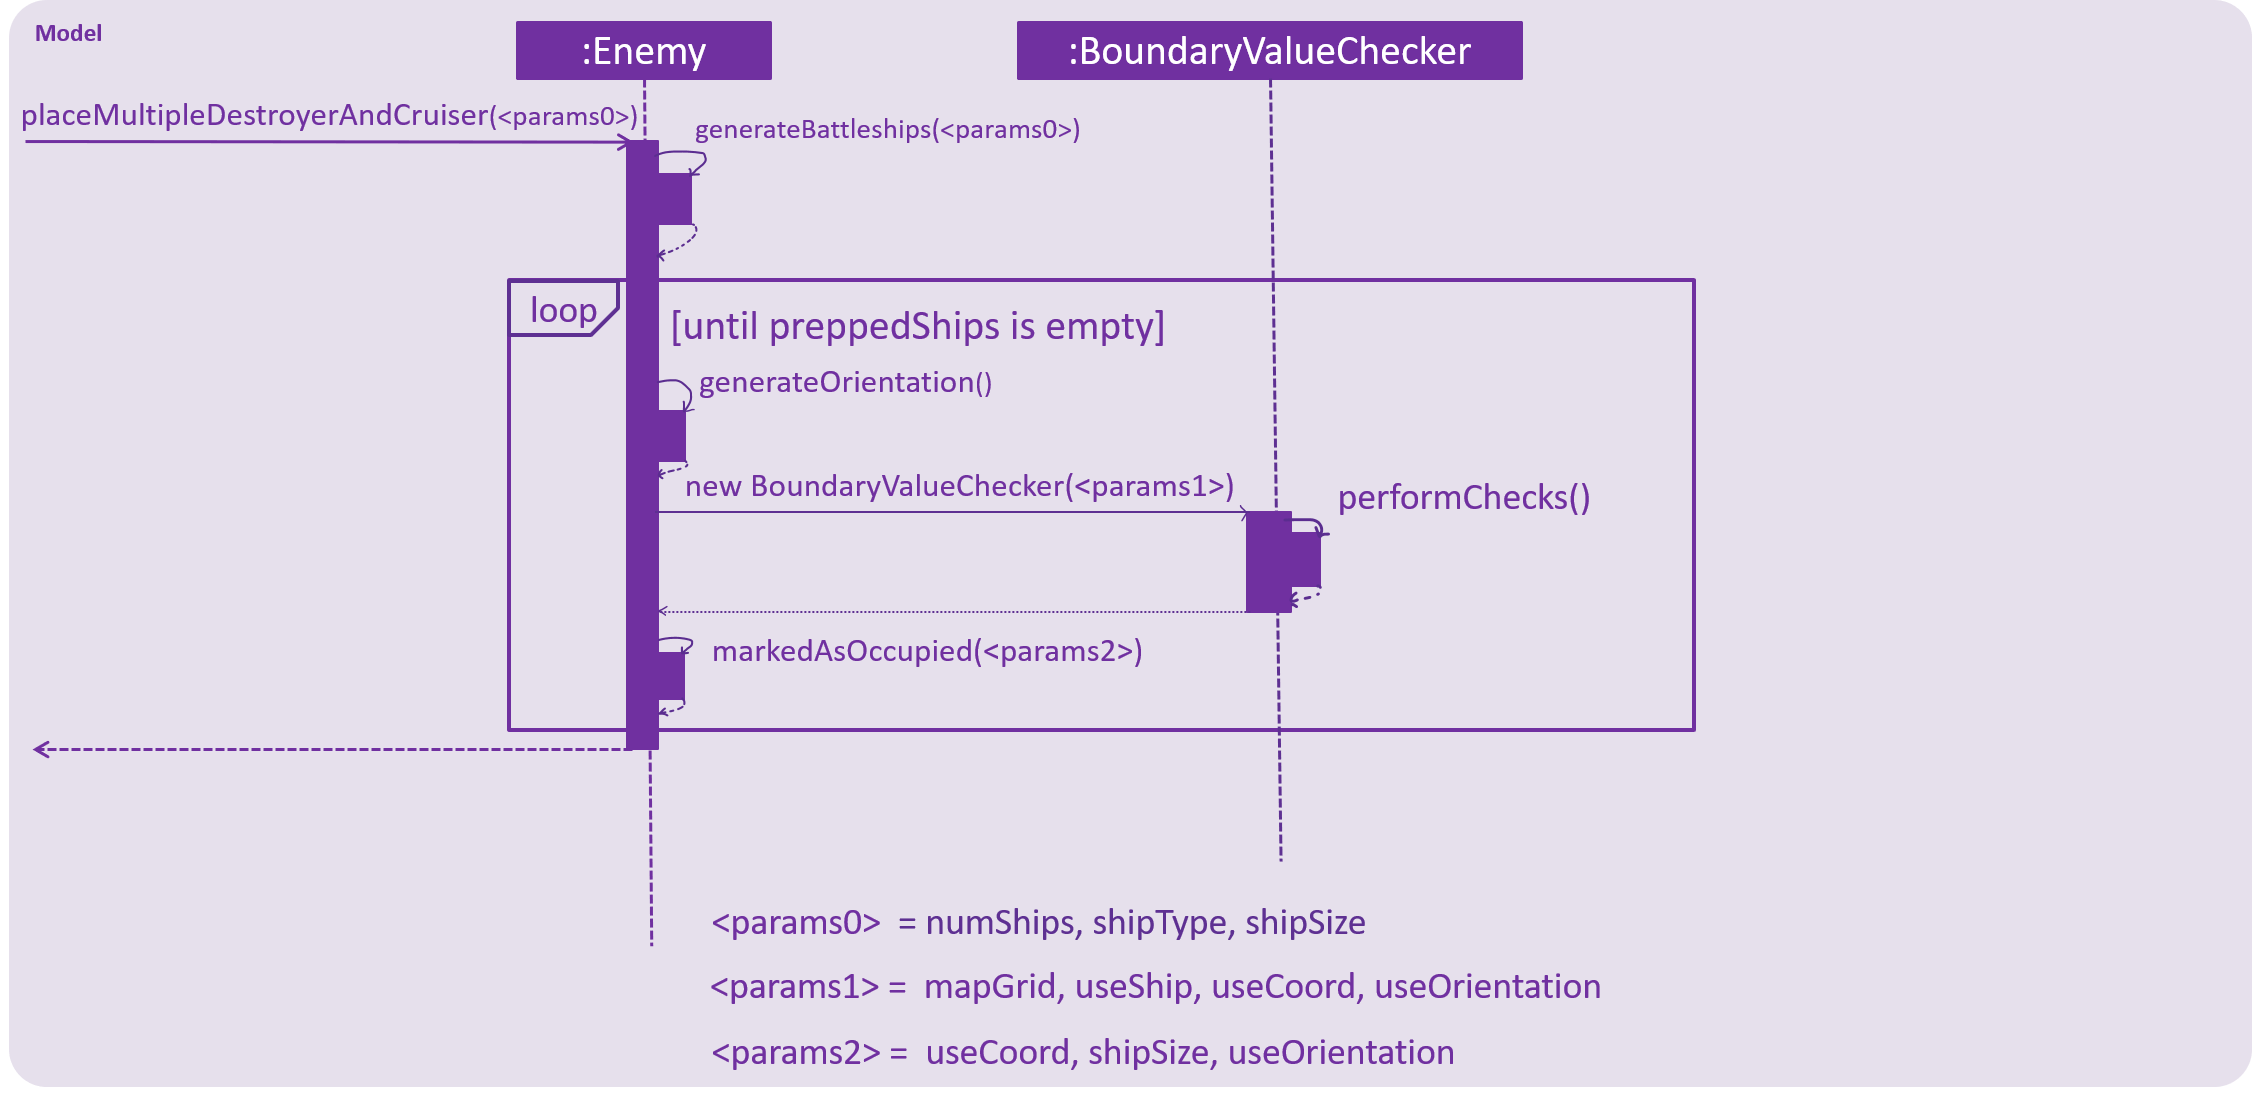
populateMapGrid() will generate randomised ships based on the number of ships
available to it for the current game, as specified in its Parent class - Player.
The number of ships available to the Enemy AI is congruent to the number of ships
available to the Player. The exact number of the different types of ships is decided from on
a formula that is based on the map size specified by the player in the init command.
3.4.3. Calculation of Coordinate to Attack
The Enemy AI has the method enemyShootAt() that is invoked when the player ends their turn upon a miss.
The Enemy AI will attempt to generate a random Coordinate to attack,
and pass this Coordinate to the BattleManager. The Enemy AI supports the ability to
check that its generated coordinates are all valid, and will perform certain calculations that will
increase its accuracy upon detecting a successful hit on any part of a ship.
The following activity diagram illustrates the conditions taken into account by the Enemy AI as part of its shooting algorithm, and shows how it decides on which Coordinate to target, depending on the success of previous hits.
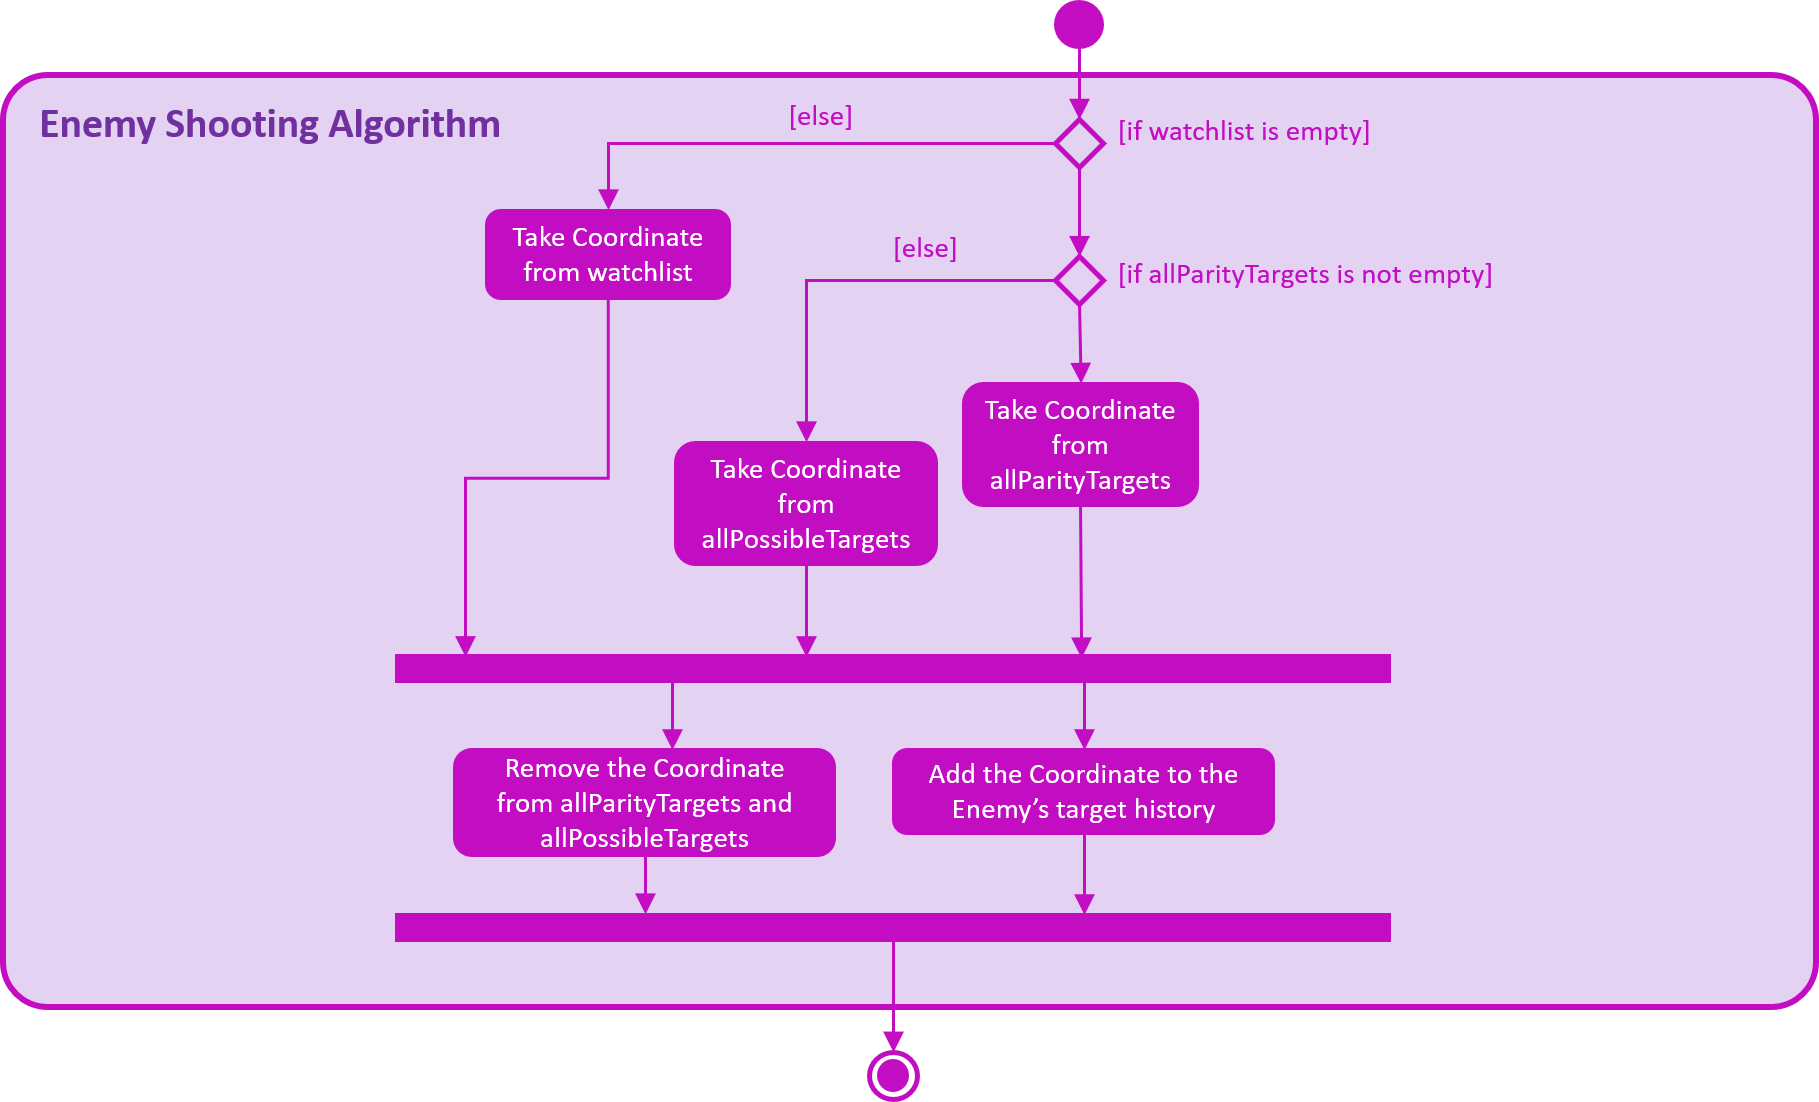
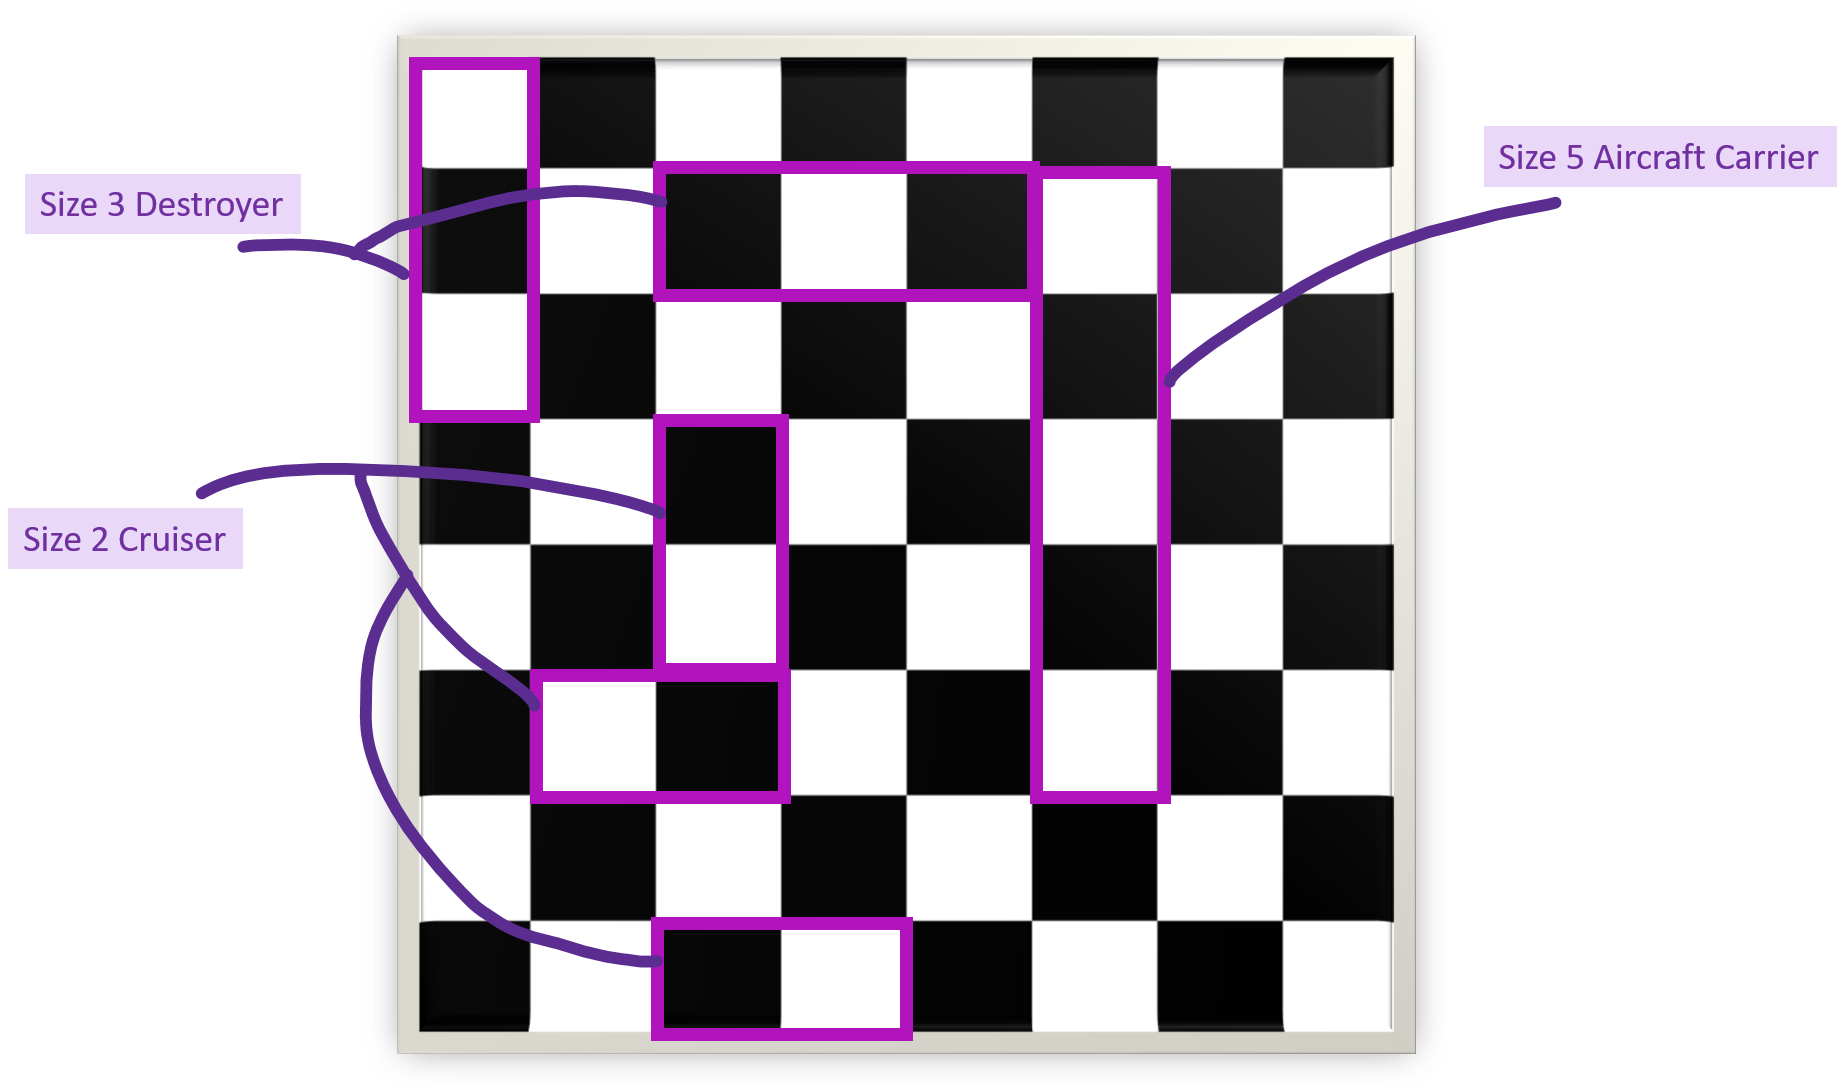
We can see from the diagram that the start of the game, when scouting for the Player’s ships, the Enemy first divides the cells with a parity of 1 on the map into two groups - we will name these groups White and Black for ease of explanation. The enemy will then randomly pick a Coordinate from the White group whenever it is guessing where the next Player ship might be. The reason for this is that since every ship must be at least of length 2, all ships will consist of at least one of each White or Black coordinates.
The Black-White groupings of Coordinates through the concept of parity is illustrated here in the following diagram:
Once the Enemy hits a Coordinate that has a ship on it, it will note down every valid Coordinate that is cardinal (to the North, South, East and West) to the cell that was discovered to hold a ship.
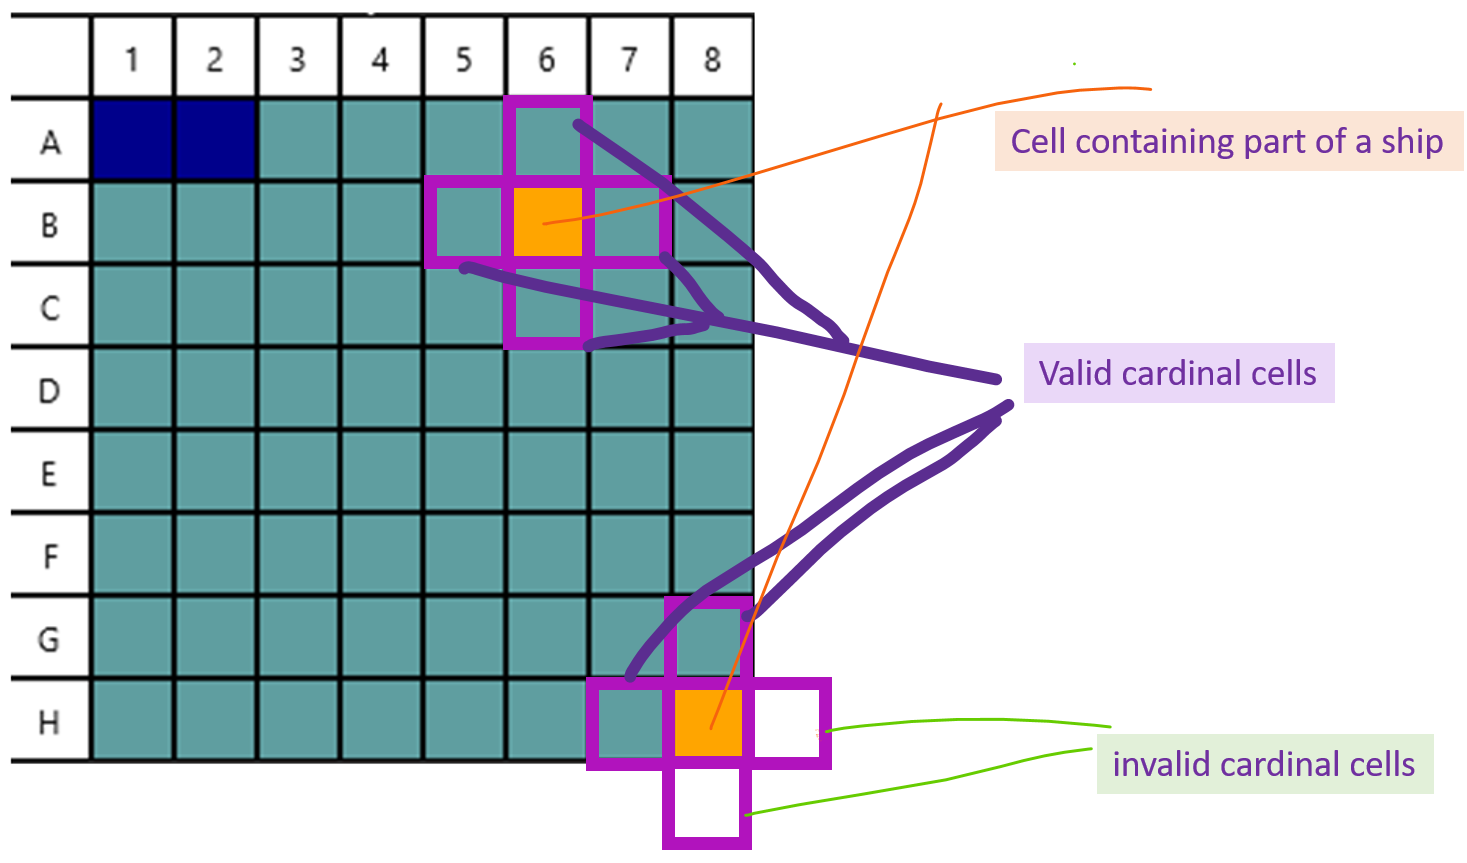
The validity of these cardinal Coordinates are evaluated by checking if they are within the bounds of the map grid, and
whether they have not been hit before. If these two conditions are satisfied, then the Enemy will note down the cardinal Coordinate into a watchlist, and
will from that point shoot everything in the watchlist, until the ship that it is targeting is destroyed.
When the Enemy AI detects that it has successfully destroyed the Player ship, it will empty out the watchlist, and go back to scouting the
map for another part of the Player ship, by randomly targeting coordinates in the Black cells, as illustrated in the previous image.
The following code snippet gives a clearer view of how the algorithm flows for the enemy shooting strategy:
    public Coordinates enemyShootAt() {
        Coordinates newTarget;

        if (watchlist.isEmpty()) {
            if (!allParityTargets.isEmpty()) {
                newTarget = drawParityTarget();
                logger.info(String.format("++++++++WATCHLIST EMPTY " + "enemy shoot parity: " + newTarget.toString()));
            } else {
                newTarget = drawFromAllTargets();
                logger.info(String.format("++++++++Parity EMPTY "));
            }
        } else {
            newTarget = drawFromWatchList();
            logger.info(String.format("++++++++WATCHLIST STUFFED " + "enemy shoot watched: " + newTarget.toString()));
        }
        modeCleanup(newTarget);

        this.addToTargetHistory(newTarget);
        return newTarget;

    }
Note: All actions taken by the Enemy AI are seeded by a pseudo-random generator. Thus, its behaviour will be different for every game session.
3.4.4. Design considerations
-
Current choice: seed all methods with pseudo-random seed
-
Pros: each game will be a different experience
-
Cons: testing will be more difficult
-
-
Alternative: pre-calculate and hardcode the actions the Enemy AI performs
-
Pros: testing is made very much easier
-
Cons: games would be less dynamic since the enemy’s behaviour is non-organic
-
3.5. Statistics feature
3.5.1. Current implementation
The statistics feature allows users to view their current gameplay information. This information will be displayed in a pop-up window that includes: Number of Attacks Made, Number of Successful Hits, Number of Misses and Number of Enemy Ships Destroyed. The statistics command can be called at any juncture of the game.
Upon a successful win game, the statistics feature also implements a save command that automatically saves the statistical data into the game’s storage. At the same time, the command will retrieve the statistical data from the previous game and perform a comparison of game data.
The following operations are invoked upon the calling of the stats command.
-
getAttacksMade()- Returns the number of attacks made by the User. -
getMovesLeft()- Returns the remaining number of moves left for the User. -
getHitCount()- Returns the number of successful hit on enemy ships. -
getMissCount()Returns the number of misses made. -
getEnemyShipsDestroyed()Returns the number of Enemy Ships Destroyed by the player. -
getAccuracy()Returns the current Hit-Miss Ratio of the User based on the game so far. -
generateData()Formats the current statistical data into a json serializable format.
3.5.2. Display statistics
Given below is an example usage scenario and how the stats command behaves at each step.
Step 1. The User initializes the game with the init 8 which will create a 8x8 map.
The Map can be initialized to any valid size (This is just a sample scenario)
Step 2. Put the ships onto the grid via the put ship command.
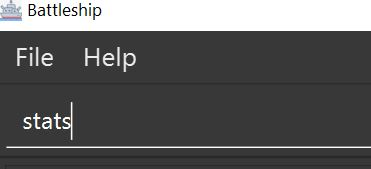
Step 3. Input stats into the command-line and press enter to obtain the current statistical data.
Inputting stats :
Pop-up window for stats :
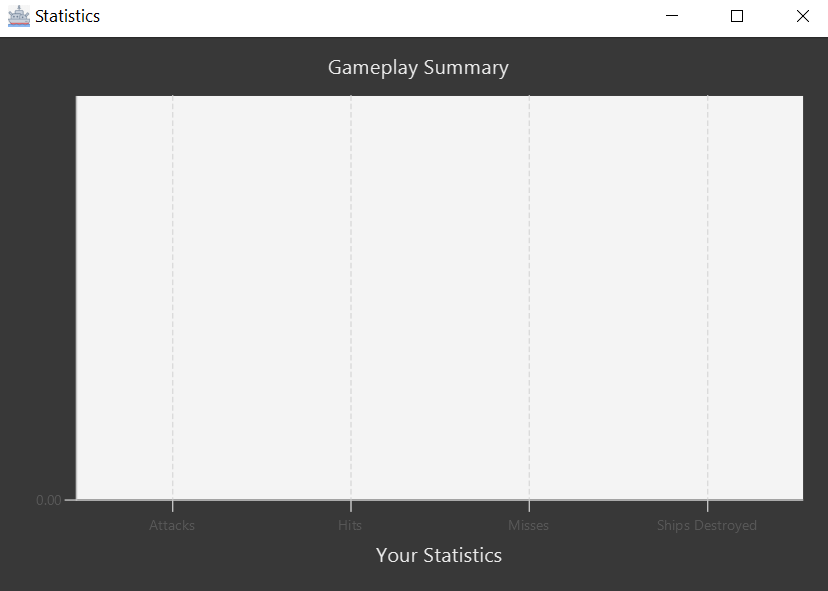
There should not be any valid data at the moment as the game as not started.
Step 4. Now proceed with the game and perform an attack. Input attack a1.
Step 5. Invoke the stats command again to view the updated statistics of the attack result.
Besides the pop-up window, the data is also captured in the command-line result box.
The following sequence diagram summarizes what happens when a User invokes the stats command.
stats command.3.5.3. Save and Compare
Given below is an example usage scenario of the automatic save and compare feature.
-
Upon winning a game, a user will be presented with the following screen.
Notice the displayed 'Statistics Analysis' section that displays a comparison of the player’s accuracy in the current game and the previous game.
-
By inputting
init 6and press enter. The game will be restarted with a new map. -
Next, input the command
statsto observe how the previous statistics data has also been cleared in preparation for the new game.
The following sequence diagram summarizes what happens at the end of a game and an automatic save is performed.
The following sequence diagram summarizes what happens at the end of the game where an automatic reading of previous statistics data is performed.
3.5.4. Activity Diagram
The following Activity Diagram shows when the stats command can be used.

3.5.5. Use Case Diagram
The following use-case diagram captures the behaviour of the statistics feature.
3.5.6. Design considerations
3.5.6.1. Design of data-tracking methods
-
Alternative 1: The methods that are responsible for incrementing the relevant game data are placed in each of the commands to be tracked. This meant that there would be a method call to the statistics class from within every method itself, which also meant that every method had to contain a parameter for the PlayerStatistics Object.
-
Pros: The methods are clearly visible within each command to be tracked and as a developer I can understand when each command is being tracked.
-
Cons: This implementation violates the DRY principle (Don’t Repeat Yourself) Principle.
-
-
Alternative 2 (Current Choice) : The method responsible for incrementing the statistical data is placed only at the AttackCommand class.
-
Pros: The implementation does not violate the DRY principle and contains less dependencies on the other components.
-
Cons: It is more difficult to code as it has to account for different CommandResult objects.
-
3.5.6.2. Type of Storage File
-
Alternative 1 (Current Choice) : Use JSON file to store statistics data
-
Pros: Easy to implement as there are libraries pre-installed.
-
Cons: Formatting errors are not validated
-
-
Alternative 2 : Use XML file to store statistics data
-
Pros: Can put metadata into the tags in the form of attributes.
-
Cons: Difficult to code as it is less readable and external libraries must be imported.
-
3.6. Logs
We are using java.util.logging package for logging. The LogsCenter class is used to manage the logging levels and logging destinations.
-
The logging level can be controlled using the
logLevelsetting in the configuration file (See Section 3.7, “Configuration”) -
The
Loggerfor a class can be obtained usingLogsCenter.getLogger(Class)which will log messages according to the specified logging level -
Currently log messages are output through:
Consoleand to a.logfile.
Logging Levels
-
SEVERE: Critical problem detected which may possibly cause the termination of the application -
WARNING: Can continue, but with caution -
INFO: Information showing the noteworthy actions by the App -
FINE: Details that is not usually noteworthy but may be useful in debugging e.g. print the actual list instead of just its size
3.7. Configuration
Certain properties of the application can be controlled (e.g user prefs file location, logging level) through the configuration file (default: config.json).
4. Documentation
We use asciidoc for writing documentation.
| We chose asciidoc over Markdown because asciidoc, although a bit more complex than Markdown, provides more flexibility in formatting. |
4.1. Editing documentation
See UsingGradle.adoc to learn how to render .adoc files locally to preview the end result of your edits.
Alternatively, you can download the AsciiDoc plugin for IntelliJ, which allows you to preview the changes you have made to your .adoc files in real-time.
4.2. Publishing documentation
See UsingTravis.adoc to learn how to deploy GitHub Pages using Travis.
4.3. Converting documentation to PDF format
We use Google Chrome for converting documentation to PDF format, as Chrome’s PDF engine preserves hyperlinks used in webpages.
Here are the steps to convert the project documentation files to PDF format.
-
Follow the instructions in UsingGradle.adoc to convert the AsciiDoc files in the
docs/directory to HTML format. -
Go to your generated HTML files in the
build/docsfolder, right click on them and selectOpen with→Google Chrome. -
Within Chrome, click on the
Printoption in Chrome’s menu. -
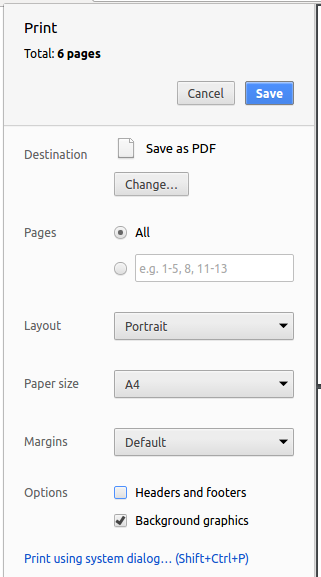
Set the destination to
Save as PDF, then clickSaveto save a copy of the file in PDF format. For best results, use the settings indicated in the screenshot below.
4.4. Site-wide documentation settings
The build.gradle file specifies some project-specific asciidoc attributes which affects how all documentation files within this project are rendered.
Attributes left unset in the build.gradle file will use their default value, if any.
|
| Attribute name | Description | Default value |
|---|---|---|
|
The name of the website. If set, the name will be displayed near the top of the page. |
not set |
|
URL to the site’s repository on GitHub. Setting this will add a "View on GitHub" link in the navigation bar. |
not set |
|
Define this attribute if the project is an official SE-EDU project. This will render the SE-EDU navigation bar at the top of the page, and add some SE-EDU-specific navigation items. |
not set |
4.5. Per-file documentation settings
Each .adoc file may also specify some file-specific asciidoc attributes which affects how the file is rendered.
Asciidoctor’s built-in attributes may be specified and used as well.
Attributes left unset in .adoc files will use their default value, if any.
|
| Attribute name | Description | Default value |
|---|---|---|
|
Site section that the document belongs to.
This will cause the associated item in the navigation bar to be highlighted.
One of: |
not set |
|
Set this attribute to remove the site navigation bar. |
not set |
4.6. Site template
The files in docs/stylesheets are the CSS stylesheets of the site.
You can modify them to change some properties of the site’s design.
The files in docs/templates controls the rendering of .adoc files into HTML5.
These template files are written in a mixture of Ruby and Slim.
|
Modifying the template files in |
5. Tests
5.1. Running tests
There are three ways to run tests.
| The most reliable way to run tests is the 3rd one. The first two methods might fail some GUI tests due to platform/resolution-specific idiosyncrasies. |
Method 1: Using IntelliJ JUnit test runner
-
To run all tests, right-click on the
src/test/javafolder and chooseRun 'All Tests' -
To run a subset of tests, you can right-click on a test package, test class, or a test and choose
Run 'ABC'
Method 2: Using Gradle
-
Open a console and run the command
gradlew clean allTests(Mac/Linux:./gradlew clean allTests)
| See UsingGradle.adoc for more info on how to run tests using Gradle. |
Method 3: Using Gradle (headless)
Thanks to the TestFX library we use, our GUI tests can be run in the headless mode. In the headless mode, GUI tests do not show up on the screen. That means the developer can do other things on the Computer while the tests are running.
To run tests in headless mode, open a console and run the command gradlew clean headless allTests (Mac/Linux: ./gradlew clean headless allTests)
5.2. Types of tests
We have two types of tests:
-
GUI Tests - These are tests involving the GUI. They include,
-
System Tests that test the entire App by simulating user actions on the GUI. These are in the
systemtestspackage. -
Unit tests that test the individual components. These are in
seedu.address.uipackage.
-
-
Non-GUI Tests - These are tests not involving the GUI. They include,
-
Unit tests targeting the lowest level methods/classes.
e.g.seedu.address.commons.StringUtilTest -
Integration tests that are checking the integration of multiple code units (those code units are assumed to be working).
e.g.seedu.address.storage.BattleManagerTest -
Hybrids of unit and integration tests. These test are checking multiple code units as well as how the are connected together.
e.g.seedu.address.logic.LogicManagerTest
-
5.3. Troubleshooting testing
Problem: HelpWindowTest fails with a NullPointerException.
-
Reason: One of its dependencies,
HelpWindow.htmlinsrc/main/resources/docsis missing. -
Solution: Execute Gradle task
processResources.
6. Dev Ops
6.1. Build automation
See UsingGradle.adoc to learn how to use Gradle for build automation.
6.2. Continuous integration
We use Travis CI and AppVeyor to perform Continuous Integration on our projects. See UsingTravis.adoc and UsingAppVeyor.adoc for more details.
6.3. Coverage reports
We use Coveralls to track the code coverage of our projects. See UsingCoveralls.adoc for more details.
6.4. Documentation previews
When a pull request has changes to asciidoc files, you can use Netlify to see a preview of how the HTML version of those asciidoc files will look like when the pull request is merged. See UsingNetlify.adoc for more details.
6.5. Release
Here are the steps to create a new release.
-
Update the version number in
MainApp.java. -
Generate a JAR file using Gradle.
-
Tag the repo with the version number. e.g.
v0.1 -
Create a new release using GitHub and upload the JAR file you created.
6.6. Dependency management
A project often depends on third-party libraries. For example, Address Book depends on the Jackson library for JSON parsing. Managing these dependencies can be automated using Gradle. For example, Gradle can download the dependencies automatically, which is better than these alternatives:
-
Include those libraries in the repo (this bloats the repo size)
-
Require developers to download those libraries manually (this creates extra work for developers)
Appendix A: Product Scope
Target user profile:
-
likes retro games
-
prefer desktop apps over other types
-
can type fast
-
prefers typing over mouse input
-
is reasonably comfortable using CLI apps
Value proposition: able to play Battleship using a computer
Appendix B: User Stories
Priorities: High (must have) - * * *, Medium (nice to have) - * *, Low (unlikely to have) - *
| Priority | As a … | I want to … | So that I can… |
|---|---|---|---|
|
new player |
see usage instructions |
know how to begin using the App |
|
existing player |
see usage instructions |
refer to instructions when I forget how to use the App |
|
player |
initialise a new game board / map |
start a new game |
|
player |
initialise a new game board / map |
play again after I finish |
|
player |
put a ships on the map |
play the game |
|
player |
see where my ships are on the map |
have a visual representation of the game |
|
player |
tag my ships |
manage my ships during the game |
|
player |
list my ships |
check the status of my ships during the game |
|
player |
list my ships by tag |
check the status of specific ships during the game |
|
player |
begin the battle |
fight the enemy |
|
player |
attack the enemy |
destroy the enemy’s ships and win |
|
player |
see how many enemy ships I have destroyed |
know how many more enemy ships to find |
|
player |
see game statistics |
know how I am performing in the game |
|
player |
compare scores with previous games |
know if I am getting better at winning the game |
Appendix C: Use Cases
(For all use cases below, the System is the Battleship application and the Actor is the user, unless specified otherwise)
C.1. Initialise Maps
MSS
-
User requests to initialise maps
-
Battleship creates and displays both player’s maps
Use case ends.
Extensions
-
2a. The map size is invalid.
-
2a1. Battleship shows an error message
Use case resumes at step 1.
-
C.2. Put ship
MSS
-
User requests to add ship to given coordinate specified.
-
Game adds a ship to the given coordinate specified, in the cell.
Use case ends.
Extensions
-
2a. If there is a ship present in the cell, show an error.
C.3. List ships
MSS
-
User requests to list ships deployed on map.
-
Game shows all of the user’s ships deployed on map.
Use case ends.
Extensions
-
2a. If there are no ships deployed, inform the user.
C.4. List all tags that ships have
MSS
-
User requests to list tags of ships that have already been deployed on map.
-
Game shows all of the tags of ships that have already been deployed on map.
Use case ends.
C.5. List ships by tag
MSS
-
User requests to list ships deployed on map that have certain tags.
-
Game shows all of the user’s ships deployed on map that have certain tags.
Use case ends.
Extensions
-
2a. If there are no ships deployed, inform the user.
C.6. Begin the battle
MSS
-
User requests to begin the battle.
-
Game instructs the enemy to place their ships.
-
Game displays that the battle has begun.
Use case ends.
Extensions
-
2a. The user has not placed any ships.
-
2a1. The game prevents the user from starting the battle, and informs them to place at least one ship.
-
C.7. Attack the enemy
MSS
-
User requests to attack a specific cell.
-
Game performs an attack on the specified cell on the enemy map.
-
Game displays the result of the user’s attacks, and the enemy’s attack(s) if any.
Use case ends.
Extensions
-
2a. The user has already attacked the cell before.
-
2a1. The game prevents the user from attacking the cell and prompts them for another.
-
-
2b. The user attacks a cell that is invalid, or a cell that is not on the map.
-
2b1. The game prevents the user from attacking the cell and prompts them for another.
-
C.8. See game statistics
MSS
-
User requests to display current gameplay statistics
-
User is presented with all of the user’s gameplay data in a pop-up window.
Use case ends.
Extensions
-
2a. There is no statistics data to display
-
2a1. A single statement indicating no statistical data yet is displayed in the command box.
-
C.9. Compare scores with previous games
MSS
-
User wins a game.
-
User is presented with a comparison between the current game and previous game score.
Use case ends.
Extensions
-
2a. There is no previous game data.
-
2a1. A single statement indicating no statistical data yet is displayed in the command box.
-
C.10. Play enemy turn
Actor: enemy player
MSS
-
Enemy turn starts.
-
Enemy performs Enemy Attack(See Enemy Attack Use Case).
-
Enemy turn ends.
-
Control is given back to Player
Appendix D: Non Functional Requirements
-
The app should work on any mainstream OS as long as it has Java
9or higher installed. -
A user with above average typing speed for regular English text (i.e. not code, not system admin commands) should be able to accomplish most of the tasks faster using commands than using the mouse.
-
The app should not use up too much memory for the application and application data for typical usage.
-
Versions should be backward compatible with each other.
-
The app should be usable by a novice who has never played Battleship before.
-
The map grid should be large enough for gameplay.
Appendix F: Instructions for Manual Testing
Given below are instructions to test the app manually.
| These instructions only provide a starting point for testers to work on; testers are expected to do more exploratory testing. |
F.1. Launch and Shutdown
-
Initial launch
-
Download the jar file and copy into an empty folder
-
Double-click the jar file
Expected: Shows the GUI with a set of sample contacts. The window size may not be optimum.
-
-
Saving window preferences
-
Resize the window to an optimum size. Move the window to a different location. Close the window.
-
Re-launch the app by double-clicking the jar file.
Expected: The most recent window size and location is retained.
-
F.2. Initialise the maps
-
Initialising the maps after launching the game
-
Test case:
init 7
Expected: Displays two empty map grids of size 7 in the GUI. Both maps will have the appropriate alphanumeric labels on the first row and column. -
Test case:
init 0
Expected: If this is the first command ran, no map will be displayed. Otherwise, no changes will be made to the displayed maps. Error message will be displayed in the result display box. -
Other incorrect initialise commands to try:
init,init x(where x is smaller or larger than the specified minimum or maximum map size respectively).
Expected: No map will be displayed if this is the first command ran. Otherwise, no changes will be made to the displayed map.
-
F.3. Putting a ship
-
Putting a ship on the map after initialising the map.
-
Prerequisites: There are ships in your fleet ready to be deployed. This means that the number of ship in the fleet is more than 0. The map is initialised to a size between 6 and 10.
-
Test case:
put n/destroyer r/horizontal c/b1
Expected: Destroyer ship of size 3 will be put horizontally on coordinatesb1,b2andb3. The map is updated with 3 black cells on each of these coordinates representing the Destroyer ship. -
Test case:
put n/aircraft carrier r/horizontal c/c1 t/bluefleet
Expected: Aircraft Carrier ship of size 5 will be put horizontally on coordinatesc1,c2,c3,c4andc5. The map is updated with 5 black cells on each of these coordinates representing the Aircraft Carrier ship. -
Test case:
put n/aircraft carrier r/horizontal c/e1 t/nomore
Expected: No ship is put down on the map. Error details shown in the status message. Map remains the same.
-
F.4. Starting the battle
-
To test
begin, we will test that it is only able to be executed at certain times. Please follow the following steps in order.-
Start the application, then execute
begin.
Expected result: The battle does not begin, and an error message is displayed in the result box. -
Execute
init 6, then executebegin.
Expected result: The battle does not begin, and an error message is displayed in the result box. -
Place one or more ships using
put, then executebegin.
Expected result: the battle successfully begins and a message stating as such is displayed. -
Execute
beginagain. Expected result: an error message is displayed in the result box.
-
F.5. Attacking
-
To test
attack, we will need to play through the game. Please follow the following steps in order.-
Start the application, then execute
attack.
Expected result: no attack is executed, and an error message is displayed. -
Execute
init 6, and place your ships on the board. -
Execute
begin. -
Make an attack on a square that is out of bounds, e.g.
attack a9.
Expected result: no attack is executed, and a prompt to select another cell is displayed. -
Make an attack on a valid square that misses.
Expected result: the attacked square on the enemy map turns dark blue, and a "miss" message is displayed. The enemy also makes one or more moves. -
Make an attack on a square you have already attacked. Expected result: no attack is executed, and a prompt to select another cell is displayed.
-
Make an attack on a valid square that hits.
Expected result: the attacked square on the enemy map turns orange, and a "hit" message is displayed. -
Make an attack that destroys a ship.
Expected result: the destroyed ship on the enemy map turns red, and a "destroy" message is displayed. -
Destroy all the enemy’s ships.
Expected result: a "win" message is displayed. -
Start another battle, then have all your ships be destroyed by the enemy.
Expected result: a "lose" message is displayed.
-
F.6. Viewing the statistics
To test the stats feature. We will perform a before and after check to see if the statistical data of a simple behaviour is captured. In this case, we will perform an attack with a miss result.
-
Initialize a 8x8 map using
init 8. -
Run the
statscommand and observe the results-
Test case :
stats(before)
Expected: All fields are 0.
-
-
Now input
attack c1to simulate an attack on the enemy map.-
Test case :
stats(after)
Expected: Number of attacks : 1, Number of Misses : 1
-
F.7. Saving statistics data
To test the statistics save and compare feature. We will use a debug command save.
-
Initialize a 8x8 map using
init 8. -
Input
saveinto the command box and press enter.-
Test case :
save(start of game)
Expected: Accuracy is same as before at 0%. This is because the application automatically compares to a default state of 0 if there is no previous game.
-
-
Now play the game until you win.
-
At the end of the game, the
savecommand will be automatically called.-
Test case : Win the game
Expected: A comparison is made between your current game accuracy and the previous game accuracy which is 0. Your accuracy has improved.
-