Project: Battleship CLI
Battleship CLI is an implementation of the classic game Battleship.
As part of a group project in the module CS2103 in NUS,
my group had to morph an existing product, addressbook-level4,
into a new product while keeping the original product’s distinctive feature of being operated through the command-line.
My group chose to morph it into a command-line based Battleships application.
My role in the team was to design and implement the Battle feature, which:
-
Ensures that the human and computer players each take their turns in order,
-
Ensures that the game progresses in a fixed sequence of stages (from setting up the map, to placing ships, to attacking)
The following sections illustrate the feature in more detail, as well as the relevant sections I have added to the user and developer guides in relation to this feature.
Summary of contributions
-
Major enhancement: implemented the logic for the battle stage of the game
The battle is one of the two important phases of Battleship, along with the placing of ships. Via the battle feature, the user will be able to launch attacks at the enemy, and the enemy launch attacks at the user. Crucially, it ensures that the user and enemy take their turns in the correct order. -
Minor enhancement: added the ability to prevent commands from being executed at inappropriate times
Preventing the user from executing certain commands at certain times (e.g. the user should not be placing ships when the battle is already in progress) will ensure the correct progression of the game, as well as prevent the game from entering an invalid state. -
Code contributed: Here are my [code commits].
-
Other contributions:
-
Project management:
-
Testing:
-
Documentation:
-
Wrote the sections of the User Guide and Developer guide for the Battle Component, as reproduced below
-
-
Community:
-
Contributions to the User Guide
Given below are sections I contributed to the User Guide. They showcase my ability to write documentation targeting end-users. |
Battle phase
Beginning the battle: begin
Begins the battle against the computer enemy.
Format: begin
Alternative command: start
Shooting at a coordinate: shoot
Launches an attack against given coordinate on the enemy’s map.
Format: shoot COORDINATES
Alternative commands: attack, fire, hit
Examples:
-
shoot a6 -
attack b5
Contributions to the Developer Guide
Given below is an excerpt of my contributions to the Developer Guide. They showcase my ability to write technical documentation and the technical depth of my contributions to the project. To see my full contribution, please refer to the full Developer Guide. |
2. Design
Battle component
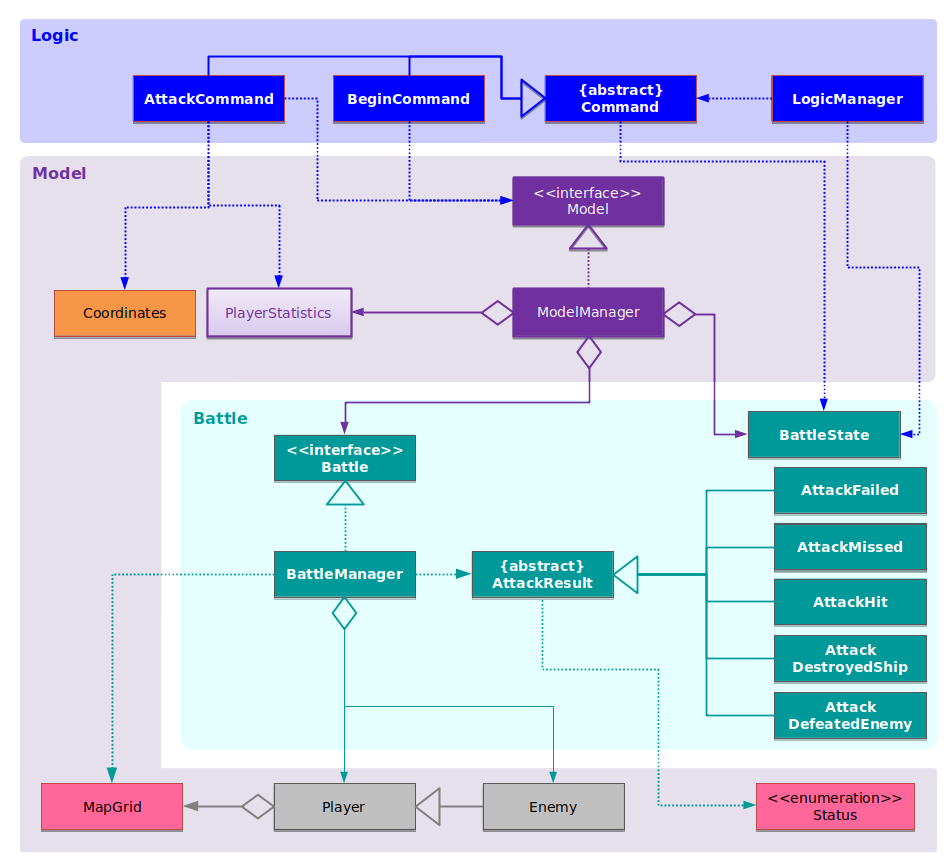
Battle Component and interactions with Model and LogicAPI : Battle.java
3. Implementation
Battle feature
The Battle feature handles the following:
-
keeping track of the stage of the battle, and ensuring that the player does not enter a command in the wrong stage of the game,
-
allowing the computer to place its ships at the correct time,
-
allowing the user and the computer enemy to attack each other and maintain proper turn-taking while doing so.
The Battle feature is split between several packages:
-
seedu.address.battle: the mainBattleclass is implemented here. -
seedu.address.battle.state: theBattleStateclass is implemented here, and can be stored and retrieved viaModel. -
seedu.address.battle.result: the attack result classes are implemented here. These classes are returned byBattle#humanPerformAttack(Coordinates)andBattle#takeComputerTurn(). -
BeginCommandandAttackCommandhandle the player’s interaction with this component.
In the following sections, we will explain the workings of each of these different packages.
Implementation of battle state
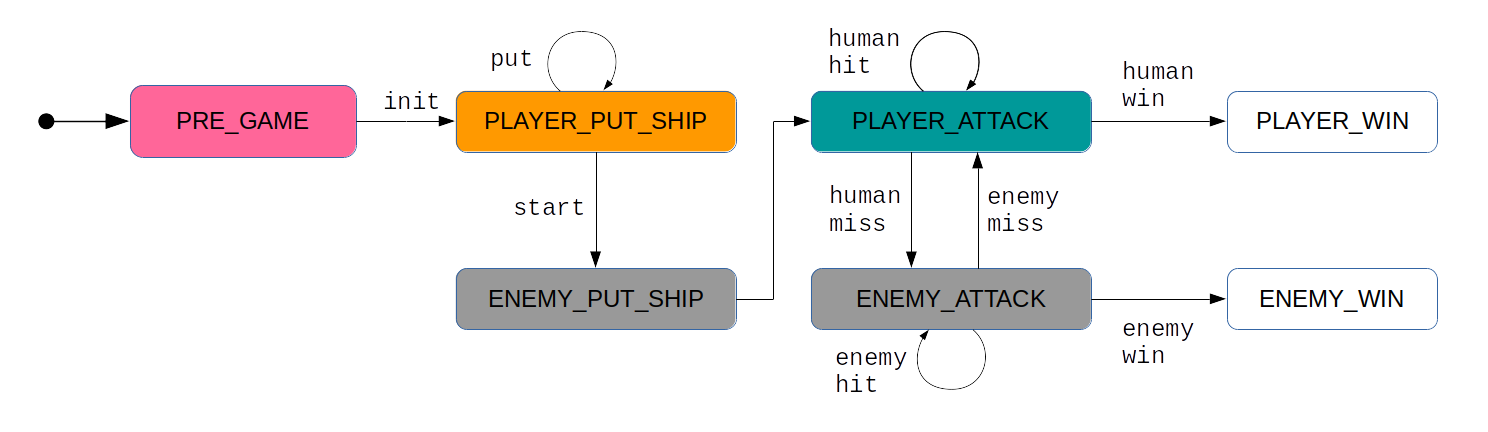
In this program, there are certain commands that may only be executed at
specific phases of the game (e.g. attack must only be used when battling,
not while placing ships). To implement this, the battle state must be tracked.
The battle state is implemented as a BattleState enumeration, and stored
within the Model. When LogicManager executes a Command object, it checks
whether that command is allowed to be executed in the current state using
Command#canExecuteIn(BattleState). Only if the command is allowed to execute
does LogicManager then call Command#execute - if it is not, then execution
is prevented and the user is notified.
In addition, certain commands may change the battle state - for example, start
changes the battle state from PLAYER_PUT_SHIP to ENEMY_PUT_SHIP then finally
to PLAYER_ATTACK.
Implementation of the BattleManager class
List<AttackResult> takeComputerTurn()
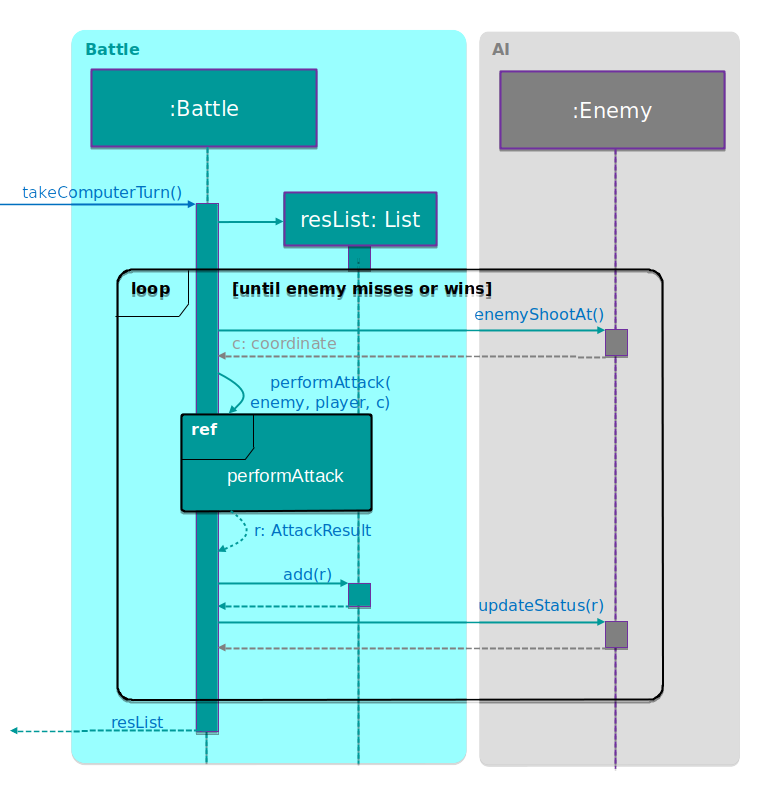
takeComputerTurn methodtakeComputerTurn is called after the player makes an attack but misses
(via AttackCommand, see below). As mentioned in the game rules, after
the player misses the computer may begin to attack until it misses, and
this method implements that functionality.
Implementation of attack result
The representation of the result of an attack is the class AttackResult and
its subclasses. To help the receiver in deciphering the attack result without
needing to resort to instanceof, methods are provided to test for attributes
such as whether the attack is a hit.
The methods are:
-
isSuccessful: tests whether the attack actually completed -
isHit: tests whether the attack damaged a ship -
isDestroy: tests whether the attack destroyed the ship -
isWin: tests whether the attack caused the attacker to win
A summary of each type of AttackResult can be seen from the following table:
| Result type | Scenario |
|---|---|
|
The |
|
The attack did not hit an enemy ship. |
|
The attack hit an enemy ship but did not sink it. |
|
The attack hit an enemy ship and sank it, but the enemy still has ships remaining. |
|
The attack hit the last of the enemy’s ships and sank it, resulting in a victory for the attacker. |
Implementation of player interaction via commands
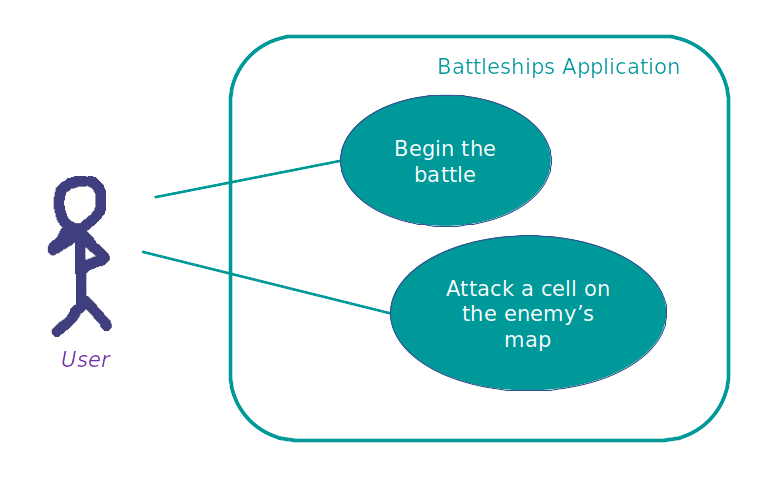
Battle Component.
The upper diagram is a use case diagram which shows briefly the possible
interactions between the user and the application during the battling phase.
Below is a more detailed activity diagram of what happens when the
user does battle against the computer enemy. As shown, the player
does battle by using the begin command to initiate the battle,
then the attack command to attack the enemy.
The following sequence diagrams show what happens when the user enters
the begin command, then the attack a1 command.
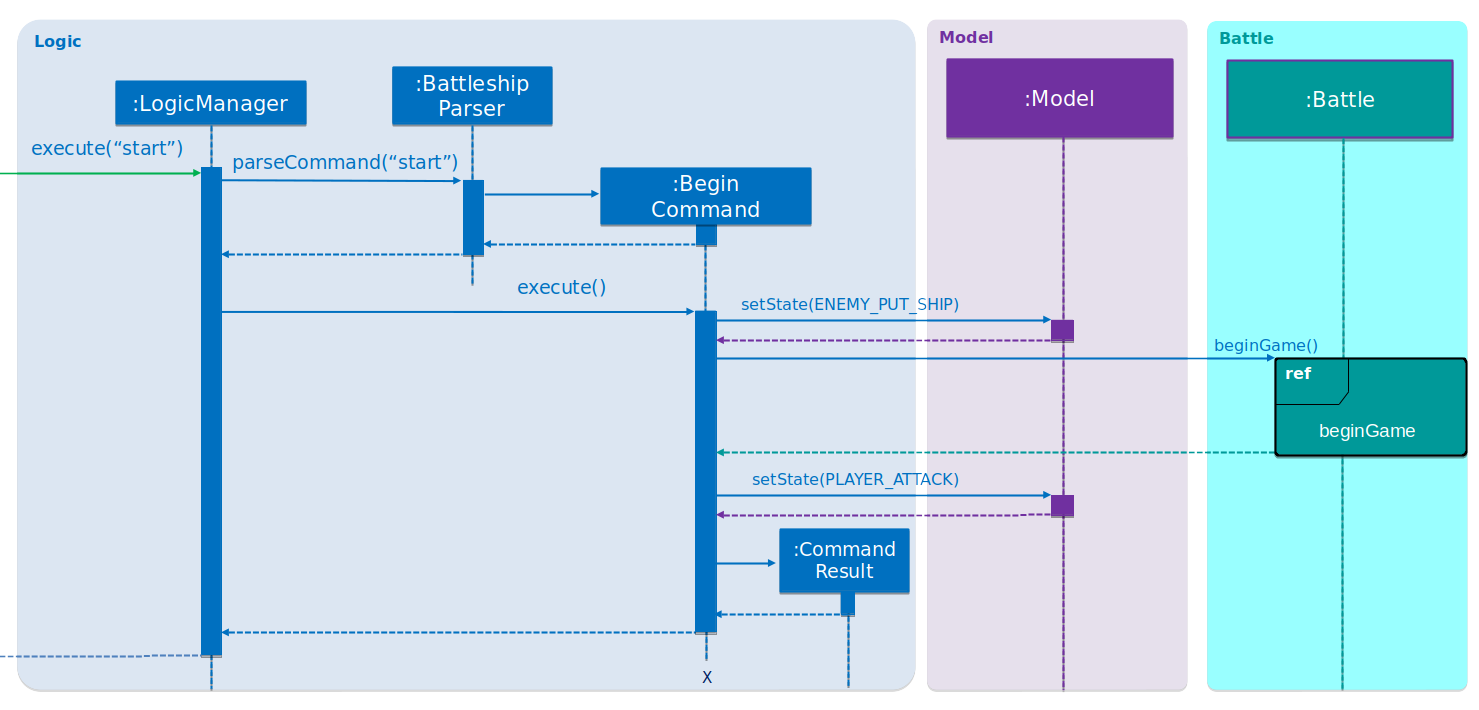
begin.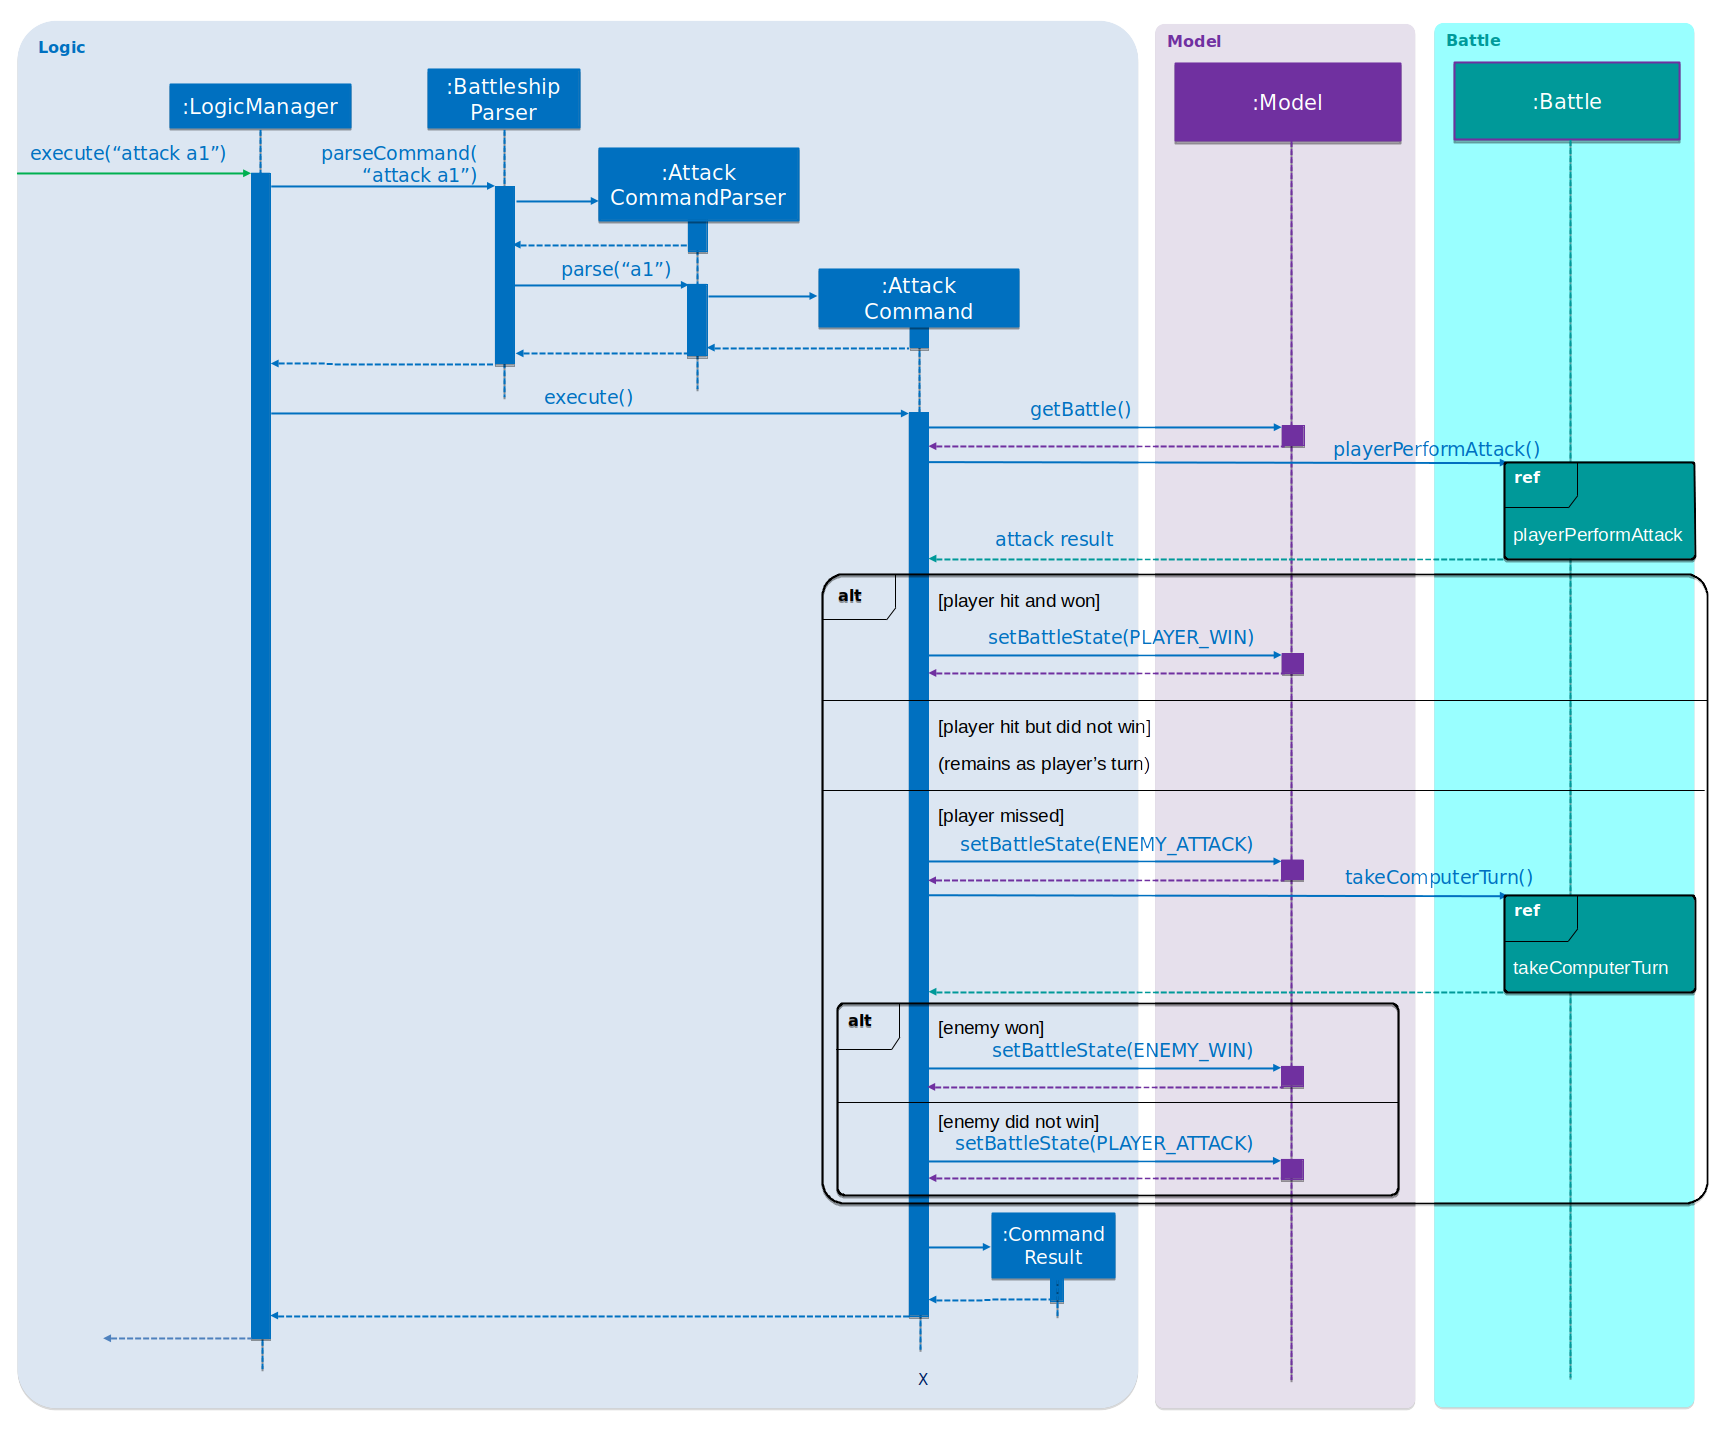
attack a1.Design considerations
-
Current choice:
BattleManageris stored underModel. Every timeAttackorBegincommands are executed, they will use thisBattleManagerto actually perform the actions, with the logic in theCommand-s mostly being error handling.
When AI performs attacks, theBattleManagerwill call the AI to compute its attack and return it, then call an internal method to actually perform the attack.-
Pros:
-
Command logic is abstracted into places where it can be reused by the AI.
-
Flow of program is clear - it always is a higher level component calling a lower-level component.
(e.g. when the player types in an Attack command, user interacts withUI, which callsLogic, which callsModelandBattleManager, which call the lowest level classesMapandPlayer)
-
-
Cons:
-
The
Modelcomponent now contains game logic (BattleManager) within it.
-
-
-
Alternative
BattleManageris stored underLogic. Every timeAttackorBegincommands are executed, they will perform the action using the logic coded within themselves, not interfacing withBattleManager.
When AI performs attacks, theBattleManagerwill create these commands and execute them. In theModel, the current attacking player is kept track of, allowing the commands to be used for both a human and AI player.-
Pros:
-
The game’s model and logic are kept separate from each other.
-
-
Cons:
-
AttackCommandis now state-dependent (the state being the current attacking player) which can more easily lead to bugs and race conditions.
-
In the end, we decided to implement Option 1. Even though some team members preferred either option, we decided that
LogicandModelnot being kept separate was a worthy tradeoff for the advantages of Option 1. -
Appendix C: Use Cases
Begin the battle
MSS
-
User requests to begin the battle.
-
Game instructs the enemy to place their ships.
-
Game displays that the battle has begun.
Use case ends.
Extensions
-
2a. The user has not placed any ships.
-
2a1. The game prevents the user from starting the battle, and informs them to place at least one ship.
-
Appendix F: Instructions for Manual Testing
Attacking
-
To test
attack, we will need to play through the game. Please follow the following steps in order.-
Start the application, then execute
attack.
Expected result: no attack is executed, and an error message is displayed. -
Execute
init 6, and place your ships on the board. -
Execute
begin. -
Make an attack on a square that is out of bounds, e.g.
attack a9.
Expected result: no attack is executed, and a prompt to select another cell is displayed. -
Make an attack on a valid square that misses.
Expected result: the attacked square on the enemy map turns dark blue, and a "miss" message is displayed. The enemy also makes one or more moves. -
Make an attack on a square you have already attacked. Expected result: no attack is executed, and a prompt to select another cell is displayed.
-
Make an attack on a valid square that hits.
Expected result: the attacked square on the enemy map turns orange, and a "hit" message is displayed. -
Make an attack that destroys a ship.
Expected result: the destroyed ship on the enemy map turns red, and a "destroy" message is displayed. -
Destroy all the enemy’s ships.
Expected result: a "win" message is displayed. -
Start another battle, then have all your ships be destroyed by the enemy.
Expected result: a "lose" message is displayed.
-