Project Overview
Greetings! My name is Lucy and I am part of a 5-person team developing a classic game of Battleship.
For the module CS2103t, we were presented with an existing code base for a command line interface(CLI) address book application. It was that which we morphed into a game of Battleship.
Battleship is a desktop game application based on the classic Battleship game. The user interacts with it using a CLI and it has a graphical user interface(GUI) created using JavaFX. It is written in Java, and has about 10 kLoC.
My role was to design and write the code for the Enemy AI feature of the game.
The feature provides the game with an automated and intelligent computerised enemy player for the user to play against
in our single-player game.
The following sections illustrate the feature in more detail, as well as the relevant sections I have added to the user and developer guides in relation to this feature.
Summary of contributions
-
Major enhancement: added the Enemy AI feature of the game
-
What it does: It is a fully automated computerised enemy player that can randomly fill its own map and attack the player’s ship with some level of intelligence.
-
Justification: We wanted to make this single-player game as realistic as possible, and so the need for a smarter computerised player that could substitute a human player arose.
-
Highlights: The behaviour of the computerised enemy AI is randomised with eah game session, to provide the player with a unique experience in each game session. Furthermore, the enemy’s shooting algorithm is also informed by past shot successes and misses, and follows an algorithm customised to the strategy of the Battleship game.
-
Credits: The algorithm for the enemy shooting references this article heavily: [DataGeneticsBattleshipAglo].
-
-
Other contributions:
-
Project management:
-
Actively hit all milestones in time, and used git issue tracker to track tasks.
-
Actively create and manage issues for myself and my team. [Issues made]
-
-
Enhancements to existing features:
-
N/A - I created a new feature essential to the Battleship game that was not present in the given Address Book codebase.
-
-
Documentation:
-
Wrote the Game Rules section in the User Guide.
-
Wrote the Enemy AI section in the Developer Guide.
-
-
Contributions to the User Guide
Given below are sections I contributed to the User Guide. They showcase my ability to write documentation targeting end-users. |
Ships ahoy! Battleship is a simple computer-based remake of the classic Battleship game.
It is for people who want to experience the joy of playing Battleships without the hassle and fuss of dealing with physical game pieces.
Battleship is optimised for people who want to use a Command Line Interface (CLI), while still retaining the benefits of a Graphical User Interface (GUI).
It’s a single-player game, and provides a fully functional computerised enemy player for the player to play against, guaranteeing many hours of fun! Can’t wait to get started? Head over to [Quick Start] to fire away!
|
What is a Command Line Interface (CLI) and a Graphical User Interface (GUI)? A Command Line Interface (CLI) interacts with the user by accepting words that are typed in by the user. Conversely, a Graphical User Interface (GUI) interacts with the user visually. It uses icons and graphics to show the user what the program is doing. |
As you will see, Battleship is a hybrid application. It combines both a CLI and GUI, meaning that the user must type in commands but will see the changes caused by those commands graphically.
This section will describe the game rules and how to play the classic Battleship game.
Goal
Sink all your opponent’s ships before they sink yours.
Captain, deploy ships!
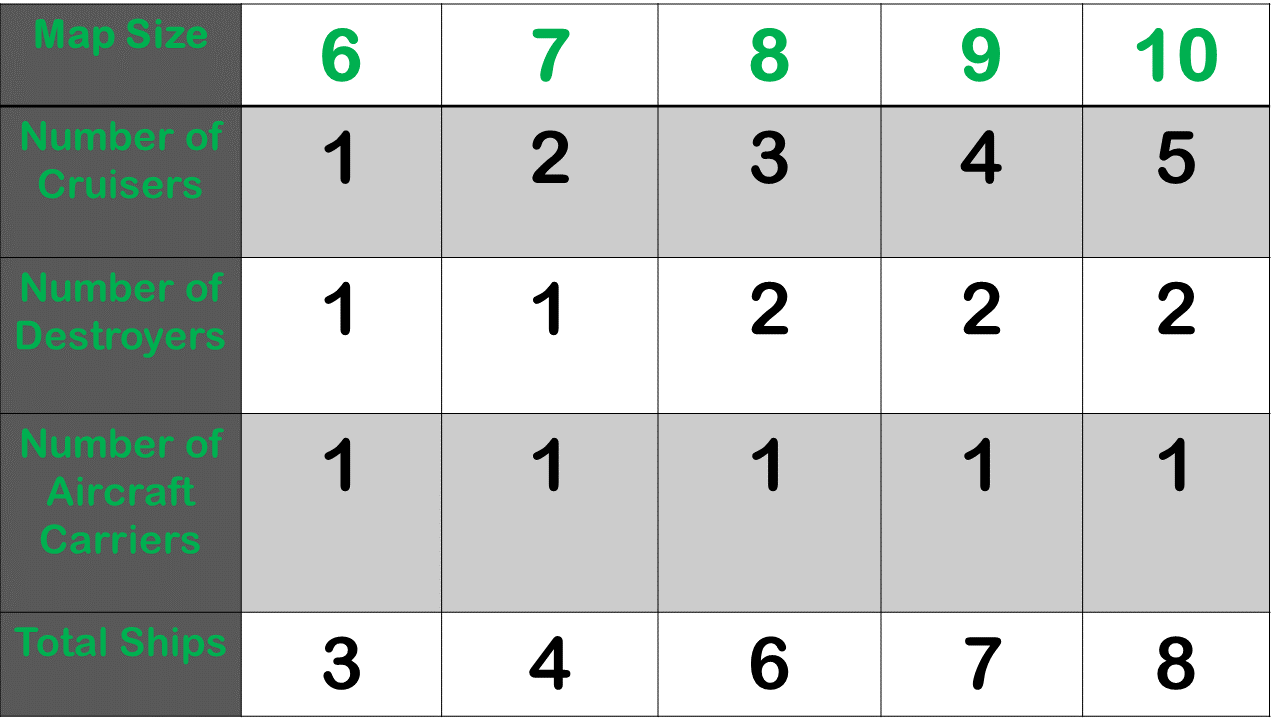
Depending on the chosen size of the map, as specified through the init <map_size> command,
you will be given different numbers of each ship.
The ships available are:
-
Cruiser: size 2
-
Destroyer: size 3
-
Aircraft Carrier: size 5
Depending on your map size, your fleet will have different numbers of each ship.
Ready, aim, fire!
After you have placed all your ships, enter begin to start the battle.
You will always be given the first turn.
You may fire shots at the enemy map through the command shoot, for example shoot a1.
If the shot hits a ship, you may continue taking shots until they miss. Upon a miss, the turn will be handed over to the enemy. The same goes for the enemy - the enemy will take its shot automatically, firing until it misses, before passing the turn back to you.
Good Game!
Whoever is first to destroy all their opponent’s ships will be declared the winner.
Had fun? You can view the game statistics with the command stats.
Contributions to the Developer Guide
Given below are sections I contributed to the Developer Guide. They showcase my ability to write technical documentation and the technical depth of my contributions to the project. |
Current implementation
The Enemy AI feature is currently implemented as an extension of the Player class,
and serves as the opponent player since Battleship is a single-player game.
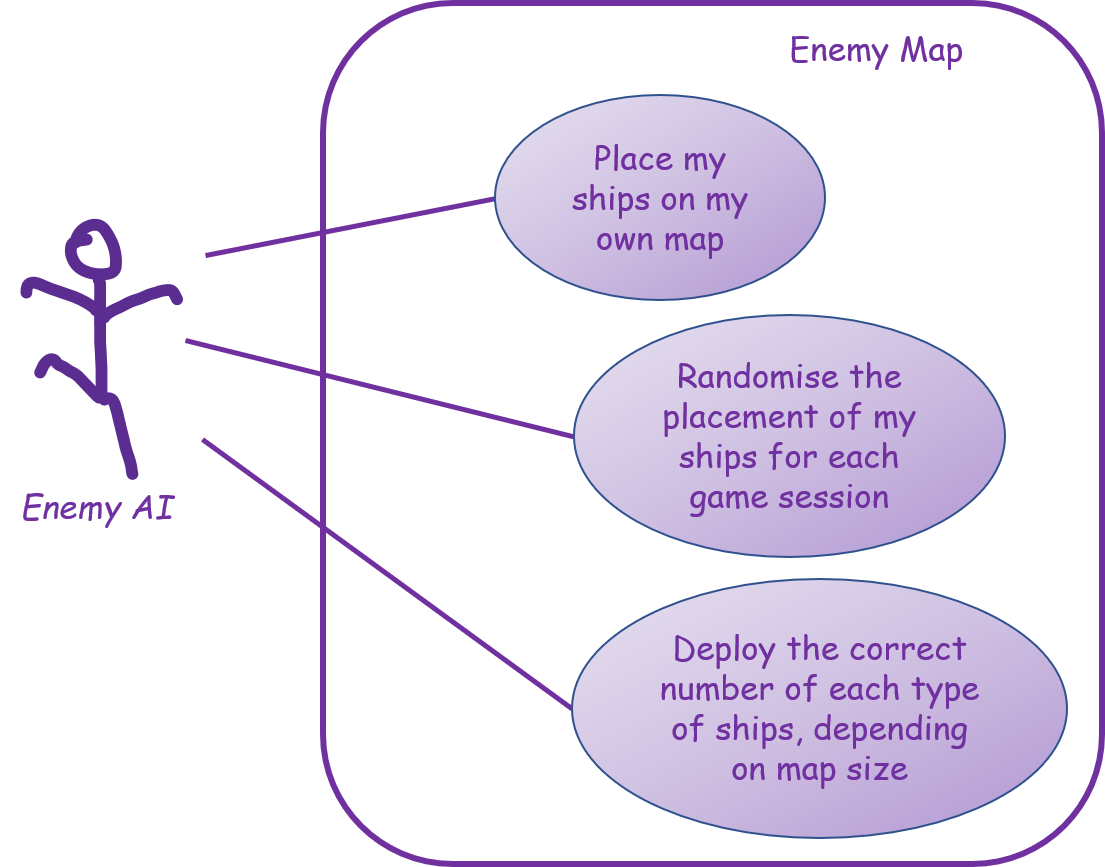
The Enemy AI can automatically perform initialising actions similar to the human player.
Mainly, the Enemy AI can randomly initialise its own mapGrid with randomly generated ships,
which is invoked by the command start game.
We can see these scenarios here:
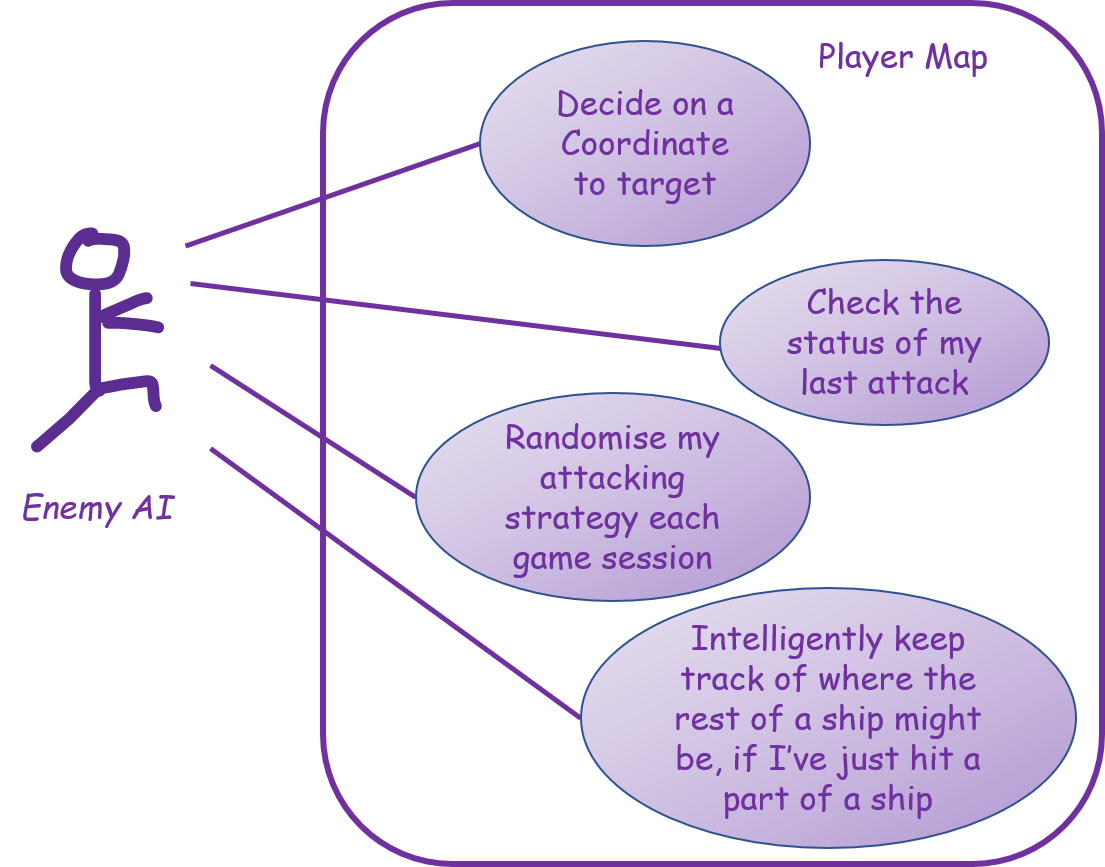
The Enemy AI also supports the ability for the enemy to automatically and intelligently shoot the player’s map when the player ends their turn, encapsulated by these scenarios:
Note that the Enemy AI feature does not contain any explicit commands to be entered by the Player. Its methods are called by other features instead, and does its magic in the background.
Initialisation of Enemy MapGrid
The Enemy AI has the method populateMapGrid() which is called by the method prepEnemy(),
which is in turn called by the Battle Manager when the Player enters the command start game.
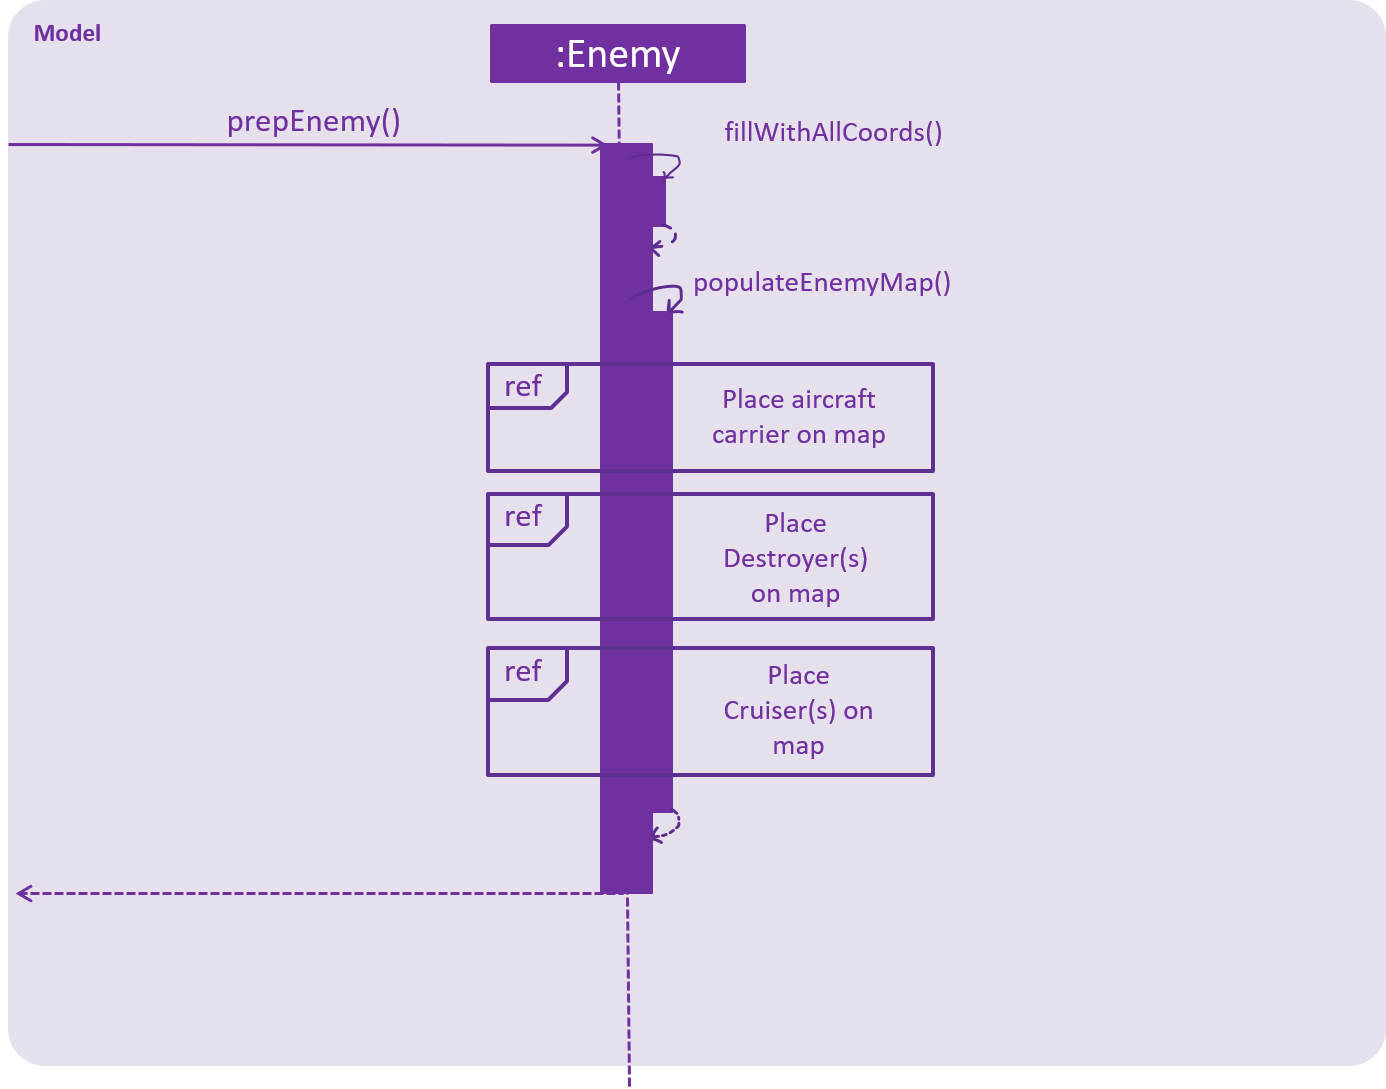
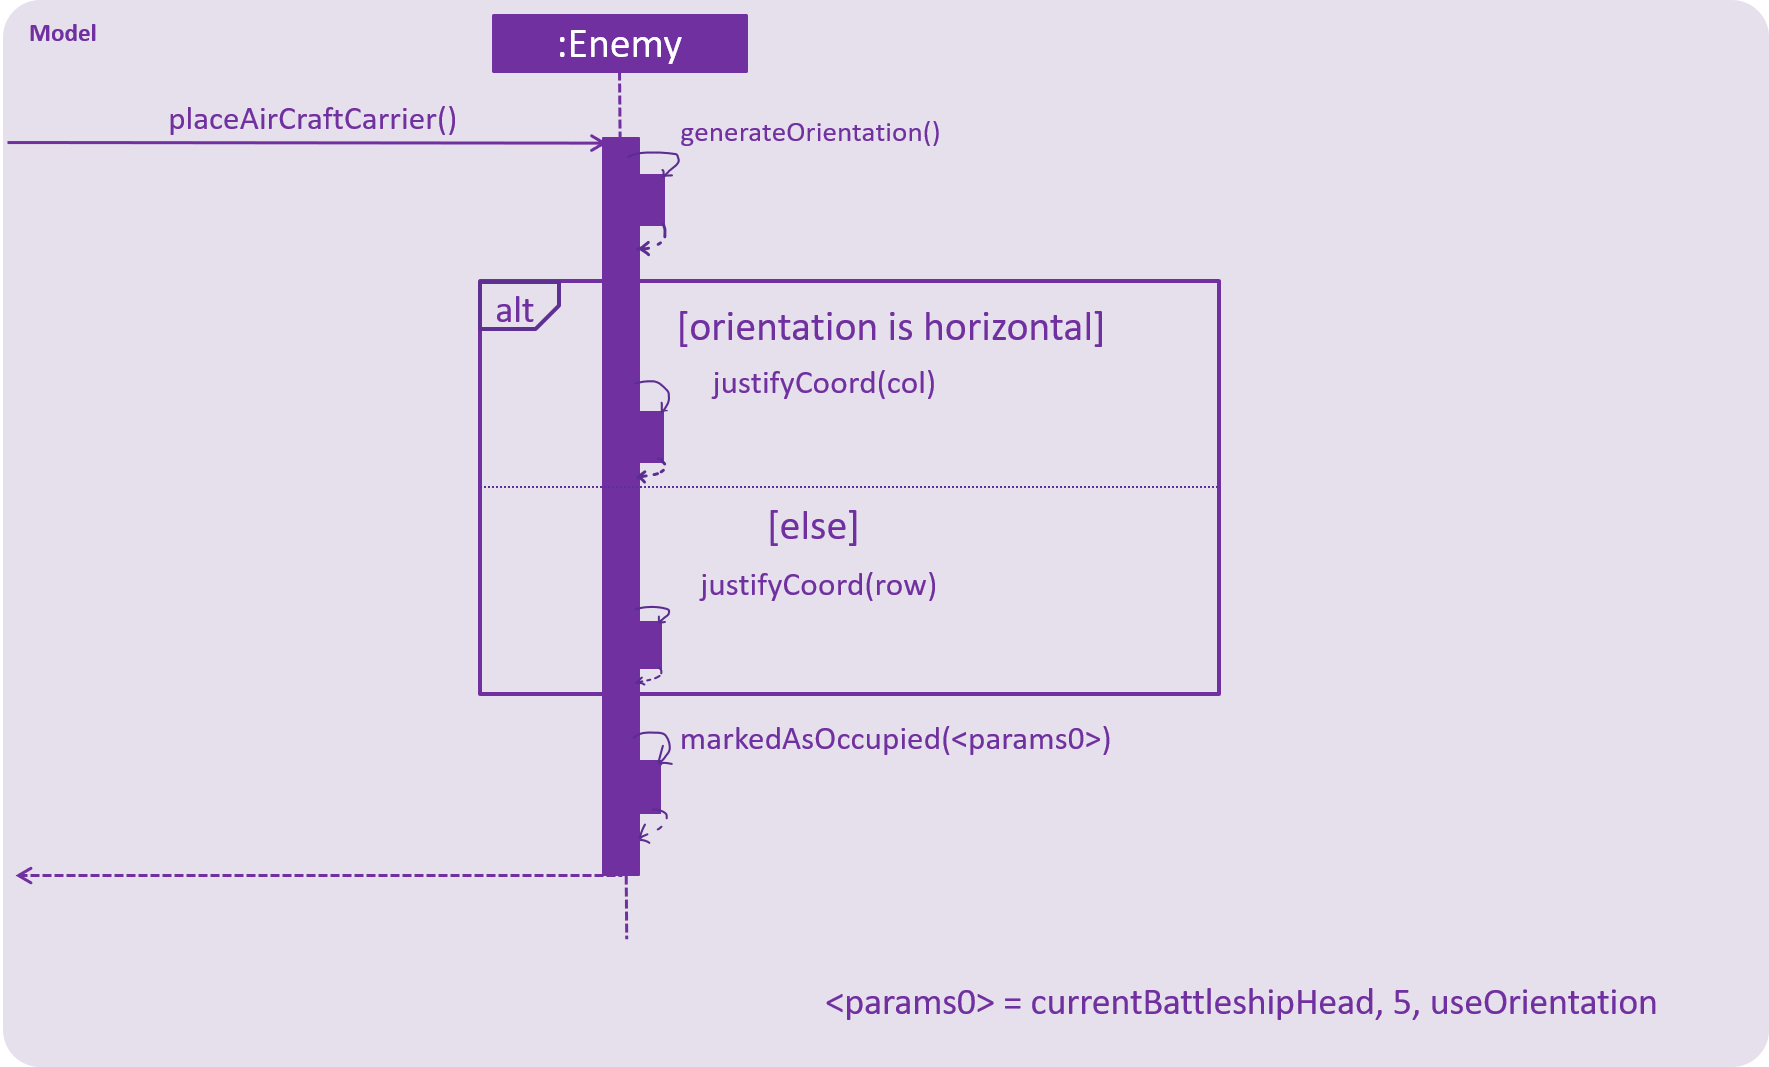
It can be seen from the above sequence diagram that populateMapGrid() goes on to call the methods
placeAirCraftCarrier() and placeMultipleDestroyerAndCruiser().
placeAirCraftCarrier() is called once, and places only one Aircraft Carrier onto the map, since the game rules state that
no matter the map size, every game will only feature a single Aircraft Carrier.
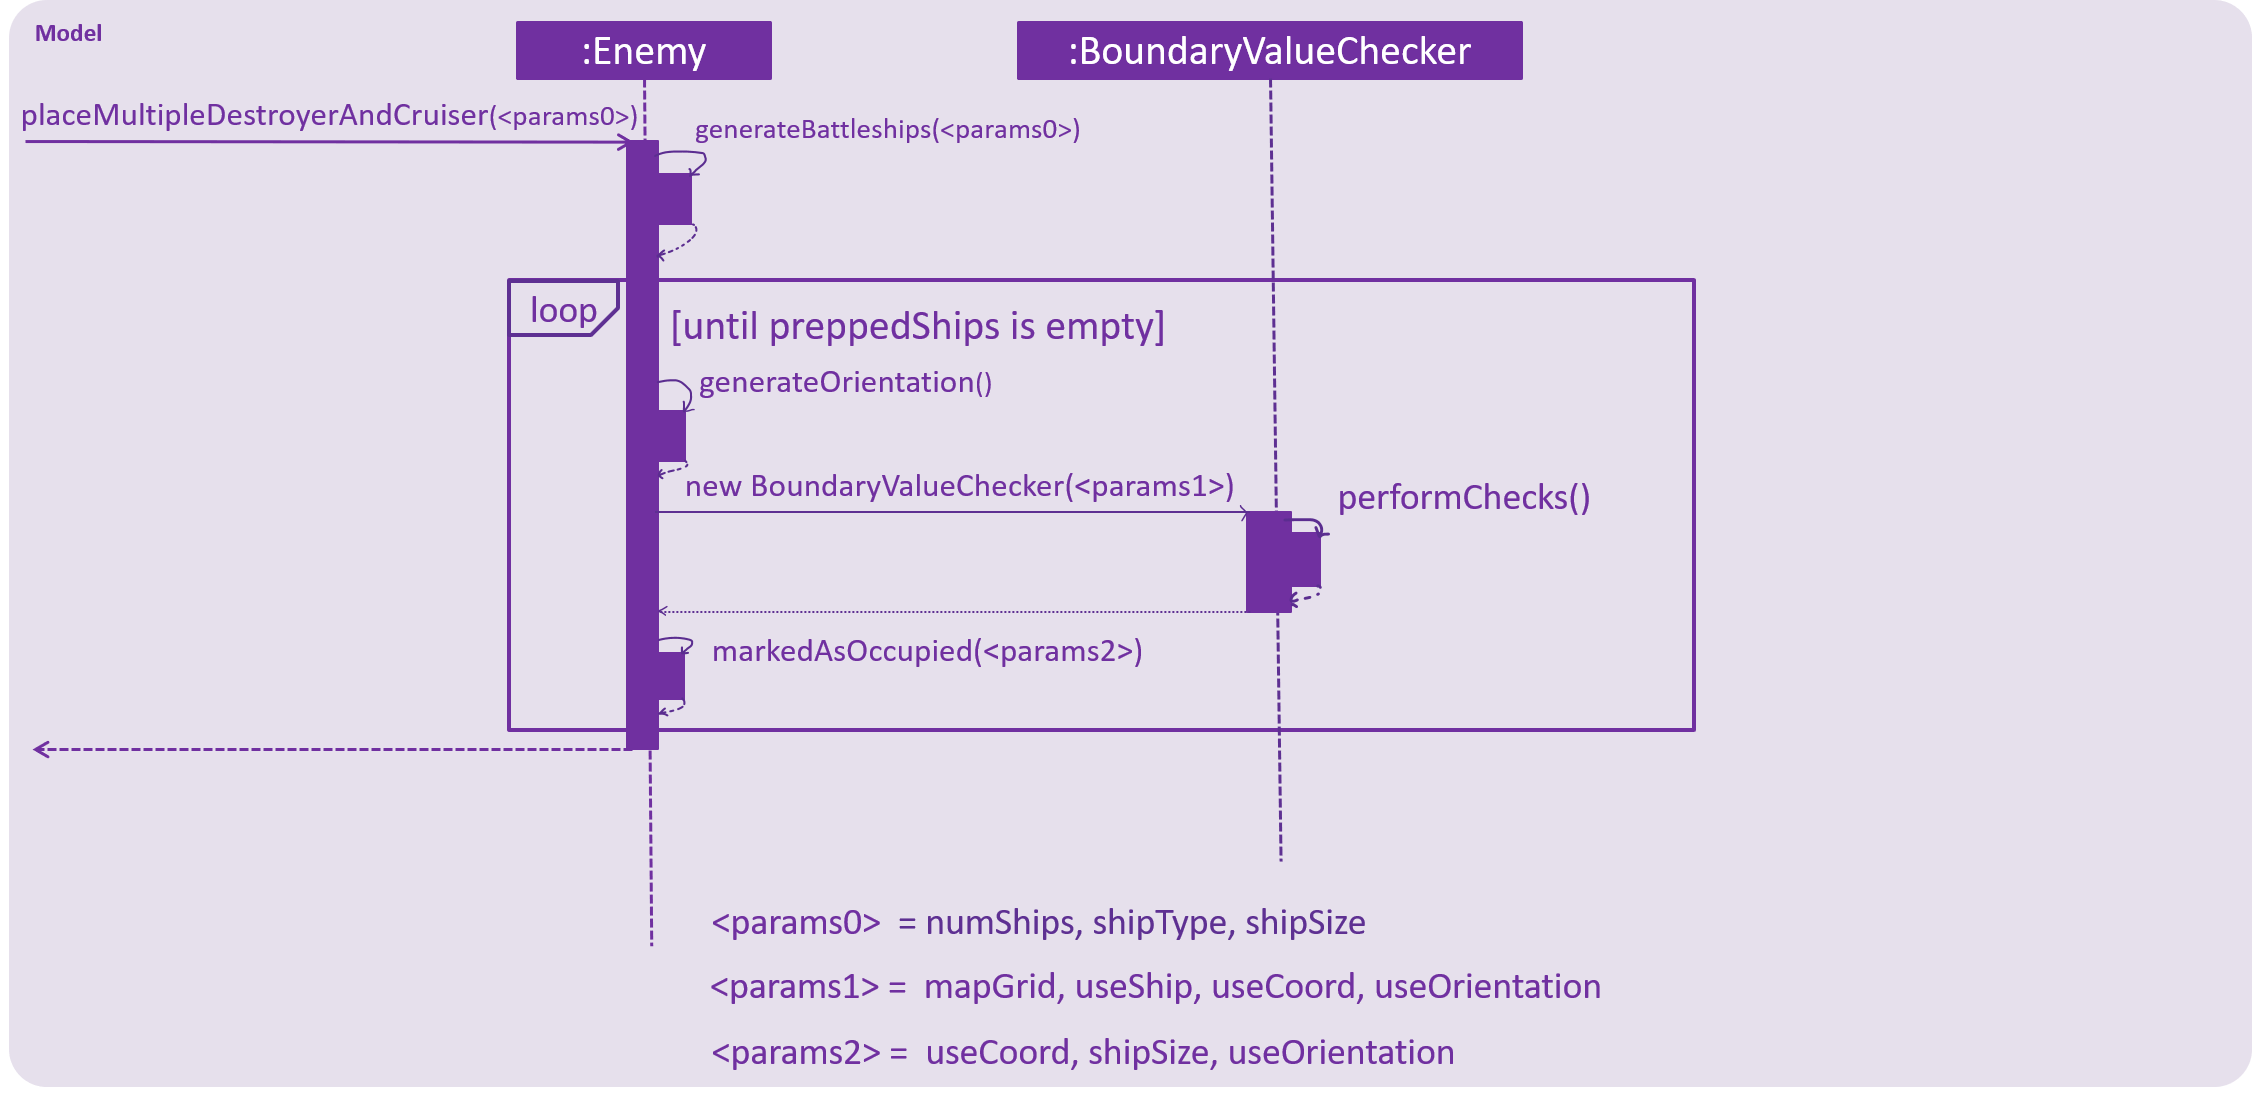
On the other hand, placeMultipleDestroyerAndCruiser() is called twice consecutively. The first call takes in the parameters required
to put as many Destroyers as available onto the enemy map, while the second call will do so for Cruisers.
The reason why placeMultipleDestroyerAndCruiser() is called twice is because the implementation to place Destroyers and Cruisers
are identical, but we still want to keep their placement separate for better abstraction and easier testing.
The following two sequence diagrams illustrate how placeAirCraftCarrier() and placeMultipleDestroyerAndCruiser() prepare the
enemy ships and put them on the enemy map grid.
Sequence Diagram for placeAirCraftCarrier()
Sequence Diagram for placeMultipleDestroyerAndCruiser()
populateMapGrid() will generate randomised ships based on the number of ships
available to it for the current game, as specified in its Parent class - Player.
The number of ships available to the Enemy AI is congruent to the number of ships
available to the Player. The exact number of the different types of ships is decided from on
a formula that is based on the map size specified by the player in the init command.
==== Calculation of Coordinate to Attack
The Enemy AI has the method enemyShootAt() that is invoked when the player ends their turn upon a miss.
The Enemy AI will attempt to generate a random Coordinate to attack,
and pass this Coordinate to the BattleManager. The Enemy AI supports the ability to
check that its generated coordinates are all valid, and will perform certain calculations that will
increase its accuracy upon detecting a successful hit on any part of a ship.
The following activity diagram illustrates the conditions taken into account by the Enemy AI as part of its shooting algorithm, and shows how it decides on which Coordinate to target, depending on the success of previous hits.
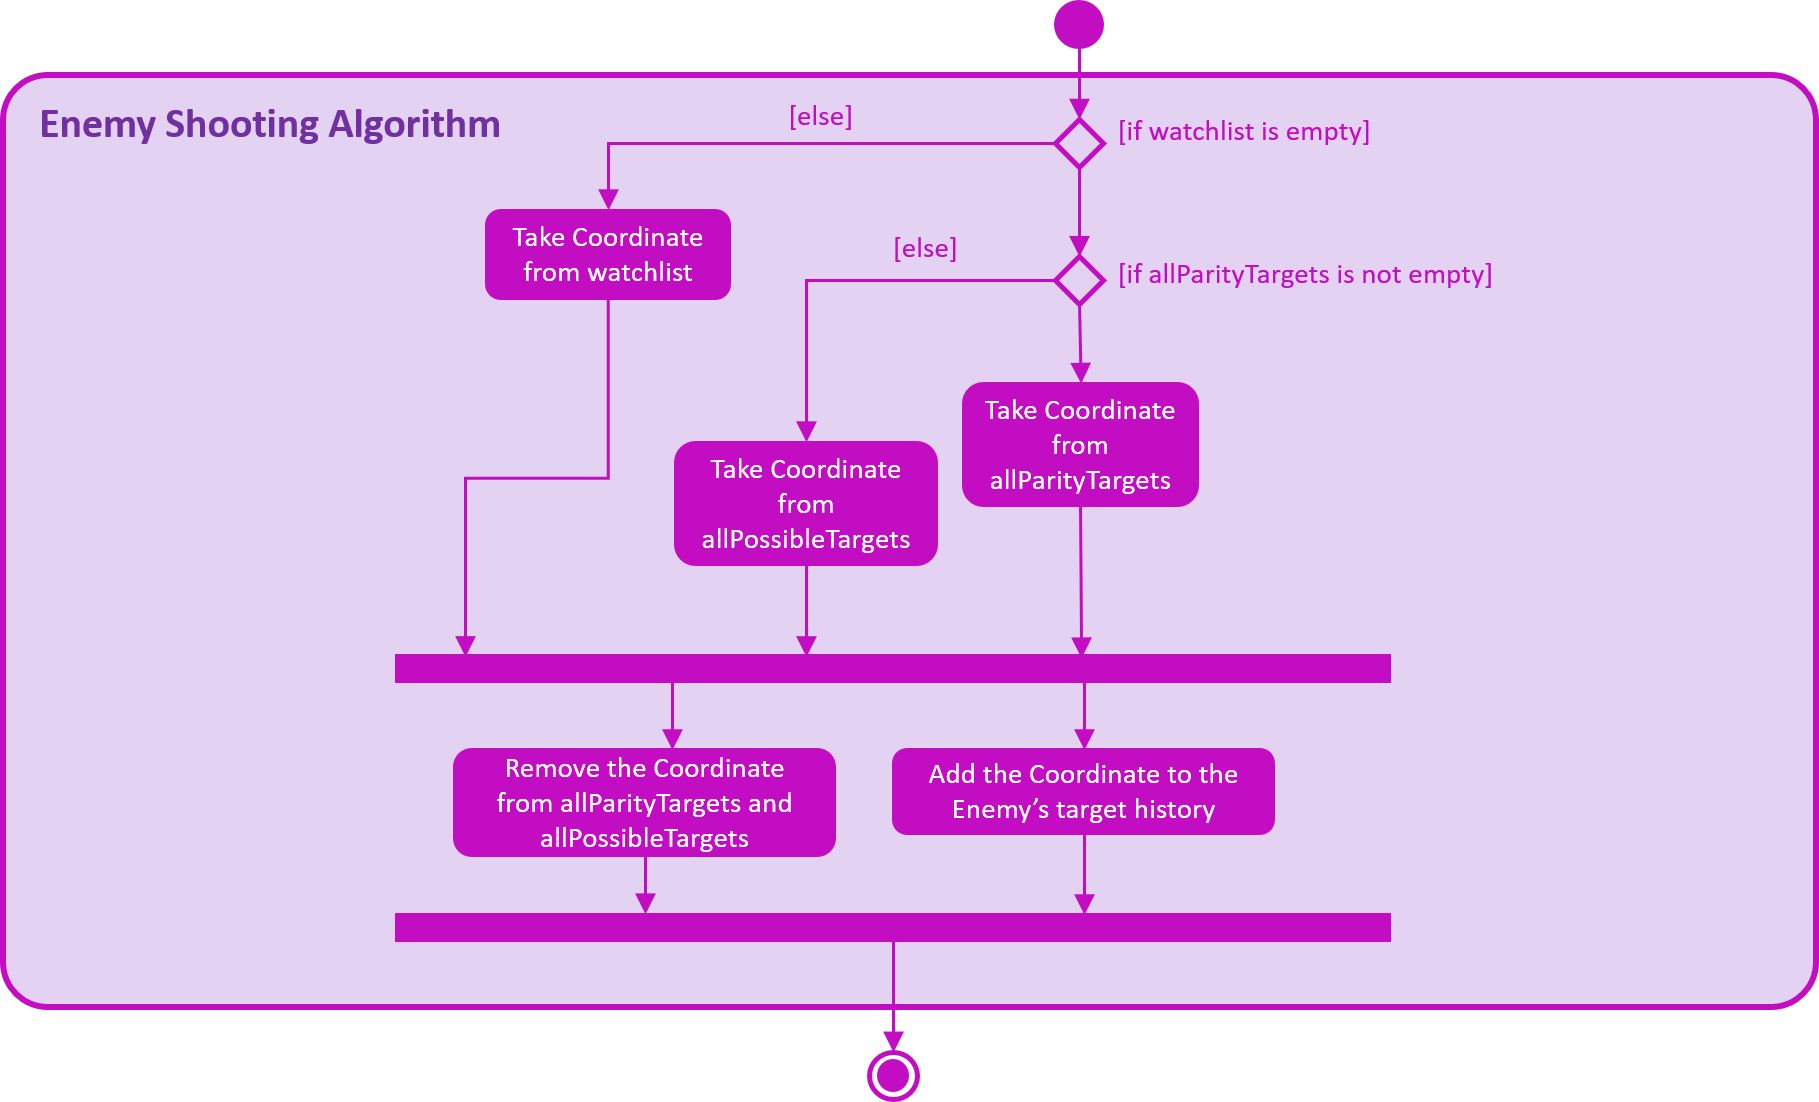
We can see from the diagram that the start of the game, when scouting for the Player’s ships, the Enemy first divides the cells with a parity of 1 on the map into two groups - we will name these groups White and Black for ease of explanation. The enemy will then randomly pick a Coordinate from the White group whenever it is guessing where the next Player ship might be. The reason for this is that since every ship must be at least of length 2, all ships will consist of at least one of each White or Black coordinates.
The Black-White groupings of Coordinates through the concept of parity is illustrated here in the following diagram:

Once the Enemy hits a Coordinate that has a ship on it, it will note down every valid Coordinate that is cardinal (to the North, South, East and West) to the cell that was discovered to hold a ship.
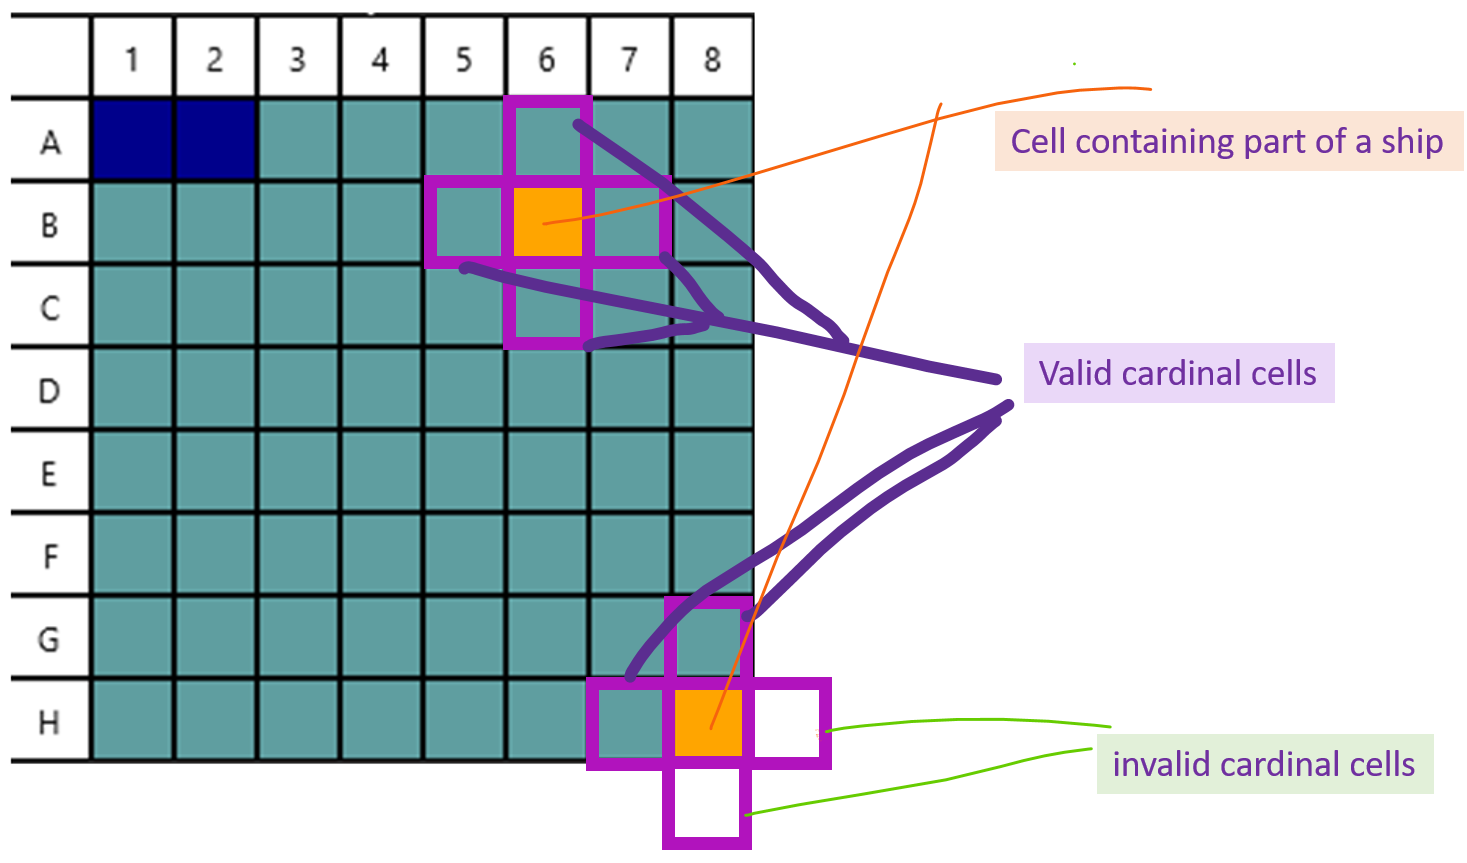
The validity of these cardinal Coordinates are evaluated by checking if they are within the bounds of the map grid, and
whether they have not been hit before. If these two conditions are satisfied, then the Enemy will note down the cardinal Coordinate into a watchlist, and
will from that point shoot everything in the watchlist, until the ship that it is targeting is destroyed.
When the Enemy AI detects that it has successfully destroyed the Player ship, it will empty out the watchlist, and go back to scouting the
map for another part of the Player ship, by randomly targeting coordinates in the Black cells, as illustrated in the previous image.
The following code snippet gives a clearer view of how the algorithm flows for the enemy shooting strategy:
    public Coordinates enemyShootAt() {
        Coordinates newTarget;

        if (watchlist.isEmpty()) {
            if (!allParityTargets.isEmpty()) {
                newTarget = drawParityTarget();
                logger.info(String.format("++++++++WATCHLIST EMPTY " + "enemy shoot parity: " + newTarget.toString()));
            } else {
                newTarget = drawFromAllTargets();
                logger.info(String.format("++++++++Parity EMPTY "));
            }
        } else {
            newTarget = drawFromWatchList();
            logger.info(String.format("++++++++WATCHLIST STUFFED " + "enemy shoot watched: " + newTarget.toString()));
        }
        modeCleanup(newTarget);

        this.addToTargetHistory(newTarget);
        return newTarget;

    }
Note: All actions taken by the Enemy AI are seeded by a pseudo-random generator. Thus, its behaviour will be different for every game session.
Design considerations
-
Current choice: seed all methods with pseudo-random seed
-
Pros: each game will be a different experience
-
Cons: testing will be more difficult
-
-
Alternative: pre-calculate and hardcode the actions the Enemy AI performs
-
Pros: testing is made very much easier
-
Cons: games would be less dynamic since the enemy’s behaviour is non-organic
-